Friday, May 22, 2020

Make It A Fun Family-Friendly Charcuterie Board...


Happy FriYay! Changing things up with a family-friendly charcuterie board...

Keeping this post simple and savoury with the photos to speak for itself. Jambon, sausages, pate, olives, pickles, bread, crackers, cheese, veggies and grapes ๐Ÿง€๐Ÿž๐Ÿ‡ Oh My... it's so much fun building with the kids and watching our masterpiece come to fruition with all the colours, shapes and textures! What an entertaining, different fun way to eat with the family. A little bit of this. A little bit of that. Like our own little party and with sparkling grape juice ๐Ÿฅ‚. And just in case we were still hungry ๐Ÿฅด, I made some homestyle Polish cabbage rolls too... laaaa ๐ŸŽถ. Have a great weekend my friends!


Homestyle Polish Cabbage Rolls


Saturday, May 16, 2020

Homestyle Take-Out Chinese Cashew Chicken...


Reminiscing ๐Ÿ’ญ a Canadian Chinese Take-Out favourite Cashew Chicken my dad and his brother used to wok cook at their restaurant eons ago ๐Ÿฅก. I miss those youthful days!

Such a great casual quick meal to dish up with leftover ingredients and odds & end bits in the fridge #nowaste. The charm here aside from the crunchy golden brown roasted cashews is chopping the chicken and vegetables into small bite size pieces to make scooping and eating a breeze with steamed rice. A touch of rice vinegar lifts the savoury soy-hoisin sauce sweetened with honey and thickened with cornstarch to make it over-the-top delish ๐Ÿ˜‹๐Ÿš๐Ÿฅข๐Ÿฅ„!


Homestyle Take-Out Chinese Cashew Chicken
Serves 4 to 6

Sauce:
4 Tbsp. soy sauce
1 Tbsp. hoisin sauce
1 Tbsp. rice vinegar
2 Tbsp. honey
1 tsp. sesame oil
½ Tbsp. ginger, minced
2 cloves garlic, minced


1 lb. boneless chicken thighs, cut into 1-inch pieces
salt, to taste
ground white pepper, to taste
1 Tbsp. cornstarch
1 Tbsp. sesame oil
1 onion, chopped into 1-inch pieces
2 medium carrots, peeled and chopped into 1-inch pieces
4 cups broccoli florets
2 celery stalks, chopped into 1-inch pieces
1 red bell pepper, cut into 1-inch pieces
¾ cup raw cashews, roasted
½ cup water

In a medium bowl, combine the soy sauce, hoisin sauce, rice vinegar, honey, sesame oil, ginger, and garlic. Set aside. (Adjust seasonings to your taste preference).

In another bowl, season the chicken with salt, pepper, and cornstarch.


To roast cashews, place the nuts on a single layer in a baking tray and roast in 350F oven for 10 minutes, tossing halfway for even roasting and colour. Let cool to develop crunch.


Heat a skillet/wok over medium-high heat and add sesame oil.

Add the chicken and cook for 5-6 minutes, or until the chicken begins to brown. Remove chicken and set aside in a separate bowl.

Add the onions, carrots and broccoli, and cook for 2-3 minutes. Then, toss in celery and peppers and stir fry for one more minute.

Add the chicken, cashews and sauce. Stir together and allow sauce to thicken about one minute. Serve hot with rice.


A great healthy and colourful stir-fry anytime!
Why get take-out when you can easily make this your own...


Served with stir fry bak choy and garlic, steamed pork and seafood omelet and steamed tofu with bonito flakes and soy sauce!


Homestyle Take-Out Chinese Cashew Chicken
Serves 4 to 6

Sauce:
4 Tbsp. soy sauce
1 Tbsp. hoisin sauce
1 Tbsp. rice vinegar
2 Tbsp. honey
1 tsp. sesame oil
½ Tbsp. ginger, minced
2 cloves garlic, minced


1 lb. boneless chicken thighs, cut into 1-inch pieces
salt, to taste
ground white pepper, to taste
1 Tbsp. cornstarch
1 Tbsp. sesame oil
1 onion, chopped into 1-inch pieces
2 medium carrots, peeled and chopped into 1-inch pieces
4 cups broccoli florets
2 celery stalks, chopped into 1-inch pieces
1 red bell pepper, cut into 1-inch pieces
¾ cup raw cashews, roasted
½ cup water

In a medium bowl, combine the soy sauce, hoisin sauce, rice vinegar, honey, sesame oil, ginger, and garlic. Set aside.

In another bowl, season the chicken with salt, pepper, and cornstarch.

Heat a skillet/wok over medium-high heat and add sesame oil.

Add the chicken and cook for 5-6 minutes, or until the chicken begins to brown. Remove chicken and set aside in a separate bowl.

Add the onions, carrots and broccoli, and cook for 2-3 minutes. Then, toss in celery and peppers and stir fry for one more minute.

Add the chicken, cashews and sauce. Stir together and allow sauce to thicken about one minute. Serve hot with rice.


Sunday, May 10, 2020

Flaky Homestyle Strawberry Rhubarb Pie...


Homemade Strawberry Rhubarb Pie to celebrate Mother's Day ๐Ÿ’–๐Ÿ’!! 

Happily astonished to find beautiful rhubarb in the garden at our temporary home, I knew pie was in the horizon paired with its perfect partner strawberry ๐Ÿ“๐Ÿฅง! Extra flaky golden crust can be had with just five ingredients- flour, sugar, a pinch of salt, cold butter and iced water! No lard, shortening or sour cream.

Bursting at the seams, this juicy red delicious sweet strawberry and tart rhubarb duo with a touch of orange zest was beyond fab to end a sweet weekend. Not seeing my mom until protocols are lifted so we can all gather relaxed with the extended family, you can bet this gorgeous pie will make an appearance! Until then, mom I miss and love you dearly ๐Ÿ’•!


What a gleeful find!


Stalks are ready for plucking when they reach 10-inches long. 14-inches even better for tender slim, less tart stalks!

Throw away those green leaves- they are toxic!

What a perfect pair!


Flaky Homestyle Strawberry Rhubarb Pie (adapted by Jo Cooks)

1 pie crust whole recipe for top and bottom:
2 1/2 cups all-purpose flour
1 Tbsp sugar
1 tsp salt
1 cup butter unsalted and cold, cut into pieces
7-9 Tbsp ice water

Filling:
4 cups rhubarb stalks cut small 1/4 to 1/2 inch pieces
4 cups strawberries cleaned and chopped small
1 cup sugar granulated
1/3 cup tapioca flour
1 Tbsp orange zest
1 pinch salt
1 egg for egg wash


Make the dough: Add the flour, sugar and salt to a food processor and pulse a couple times to mix. Add the butter and pulse several times until the pieces of butter are pea size. Add ice water. Start with 7 Tbsp of water (no ice cubes) and pulse again. Pinch the dough between your fingers and if it doesn’t stick together between your fingers add the rest of the water, a tablespoon at a time until the dough just begins to hold together.


Knead the dough: Transfer the dough from the food processor to a clean work surface and use your hands to form into a ball. Do not over-knead. If you over knead you start melting the butter with your hands and the dough starts developing gluten which means tough dough.

Shape into discs and refrigerate: Cut the ball into 2 pieces and shape each piece into a disc. You should still see pieces of butter in the dough. This is what will make your dough flaky. Wrap each disc in plastic wrap and refrigerate for at least 30 minutes or up to 2 days.


Prepare the filling: To a large bowl add the strawberries, rhubarb, sugar, tapioca flour, orange zest and salt. Toss everything together well then allow the filling to rest for 15 to 30 minutes before baking, for the tapioca to soften.

Tapioca starch is key as a syrupy thickener.

Rolling your dough: After removing your crust from the fridge you’ll want to allow it to rest for up to 10 minutes, this will make it easier to roll out. Once it’s softened you’ll want to flour your rolling pin, to prevent the dough from sticking, and get to work. Each disc will need to be 1/8 of an inch thick. Place the dough gently onto the pie plate before crimping the edges and removing any excess dough.

Doing the finger press crimping.

Assemble your pie: Add the filling to your bottom crust, roll out your top crust in the same way described above and drape it over your pie. Crimp and seal your edges before slicing vents or cut outs in the top crust with a knife. From there you will brush with your egg wash mixture, making sure to seal the edges.


Bake the pie: Preheat your oven first to 425 F. Add the pie to the oven, on the bottom rack and bake for 15 minutes. Reduce the heat to 350 F degrees and bake for another 45 minutes to an hour or until the crust is golden brown and the filling is bubbling.

Lots of hearts for Mother's Day!

Look at that flaky layered crust!


Wait to cool 30 minutes before slicing so it can firm up and hold its shape. Serve with whipped cream or a scoop of ice cream. DELISH!!!


Full Recipe:

Flaky Homestyle Strawberry Rhubarb Pie
(adapted by Jo Cooks)

1 pie crust whole recipe for top and bottom:
2 1/2 cups all-purpose flour
1 Tbsp sugar
1 tsp salt
1 cup butter unsalted and cold, cut into pieces
7-9 Tbsp ice water

Filling:
4 cups rhubarb stalks cut small 1/4 to 1/2 inch pieces
4 cups strawberries cleaned and chopped small
1 cup sugar granulated
1/3 cup tapioca flour
1 Tbsp orange zest
1 pinch salt
1 egg for egg wash

Make the dough: Add the flour, sugar and salt to a food processor and pulse a couple times to mix. Add the butter and pulse several times until the pieces of butter are pea size. Add ice water. Start with 7 Tbsp of water (no ice cubes) and pulse again. Pinch the dough between your fingers and if it doesn’t stick together between your fingers add the rest of the water, a tablespoon at a time until the dough just begins to hold together.

Knead the dough: Transfer the dough from the food processor to a clean work surface and use your hands to form into a ball. Do not over-knead. If you over knead you start melting the butter with your hands and the dough starts developing gluten which means tough dough.

Shape into discs and refrigerate: Cut the ball into 2 pieces and shape each piece into a disc. You should still see pieces of butter in the dough. This is what will make your dough flaky. Wrap each disc in plastic wrap and refrigerate for at least 30 minutes or up to 2 days.

Prepare the filling: To a large bowl add the strawberries, rhubarb, sugar, tapioca flour, orange zest and salt. Toss everything together well then allow the filling to rest for 15 to 30 minutes before baking, for the tapioca to soften.

Rolling your dough: After removing your crust from the fridge you’ll want to allow it to rest for up to 10 minutes, this will make it easier to roll out. Once it’s softened you’ll want to flour your rolling pin, to prevent the dough from sticking, and get to work. Each disc will need to be 1/8 of an inch thick. Place the dough gently onto the pie plate before crimping the edges and removing any excess dough.

Assemble your pie: Add the filling to your bottom crust, roll out your top crust in the same way described above and drape it over your pie. Crimp and seal your edges before slicing vents or cut outs in the top crust with a knife. From there you will brush with your egg wash mixture, making sure to seal the edges.

Bake the pie: Preheat your oven first to 425 F. Add the pie to the oven, on the bottom rack and bake for 15 minutes. Reduce the heat to 350 F degrees and bake for another 45 minutes to an hour or until the crust is golden brown and the filling is bubbling.

Wait to cool 30 minutes before slicing so it can firm up and hold its shape. Serve with whipped cream or a scoop of ice cream.


Friday, May 1, 2020

Japanese Korokke (Potato Croquettes)...


Happy Friday with cheap and cheerful Japanese korokke! ๐ŸŒธ.

Potato Croquettes, or “Korokke” is a tasty beloved ๐Ÿ‡ฏ๐Ÿ‡ต street eats that is deep fried with a panko-crust filled with a mashed potato, filling. Today, I made a popular version with add-ins of minced beef, carrot and onions. Korokke is one of those bento box compartment favourites, that Japanese home cooks love to pack for their kids lunch (handheld goodness)- popular with the working too!

The key is a golden crunchy shell yielding to a super fluffy potato filling! I've made croquettes with beef curry trading potatoes with cooked rice (scroll down below). Shaped into pucks or cylinders these are sure to be a hit with your family and friends!


Japanese Potato Croquettes (Korokke)
Makes 15 

5 to 6 medium starchy potatoes, about 1 lb.
1/2 lb. ground beef
1 medium onion, finely diced
1 medium carrot, finely diced
1 Tbsp. butter
Salt and ground pepper to taste
3 Tbsp. milk
Oil for deep frying

Coating:
1  egg, beaten
3  Tbsp. water
1  Tbsp. kewpie mayonnaise
4  Tbsp. flour
2  cups  of Japanese panko bread crumbs

Score the potatoes with an X on both sides (this will open up the skins while boiling to make it easy for peeling). Cook the potatoes in boiling water for about 20 to 25 mins. until soft. A skewer that can pierce through its centre means the potato is cooked.

Heat butter in a skillet over medium-high heat and add the onions, then beef and carrots to cook for five minutes until cooked through. Season with salt and pepper. Set aside.


Strain the water from the potatoes, peel them, place back in the pot and shake them around to rough up the outsides a little and mash until smooth. Add milk, mash and season with salt and pepper.

Add the cooked beef mixture to the mashed potato and combine well. Let cool and firm up for easy handling.


Divide the mix into 15 equal palm-sized flat ovals.

Use disposable gloves to make it less messy.

Combine the egg, water, mayonnaise, and flour in a small bowl to make the batter. Note: this can be messy. Use one hand for wet handling and the other for dry.

Coat each patty with batter, then place into the panko crumbs. Pat evenly to coat.


Can get messy! But so worth it!


Heat deep frying oil in a pot until it reaches around 350°F. Oil is ready when a skewer inserted in it has bubbles shooting up its side. Fry each patty until golden brown and crispy. Now they are croquettes! Place on rack with paper-lined tray underneath to rest.

Nice crunchy crust!


My kids love this handheld snack/lunch!


Crunchy outside...
Soft and fluffy inside...


So beautiful!


I like to serve the croquettes with a side of finely shredded cabbage.


Eat on its own or dress it up with Japanese thick worcestershire sauce, kewpie mayo and a sprinkle of chopped green onions. Oishi!


You can shape croquettes into pucks or cylinders. Check out my recipe for curry beef rice korokke swapping mashed potatoes for cooked rice.

Japanese Curry Beef Rice Croquettes


Full Recipe:

Japanese Potato Croquettes (Korokke)
Makes 15 

5 to 6 medium starchy potatoes, about 1 lb.
1/2 lb. ground beef
1 medium onion, finely diced
1 medium carrot, finely diced
1 Tbsp. butter
Salt and ground pepper to taste
3 Tbsp. milk
Oil for deep frying

Coating:
1  egg, beaten
3  Tbsp. water
1  Tbsp. kewpie mayonnaise
4  Tbsp. flour
2  cups  of Japanese panko bread crumbs

Score the potatoes with an X on both sides (this will open up the skins while boiling to make it easy for peeling). Cook the potatoes in boiling water for about 20 to 25 mins. until soft. A skewer that can pierce through its centre means the potato is cooked.

Heat butter in a skillet over medium-high heat and add the onions, then beef and carrots to cook for five minutes until cooked through. Season with salt and pepper. Set aside.

Strain the water from the potatoes, peel them, place back in the pot and shake them around to rough up the outsides a little and mash until smooth. Add milk, mash and season with salt and pepper.

Add the cooked beef mixture to the mashed potato and combine well. Let cool and firm up for easy handling.

Divide the mix into 15 equal palm-sized flat ovals.

Combine the egg, water, mayonnaise, and flour in a small bowl to make the batter. Note: this can be messy. Use one hand for wet handling and the other for dry.

Coat each patty with batter, then place into the panko crumbs. Pat evenly to coat.

Heat deep frying oil in a pot until it reaches around 350°F. Oil is ready when a skewer inserted in it has bubbles shooting up its side. Fry each patty until golden brown and crispy. Now they are croquettes! Place on rack with paper-lined tray underneath to rest.

Serve croquettes with salad leaves or any side dish of your choice.


Saturday, April 25, 2020

Easy Chinese Chicken Congee...


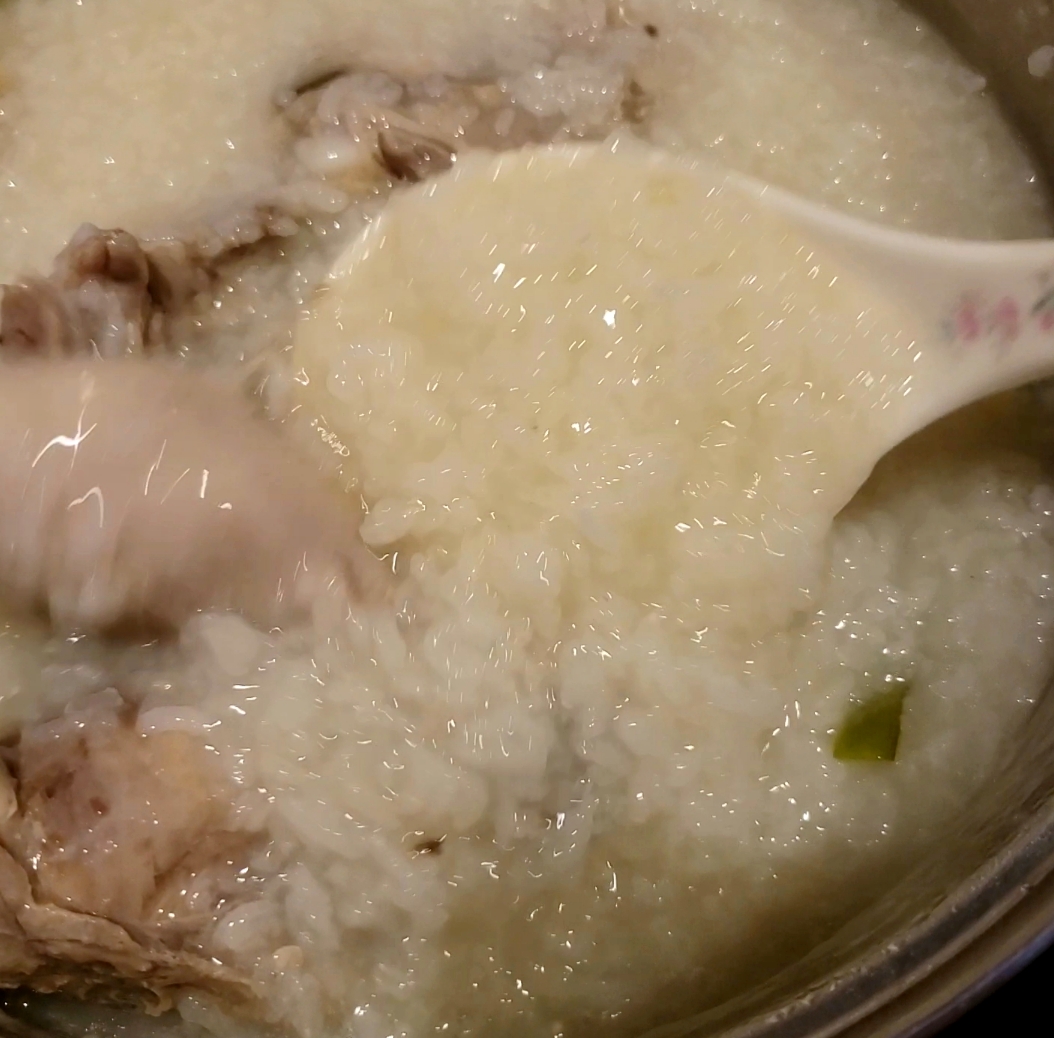
Congee "jook" for breakfast. For lunch. For dinner. For midnight snack too. This resonates true in a Chinese household. It's the ultimate comfort porridge for any time but especially when you're under then weather with a weary head and off taste buds. When the body simply craves uncomplicated nourishment, it soothes like nothing else. You can cook it plain with just rice and water to serve alongside a few salty side dishes or concoct a variety of porridges by adding meat, vegetables, mushrooms, herbs or eggs. I've always loved the classic flavour combo of pork, salted duck eggs and a thousand year old black eggs. But to make it really simple, I am going to show you how with just chicken legs so you can be on your way to making your very own chicken congee.


You want homemade congee that is glossy with a thick viscous texture for heartiness and oomph. The secret is to use three varieties of rice for their unique textures. Glutinous or sweet rice gives the porridge the stickiness texture (1 part); Jasmine medium grain rice gives the porridge “volume” (2 parts); Japanese or Korean short grain rice gives the porridge the shiny and glossy texture (1 part).


Easy Chicken Congee
Serves 6

1-1/2 lbs. bone-in chicken legs (skinned, cut into thigh and drumsticks (about 3), rubbed with salt and white pepper in fridge for one hour)
2 slices ginger
1 green onion, cut into 2-inch pieces
2 cups rice (1/2 cup glutinous / 1 cup jasmine /1/2 cup short grain rice), rinsed
12 cups water
Salt to taste

After rinsing rise, soak the rice with water to cover for one hour if you have the time. If you don’t, don't bother and skip this step.
Soaking rice speeds up the cooking by kick-starting the absorption of water.


Marinating skinless chicken pieces with salt and white pepper for at least one hour in fridge.

Bring a pot of water to a boil with a tsp. of salt, ginger and onions. Add the chicken pieces. Bring the water back to a boil and cook on medium heat, uncovered. 15 mins. later, add drained rice, stir and continue to cook for 45 mins (total one hour). Stir, pot bottom up every 15 minutes to ensure it doesn't stick.


Cook's NOTE: Add 1/2 cup of water during the last 15 mins. Of cooking if the congee is too thick. Add more water to get the desired consistency. 


Remove chicken at the end of cooking time; shred the tender chicken off the bones with two forks. Return to pot and mix with congee. Season to taste. Serve hot.


At the table, set ground white pepper, salt, sesame oil, sliced green onions, cilantro, shredded ginger and preserved spicy radish as classic garnishes to jazz up your congee.

Here, I have spicy chicken gizzards and lotus root as sides too.

Oh and don't forget those dual fried dough crullers pronounced as Yau Tiew in Cantonese (meaning oil sticks) which are a must companion! Dunk the stick to eat or slice into thin pieces for a crunchy topping. You can pick this up at your Asian supermarket in the bakery or hot table section, especially if that counter is a dim sum one. Just pop it in the oven to warm up.


Always a welcomed hearty pot in our house!


Jook time! 


Full Recipe: 

Easy Chicken Congee
Serves 6

1-1/2 lbs. bone-in chicken legs (skinned, cut into thigh and drumsticks (about 3), rubbed with salt and white pepper in fridge for one hour)
2 slices ginger
1 green onion, cut into 2-inch pieces
2 cups rice (1/2 cup glutinous /1 cup jasmine /1/2 cup short grain rice), rinsed
12 cups water
Salt to taste

After rinsing rise, soak the rice with water to cover for one hour if you have the time. If you don’t, don't bother and skip this step.
Soaking rice speeds up the cooking by kick-starting the absorption of water.

Bring a pot of water to a boil with a tsp. of salt, ginger and onions. Add the chicken pieces. Bring the water back to a boil and cook on medium heat, uncovered. 15 mins. later, add drained rice, stir and continue to cook for 45 mins (total one hour). Stir, pot bottom up every 15 minutes to ensure it doesn't stick.

Remove chicken at the end of cooking time; shred the tender chicken off the bones with two forks. Return to pot and mix with congee. Season to taste. Serve hot.

Cook's NOTE: Add 1/2 cup of water during the last 15 mins. Of cooking if the congee is too thick. Add more water to get the desired consistency.