
I get the question a lot. How do I know which soy sauce to use when I'm cooking? I can appreciate the confusement. There are so many types on the market. Just walk down the bottled condiment aisle in an Asian supermarket with their vast multi-coloured labels and light, less sodium, dark, mushroom dark, double dark claims. It's enough to throw your hands in the air, pack it in, and opt for Chinese take-out. While there are many brands with their distinct flavour nuances, here are some universal key take-aways for choosing soy sauce to best optimize your Asian dish. It doesn't have to be daunting.

A staple in Chinese cooking for 3000 years, soy sauce is made by fermenting four ingredients: Soybeans (90%), Wheat Flour (10%), Water and Salt. The best are fermented naturally in open air and sun. Others produced through a factory.
Soy sauce differ in three ways: Appearance, Taste and Texture. Each Asian country of origin produces a range of this condiment to best suit their cuisines.
If a Chinese recipe calls for "soy sauce" without any further detail, you can assume it means light soy sauce. My all-time favourite soy sauce is heritage brand Pearl River Bridge- one I grew up with in my parents' household.
Light or Thin: This is the first soybean press or the tops of the brew in earthenware crocks. It is the most saltiest, thin and clear. Meant to enhance flavours when cooking- marinating, stir frying and dipping, it is the most common cooking sauce in Chinese cuisine. This is not the same as less sodium. When we hear light we tend to think less salty, but in fact the opposite is true.

Stir-Fried Cabbage with Dried Shrimps
Serves 4
1 Tbsp. oil
1 to 1-1/2 Tbsp. dried tiny shrimps
¼ medium Taiwanese cabbage, cut into small wedges, then two-bite pieces
3 Tbsp. cooking wine
Salt and ground white pepper to taste
Heat oil in skillet on medium-high heat; add shrimps. Let sizzle for 10 seconds then add cabbage. Stir-fry for two minutes until slightly soft. Add cooking wine and stir-fry for another two minutes. Add salt and pepper. Serve hot.
A combination of halved bone-in chicken drumsticks, and skinless boneless chicken leg meat pieces to show this dish can be done with a myriad of chicken cuts. Try with chicken wings too.
Here is a peek into my first winter culinary session back at the community centre. A great way to kick start our return to classes on a cold morning was with two Chinese breakfasty brunch ideas- fish congee, prepared steamed rice rolls and sauteed snow peas with garlic to round things out. This yummy healthy veggies are charged at a premium in Chinese restaurants. Easily make a bountiful dish at home with a few simple guidelines. See below.
Sautéed Snow Pea Leaves and Garlic
Serves 4
1 Tbsp. oil
1/2 lb. snow pea leaves
2 cloves garlic, chopped
½ cup chicken broth
Heat the oil in a skillet on medium-high heat. Toss in the pea shoots. Stir and cook until starting to wilt. Use your spatula/cooking spoon to push the leaves away to create a centre well. Add garlic. Let sizzle and continue to cook by mixing all the shoots together with the garlic; add 1/2 cup hot chicken broth, cover and cook for five minutes until the stems are soft to the pinch. Remove onto a serving bowl or plate.
Soy sauce for seafood is a delicious complement to serve with steamed rice rolls. It gives a balanced sweet and salty flavour that is super divine on flavourless rolls. That deliciousness is further enhanced with a topping easily made of chopped green onions drizzled over top with piping hot oil. A dollop along with the sweeter soy sauce and a bit of hot sauce transports you to rice roll heaven!

Three Cup Chicken (San Bei Ji)
Serves 4 to 6
1/3 cup sesame oil
1 (2-inch) piece fresh ginger, peeled and sliced into 8 to 10 thick slices
12 garlic cloves, peeled and smashed
4 green onions, cut into 1-inch pieces
2 red chilies, sliced (optional)
2 lb. bone-in chicken legs, thighs and/or wings, or use boneless chicken, cut into roughly 2-inch pieces (see below)
1/3 cup cooking wine
1/3 cup light soy sauce
½ Tbsp. dark soy sauce
1 to 2 Tbsp. sugar
1 bunch fresh Thai basil, leaves plucked
For Bone-In Chicken: The Chinese meat cleaver is the "woman" for the job of hacking! Just make sure it's sharp. I like to use leg quarters, so first cut the joint where drumstick and thigh meet. Then, cut the drumstick in half and the thigh in quarters; it may take a couple of good whacks to get through the bones, and if you miss the initial cut the next chop, make sure you remove any bone fragments before cooking.
Heat 2 Tbsp. sesame oil in a wok/skillet over medium-high heat; stir-fry the ginger, garlic, onions and chilies if using and cook until fragrant about one minute. Add remaining sesame oil and let heat to simmering.
Add chicken pieces and lightly brown, stirring occasionally for two to three minutes. Pour in the rice wine and soy sauce and bring to a boil (Add 1/2 Tbsp. dark soy sauce to give the dish a deeper richer brown colour).
Reduce heat to a simmer and cook, uncovered, until the chicken pieces are cooked through, and the sauce has slightly reduced about 15 minutes. Stir in the sugar. Turn off heat and stir in the basil leaves. Serve immediately.
Dark or Black: Chinese "dark" soys are darker in colour and thicker in texture, but tend to be lighter in saltiness. This comes from the bottom of earthenware crocks and generally fermented for a longer period of time, often with added sugar or molasses and cornstarch, giving it a sweet-salty flavour and viscous texture. Used solely for cooking, it is often added at the last stages to season and colour sauces. There is a Mushroom Dark that has a deep mushroom flavour and gives additional sweetness. Double Dark/Black Soy Sauce is even thicker, darker, and sweeter than dark soy. It's also used for adding colour and rich, sweet flavour. A little goes a long way.
Soy Sauce: aka regular- a middle ground between light and dark in terms of colour, saltiness and texture. Also used the same way as light soy sauce in cooking. It comes down to preference in taste and colour. Kung Fu brand is a good one with a hint of sweetness.
"Less Sodium" Soy Sauce is made the same way as regular soy sauce, but with a percentage of salt removed post-brewing such as the label "40 percent less sodium". You can expect a lighter salty flavour and can be used the same way as light soy sauce.
Soy Sauce For Seafood enhances the natural essence of seafood as a balance salty sweet sauce over steamed whole fish, or a dip for cooked shrimps. In Cantonese, we call the ideal flavour "seen teem"- seafood sweetness. This condiment is also wonderful over plain tofu dishes and steamed rice noodles such as cheurng fun.
When Japan adopted soy sauce, the recipe was modified to use a 50 to 50% ratio of soybeans and wheat, resulting in a sweeter, less salty, less harsh flavour. Japanese-style soy sauces tend to be clearer and thinner than Chinese sauces called shoyu.
Tamari: Similar to traditional Chinese soy sauce, this is made with soybeans and little to no wheat. If you have a wheat allergy, tamari can be a good gluten-free alternative. With a higher soybean content, tamari has a stronger flavour and is ideally used as a dipping sauce.
Soy sauce's two main enemies are light and heat, so be sure to store it in a dark place away from a heat source. Once opened, it can keep in room temp. for six months.
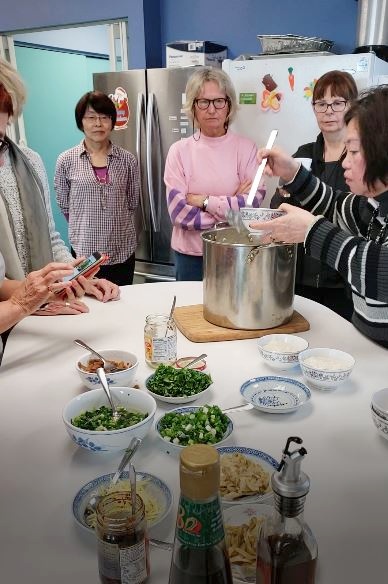
I am pleased to return to teach Chinese cooking classes at the St.Stephen's Community Centre in Chinatown with seniors for the winter term. It was wonderful to see the majority were returning learners- another opportunity to engage, cook and learn from each other for two months. It will be about comfort foods to warm our insides from this frigid cold weather and to look forward to some delicious dishes giving happy nods to two favourable occasions in February- namely Chinese New Year and Valentine's Day :D.
Presenting the differences in soy sauce as a request from one of the learners, a popular comfort dish San Bei Ji- Three Cup Chicken recipe followed. This is touted as a quintessential Taiwanese home-style dish. Three Cup Chicken's name comes from its three equal parts measurement of soy sauce (light or regular), sesame oil and cooking rice wine. The signature savoury braise gets its rich flavours from the loaded garlic cloves, ginger and fresh Thai basil.
 |
| San Bei Ji highlights both light and dark soy sauce sauces. |
I am pleased to return to teach Chinese cooking classes at the St.Stephen's Community Centre in Chinatown with seniors for the winter term. It was wonderful to see the majority were returning learners- another opportunity to engage, cook and learn from each other for two months. It will be about comfort foods to warm our insides from this frigid cold weather and to look forward to some delicious dishes giving happy nods to two favourable occasions in February- namely Chinese New Year and Valentine's Day :D.
Presenting the differences in soy sauce as a request from one of the learners, a popular comfort dish San Bei Ji- Three Cup Chicken recipe followed. This is touted as a quintessential Taiwanese home-style dish. Three Cup Chicken's name comes from its three equal parts measurement of soy sauce (light or regular), sesame oil and cooking rice wine. The signature savoury braise gets its rich flavours from the loaded garlic cloves, ginger and fresh Thai basil.
 |
| Sleeves rolled up, chicken being prepared. |
 |
| The lovely and fragrant mix of aromatics! |
 |
| Smashing two handfuls of peeled garlic for this dish to feed a crowd. |
A humble side of stir-fried Taiwanese cabbage aka Korean or hat cabbage to compliment.

Stir-Fried Cabbage with Dried Shrimps
Serves 4
1 Tbsp. oil
1 to 1-1/2 Tbsp. dried tiny shrimps
¼ medium Taiwanese cabbage, cut into small wedges, then two-bite pieces
3 Tbsp. cooking wine
Salt and ground white pepper to taste
Heat oil in skillet on medium-high heat; add shrimps. Let sizzle for 10 seconds then add cabbage. Stir-fry for two minutes until slightly soft. Add cooking wine and stir-fry for another two minutes. Add salt and pepper. Serve hot.
 |
| Love the toss fry action over the stove with these lovely ladies. |
Light soy sauce is part of the braise, and a bit of dark soy sauce added for rich colour.
 |
| Waiting until the quick braise is done before folding in the pretty green Thai basil. |
A combination of halved bone-in chicken drumsticks, and skinless boneless chicken leg meat pieces to show this dish can be done with a myriad of chicken cuts. Try with chicken wings too.
 |
| Perfectly served over steamed rice and with some of that savoury sweet sauce too. |
Home cooking San Bei Ji with my family. See step-by-step recipe.
 |
| I like to cook with bone-in chicken. |
Ga-gorgeous and the aroma-- sweet savoury and garlicky with hints of anise basil fills the kitchen!
Chicken, juicy succulent delicious in its potent, salty-sweet savoury braised sauce.
Chicken, juicy succulent delicious in its potent, salty-sweet savoury braised sauce.
 |
| My family dinner table with pan-fried dumplings, stir-fried snow peas and burdock salad. |
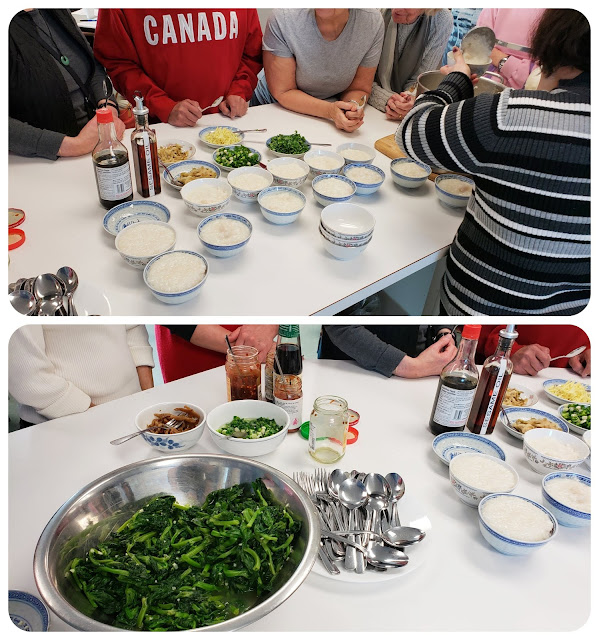
Here is a peek into my first winter culinary session back at the community centre. A great way to kick start our return to classes on a cold morning was with two Chinese breakfasty brunch ideas- fish congee, prepared steamed rice rolls and sauteed snow peas with garlic to round things out. This yummy healthy veggies are charged at a premium in Chinese restaurants. Easily make a bountiful dish at home with a few simple guidelines. See below.
 |
| You can buy rice rolls in packages, plain or with dried shrimps. |
Sautéed Snow Pea Leaves and Garlic
Serves 4
1 Tbsp. oil
1/2 lb. snow pea leaves
2 cloves garlic, chopped
½ cup chicken broth
Heat the oil in a skillet on medium-high heat. Toss in the pea shoots. Stir and cook until starting to wilt. Use your spatula/cooking spoon to push the leaves away to create a centre well. Add garlic. Let sizzle and continue to cook by mixing all the shoots together with the garlic; add 1/2 cup hot chicken broth, cover and cook for five minutes until the stems are soft to the pinch. Remove onto a serving bowl or plate.
 |
| Condiments and garnishes await the food! |

Soy sauce for seafood is a delicious complement to serve with steamed rice rolls. It gives a balanced sweet and salty flavour that is super divine on flavourless rolls. That deliciousness is further enhanced with a topping easily made of chopped green onions drizzled over top with piping hot oil. A dollop along with the sweeter soy sauce and a bit of hot sauce transports you to rice roll heaven!

Three Cup Chicken (San Bei Ji)
Serves 4 to 6
1/3 cup sesame oil
1 (2-inch) piece fresh ginger, peeled and sliced into 8 to 10 thick slices
12 garlic cloves, peeled and smashed
4 green onions, cut into 1-inch pieces
2 red chilies, sliced (optional)
2 lb. bone-in chicken legs, thighs and/or wings, or use boneless chicken, cut into roughly 2-inch pieces (see below)
1/3 cup cooking wine
1/3 cup light soy sauce
½ Tbsp. dark soy sauce
1 to 2 Tbsp. sugar
1 bunch fresh Thai basil, leaves plucked
For Bone-In Chicken: The Chinese meat cleaver is the "woman" for the job of hacking! Just make sure it's sharp. I like to use leg quarters, so first cut the joint where drumstick and thigh meet. Then, cut the drumstick in half and the thigh in quarters; it may take a couple of good whacks to get through the bones, and if you miss the initial cut the next chop, make sure you remove any bone fragments before cooking.
Heat 2 Tbsp. sesame oil in a wok/skillet over medium-high heat; stir-fry the ginger, garlic, onions and chilies if using and cook until fragrant about one minute. Add remaining sesame oil and let heat to simmering.
Add chicken pieces and lightly brown, stirring occasionally for two to three minutes. Pour in the rice wine and soy sauce and bring to a boil (Add 1/2 Tbsp. dark soy sauce to give the dish a deeper richer brown colour).
Reduce heat to a simmer and cook, uncovered, until the chicken pieces are cooked through, and the sauce has slightly reduced about 15 minutes. Stir in the sugar. Turn off heat and stir in the basil leaves. Serve immediately.


