Monday, October 8, 2018

Warm Autumn Salad... For Thanksgiving Day!


Happy Thanksgiving to my family, friends and readers!

Our family get together dinners for special occasions are usually a combination of potluck sides, with the host taking care of the mains. This year, it was at my parents and I couldn't wait to make and tote a warm autumn salad that highlights the beautiful bounty and colours of our local fall harvest. I was so loving this very salad I grabbed for lunch recently over at The Big Carrot during a food product demo, representing LiveWell Marketing as a Wellness Ambassador (more on this role in my next post). It was a flavour mix of tart and sweet- apple cider vinaigrette with the warm kiss of ginger on lovely textural fall vegetables, apples and toasty pumpkin seeds. What a perfect holiday to share this healthful bountiful delicious salad on a day of Thanks. I used maple-eh syrup and added dried cranberries for that big Canadian nod. Thank You The Big Carrot for the instant inspiration. It was a great hit with everyone! 


 The lovely spread of side options at The Big Carrot Kitchen.

Warm Autumn Salad at The Big Carrot. Mixing it with an Israeli Couscous Side.

Warm Autumn Salad
Serves 6 to 8  (I doubled this recipe to serve a crowd 12+)

1 bunch kale, leaves only removed from hard stems
1/2 medium red cabbage, cut into bite size pieces
1/2 medium butternut squash, peeled, seeds removed and diced
2 medium beets (see below for how-to cook), chopped
1 to 2 tart apples (Granny Smith, Jonathan, Cortland, Empire), chopped near the end to prevent oxidation
a handful pumpkin seeds, toasted
a handful dried cranberries

Dressing:
3 Tbsp. apple cider vinegar
1-1/2 Tbsp. lemon juice
1/2 tsp. sea salt
1 tsp. finely grated fresh ginger (optional)
1-1/2 Tbsp. maple syrup
ground black pepper
3 Tbsp. olive or sunflower oil


Preheat oven to 300 degrees F. Spread the seeds in a single layer on a baking sheet and bake for about 10 minutes or until golden brown; stir occasionally. NOTE: Pumpkin seeds are thin and delicate compared to roasting nuts, they don't need to bake as long and can easily burn. 


Fill a pot with water. Add the beets and cover to simmer on medium for an hour. Beets are ready when beets can be pierced smoothly with a butter knife. Remove and set aside to cool. Drain beets and rub off skins with hands under cool running water. Transfer to a non-porous plate such as glass or metal and use a dark cutting board so not to easily stain; let cool, then slice into thin rounds and cut into small pieces. NOTE: Keep the beet broth to make soup. If you have extra beets, try this delish Russian Borsch recipe I made.

Use a disposable plastic glove to prevent your fingers from turning red.

The cross-section of a red cabbage is purple-ly gorgeous!

Trim the leaves off the hard stems and cut into bite-size pieces. Discard stems.


Peeling, coring and dicing the butternut squash.


Roast diced squash (sprinkled with salt, pepper and tossed in olive oil) in the oven at 400F for 20 minutes until tender.


The tasty seasonings that make the delicious tart and sweet dressing (with our without the warmth of ginger). Mix the apple cider and lemon juice in a bowl or shaker, then add the salt to dissolve. Add maple syrup, grated ginger (if using), pepper and oil. Blend or shake well.


Heat the skillet over medium-high heat. Add 2 Tbsp oil, sauté the cabbage first for three minutes before adding the kale. Toss, pour a little water and cover lid to let steam and cook for two to three minutes. Remove lid, toss, sprinkle with a little salt, remove from heat and let cool slightly. 


Place kale and cabbage in a large bowl. Add the apples, beets and roasted squash and toss with the maple (ginger- optional) apple cider vinaigrette. 


Sprinkle with toasted pumpkin seeds and dried cranberries upon serving.


As the flavours meld so does the colours, especially the reds bleeding into the squash and apples. Pretty huh?


The salad certainly was a dazzling showstopper! Nice to have a nutritious vegetarian dish take centre stage :D


Yes you see right- chopsticks! Our family gatherings are always an East meets West feasting affair! (On the table also grilled steaks, chicken kabobs, grilled salmon fillets, Chinese steamed chicken with onion-ginger sauce, steamed Chinese greens, spinach feta rolls and Mediterranean dips and pitas).


Full Recipe:

Warm Autumn Salad
Serves 6 to 8 (double recipe to serve a crowd)

1 bunch kale, leaves only removed from hard stems
1/2 medium red cabbage, cut into bite size pieces
1/2 butternut squash, peeled, seeds removed and diced
2 beets (see below for how-to cook), chopped
1 to 2 tart apples (Granny Smith, Jonathan, Cortland, Empire), chopped near the end to prevent oxidation
handful pumpkin seeds, toasted
handful dried cranberries

Dressing:
3 Tbsp. apple cider vinegar
1-1/2 Tbsp. lemon juice
1/2 tsp. sea salt
1 tsp. finely grated fresh ginger (optional)
1-1/2 Tbsp. maple syrup
ground black pepper
3 Tbsp. olive oil

Fill a pot with water. Add the beets and cover to simmer on medium for an hour. Beets are ready when beets can be pierced smoothly with a butter knife. Remove and set aside to cool. Drain beets and rub off skins with hands under cool running water. Transfer to a non-porous plate such as glass or metal and use a dark cutting board so not to easily stain; let cool, then slice into thin rounds and cut into small pieces. NOTE: Keep the beet broth to make soup. If you have extra beets, try this delish Russian Borsch recipe I made.

Roast diced squash (sprinkled with salt and pepper and tossed in olive oil) in the oven at 400F for 20 minutes until tender.

Mix the apple cider and lemon juice in a bowl or shaker, then add the salt to dissolve. Add maple syrup, grated ginger (if using), pepper and oil. Blend or shake well.

Heat the skillet over medium-high heat. Add 2 Tbsp oil, sauté the cabbage first for three minutes before adding the kale. Toss, pour a little water and cover lid to let steam and cook for two to three minutes. Remove lid, toss, sprinkle with a little salt, remove from heat and let cool slightly. 

Place kale and cabbage in a large bowl. Add the apples, beets and roasted squash and toss with the maple (ginger- optional) vinaigrette. 

Sprinkle with toasted pumpkin seeds and dried cranberries upon serving.


Monday, October 1, 2018

TDSB Learn4Life Chinese Cooking Program With Seniors...


I haven't officially made the announcement here, but I am so proud to share that I have been working for TDSB Learn4Life as a Senior Instructor, teaching one-day-a-week Chinese cooking classes to seniors in the Toronto Chinatown community. I just taught my third class :). As part of Continued Education, this division of the Toronto District School Board (TDSB) has served adults for more than 160 years. Today, nearly 30,000 adult learners join 1700 general interest classes to take up a hobby, get active, learn a new language or skill and to meet people in their communities.

I am also continuing this year as the Culinary Consultant, partnering with TDSB Newcomer Services in their Business Development and Community Services division. As kids and parents get settled into the swing of school, we are amidst discussions of returning to the much-enjoyed parent engagement culinary program offered to the Thorncliffe community. In addition, there is also enthusiasm for me to lead sessions where kids (newcomer arrivals withing five years) and their parents cook and eat together surrounding foods during special occasions and holidays. What a great way to introduce Canadian culture and traditions around themed food and flavours!

I have cooked and food educated kids of all ages, youths and adults and lucky me, a 360 teaching experience with the privilege now working with seniors, and at the same time giving back to my Chinese community. The Chinese cooking program has been running for years at the St.Stephen's Community Centre, with only Cantonese-speaking folks. When my predecessor retired, TDSB opened up the program to welcome all seniors to participate and we have the highest attendees this term yet. My classes are demo-style, with a main and side, along with students coming up to get hands-on. And yes, I get to practice my mother tongue Cantonese with Chinese-only speaking seniors. I have taught some Chinese recipes last year in my culinary program with parents, mainly with moms of Sri Lankan descent, but this is my first full-term Chinese-focused one. Referencing my contribution to a beautiful collaborative global kitchen cookbook- The Taste of The Place, Chapter on China launched this June, it's a great joy to be able to bring to life a few of my favourite all-time and classic Chinese dishes. Twice now during my programs, I have been thrilled to cook together Cantonese Chow Mein.

Vegetable prep for Cantonese Chow Mein (my top most-viewed recipe).

Shrimps being peeled, vegetables a-blanching and chicken thighs being sauteed.

Lots of mouths to feed, so we're doubling up on the cookery and platters.


When it comes to Cantonese Chow Mein, it's all about the bounty of colour and the glazy sauce!

A few toss more then the cornstarch slurry goes in to thicken.

Digging in the oodles and oodles of crispy egg noodles.

My Cantonese Chow Mein is the top contender as my most popular blog post, and that's after 600+ posts. And I'll say I'm not surprised in the least-- it's such a gorgeous dish, full of healthful veggies, colour and textures all smothered in a glazy thickened savoury sauce over fried egg noodles! Here is the gorgeous shot of the dish in The Taste of The Place cookbook, one of four recipes in my chapter on China. I was so pleased to learn that this beautiful rendition by creator Julie Cockburn, made running photo after the cookbook's cover page.

Cantonese Chow Mein, The Taste of The Place

More about this book... Along with 12 other food writers from around the world, each with our own countries' chapter, I contributed four recipes for China (an appetizer, main meal, side and dessert) from my beloved heritage on Cantonese Chinese cuisine. 

Here are a few highlights to whet your appetite –
  • Enjoy over 50 authentic, regional recipes from real kitchens around the globe, each accompanied by beautiful, full-color photos.
  • Each regional chapter explores what makes the food from that area so special.
  • Gain personal insights into the culinary cultures of 13 different parts of the world. 
  • The areas of the world we will explore together – Argentina, China, Curaçao, Czech Republic, India, Italy, Jordan, Kenya, Romania, South Africa, Cornwall in the United Kingdom, The Midwest United States, and The Southwest United States. 
  • For more information of how to order an E-Book or Cookbook, see HERE.


If you are interested in getting your hands on a copy, you can get an E-book or a printed cookbook shipped out of the States. To my students and readers, I am offering a discount code of 20% off either the printed book or e-book. 
The code to use is: susanssavourit. Click HERE for pricing, and a sneak peek into two of my published recipes.

I hope you enjoy reading the book and trying something new…

Here’s to taking the culinary adventure into your kitchen!
Susan Ng


Monday, September 24, 2018

Taro Coconut Tapioca Soup Dessert...


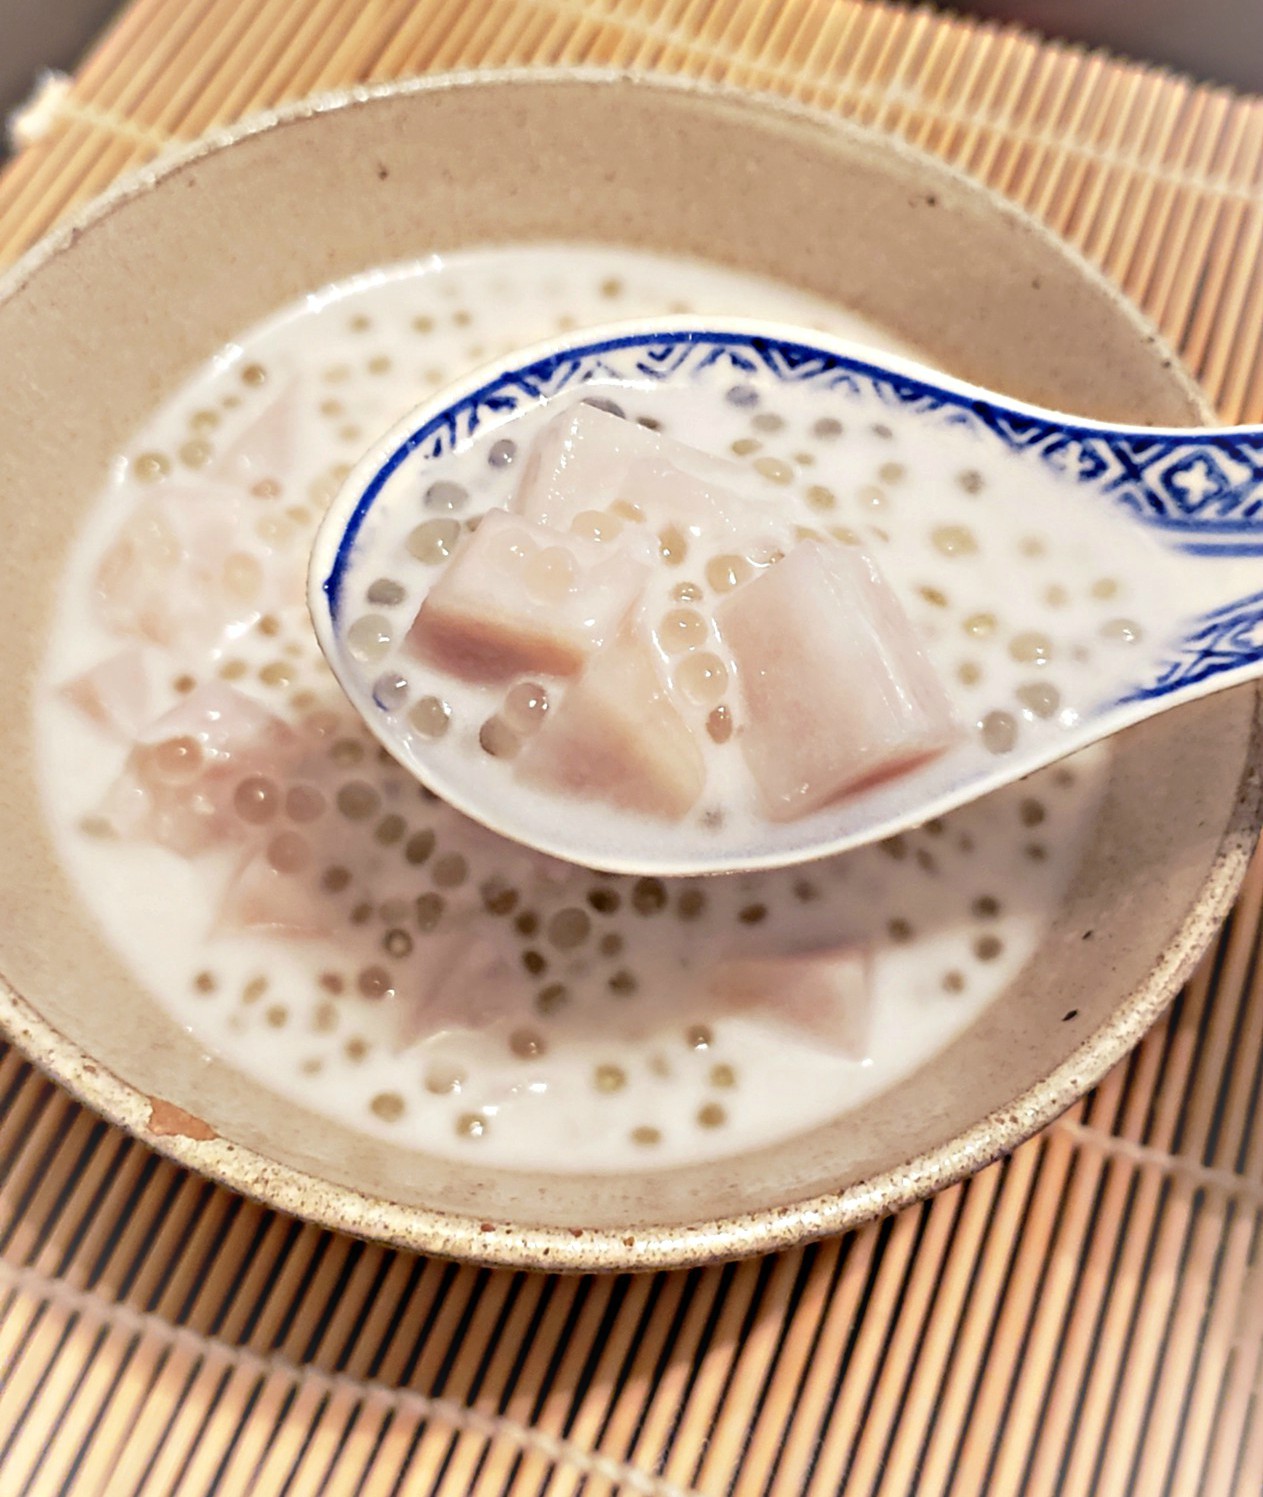
Happy Mid-Autumn Festival! Also known as the Moon Cake, Harvest Moon or Lantern Festival, it has been an important annual festival for over 3500 years celebrated by the Chinese and Vietnamese. The harvest is praised and the full bright moon worshipped as a symbol of peace, prosperity, and family reunion; moon cakes typically filled with red bean or lotus paste are eaten and exchanged as gifts. Aside from ubiquitous moon cakes, the Chinese also eat a myriad of auspicious foods to pay homage. One such ingredient is taro root, round resembling the full moon. This lavender speckled root has a host of health benefits and is a beloved ingredient in Chinese cooking. I've made Pan-Fried Taro Cakes- one of my mom's specialty, cooking with her a mid-autumn occasion years ago. This year the special day lands on my Monday Chinese cooking class, and I thought we could start it by enjoying with steamed buns filled with taro paste and a cup of hot water/tea :). The seniors liked it, and I'll be buying them again (frozen section). Toting back the piece of fresh taro that was passed around, I turned it into the classic taro coconut tapioca dessert often served at Chinese restaurants after a meal. How easy it is to make from home...? Just four ingredients in a pot, and you have a comforting delicious and nutritious sweet soup to savour, served warm or cold.


Purple tinted buns with centres filled of soft taro paste.

Photo Credit Right: Ilene Huynh

Taro Coconut Tapioca Soup Dessert
Makes 8 to 10 servings

4 cups water
1 cup dried tapioca pearls (look for the packages in Asian supermarkets)
4 cups water
3 cups raw taro root, peeled and cut into 1/2-inch cubes

2 cans (400 mL) coconut milk (I like brands Aroy-D and Savoy)
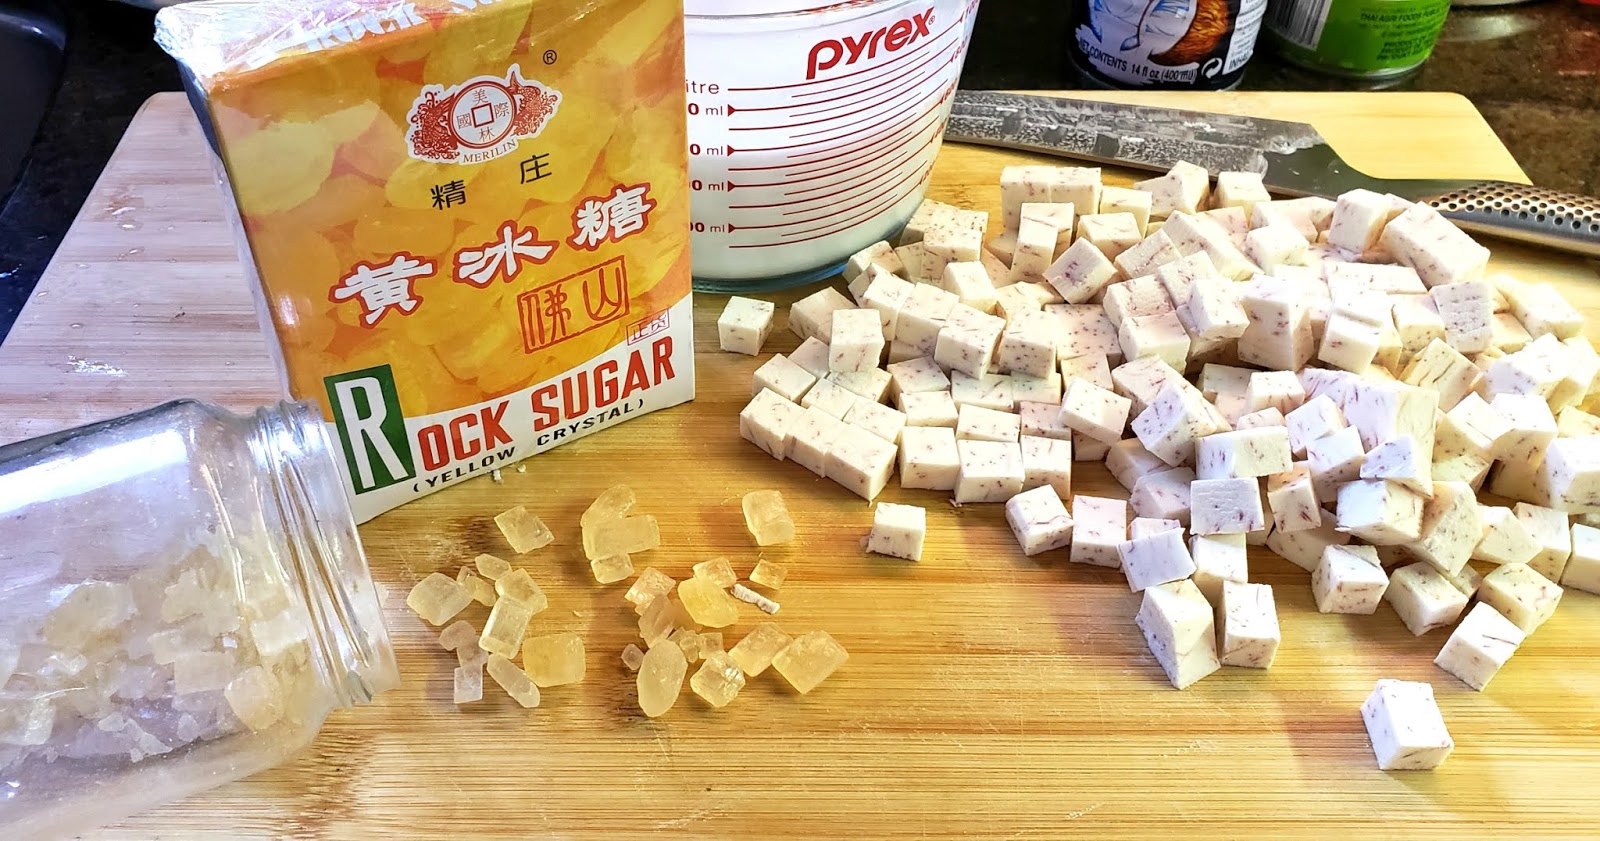
1/2 cup rock sugar 


NOTE: Chinese usually cook with rock sugar to sweeten their dessert-style soups. Rock sugar or rock candy is crystallized sugar, tastes milder than granular sugar and yields better cooking results. You can substitute with golden sugar, but start with 1/4 cup. 

I prefer white pearls but the store only had green which is fine.

Slice the peeled taro in half, cut into pieces, strips then 1/2-inch cubes. 


Bring a pot of water to a boil; carefully add the tapioca, and cook on medium heat until the pearls are translucent with a tiny bead of white in its centres. (Overcooking will cause the pearls to go mushy and sticky). Stir occasionally to prevent clumping and sticking. When done, rinse with cold water and drain thoroughly until no starch is felt on the pearls.

Left: Not Done, Right: Done


Bring four cups of water to a boil in a large saucepan and stir in the taro root. Reduce the heat to medium-low, and simmer the taro until soft, about 10 minutes. Add coconut milk and rock sugar, stirring to dissolve the sugar, and simmer for 10 more minutes to blend the coconut milk and taro. Gently stir in the cooked tapioca pearls until well combined. Taste to adjust sugar if desired. 

Serve warm, or chilled. If serving cold, let cool completely first before storing in fridge. TIP: I put the pot outside on my patio in cold weather or near the a/c vent to chill faster. Do not cool in fridge as it will bring up the fridge's temperature, and can make other foods unsafe. 

NOTE: I always heat up canned coconut milk before using. Although coconut milk is cooked during the canning process, I think it's a safer measure to heat it up thoroughly before using-- you don't know how long it has been canned.


My 9-year old Sébastien loves to get hands-on to help me cook.

As the tapioca sits in the warm liquid or overnight cold in fridge, the tapioca pearls will swell and double its size. You may need to add some cold water to give the soup better viscosity. Adjust with dissolved sugar if desired.


Creamy, smooth, perfectly sweet taro and nibbles of pearly tapioca makes for a delightful dessert treat.


If you like tapioca dessert, check out my popular Coconut Jackfruit Tapioca soup dotted with chewy palm seeds and fun coloured gels for a textural sweet creamy treat.

Full Recipe:

Taro Coconut Tapioca Soup Dessert
Makes 8 to 10 servings

4 cups water
1 cup dried tapioca pearls (look for the packages in Asian supermarkets)
4 cups water
3 cups raw taro root, peeled and cut into 1/2-inch cubes

2 cans (400 mL) coconut milk (I like brands Aroy-D and Savoy)
1/2 cup rock sugar 


NOTE: Chinese usually cook with rock sugar to sweeten their dessert-style soups. Rock sugar or rock candy is crystallized sugar, tastes milder than granular sugar and yields better cooking results. You can substitute with golden sugar, but start with 1/4 cup. 

Bring a pot of water to a boil; carefully add the tapioca, and cook on medium heat until the pearls are translucent with a tiny bead of white in its centres. (Overcooking will cause the pearls to go mushy and sticky). Stir occasionally to prevent clumping and sticking. When done, rinse with cold water and drain thoroughly until no starch is felt on the pearls.

Bring four cups of water to a boil in a large saucepan and stir in the taro root. Reduce the heat to medium-low, and simmer the taro until soft, about 10 minutes. Add coconut milk and rock sugar, stirring to dissolve the sugar, and simmer for 10 more minutes to blend the coconut milk and taro. Gently stir in the cooked tapioca pearls until well combined. Taste to adjust sugar if desired. 

Serve warm, or chilled. If serving cold, let cool completely first before storing in fridge. TIP: I put the pot outside on my patio in cold weather or near the a/c vent to chill faster. Do not cool in fridge as it will bring up the fridge's temperature, and can make other foods unsafe. 

NOTE: I always heat up canned coconut milk before using. Although coconut milk is cooked during the canning process, I think it's a safer measure to heat it up thoroughly before using-- you don't know how long it has been canned.


Tuesday, September 18, 2018

Mixed Mushrooms Beancurd Rolls (Cold and Pan-Fried)...


High-protein, high-fibre and heart-healthy soybeans, with its many nutritious benefits are remarkably versatile, adapting well to other ingredients and flavours-- so it's up to you to make the culinary best of its many formats and to jolt its potential with deliciousness! With so many people venturing into vegetarian diets and going meat-free occasionally, soy products are a smart and nutritious way to go! 

One of the most delicious ingenious format is bean curd sheets to make my hands-down dim sum favourite, Pan-Fried Stuffed Bean Curd RollsSheets of dried bean curd (yuba) are made from the skin that forms on the surface when soy milk is heated. The skin has no flavour or aroma until they are cooked, and rapidly absorb the flavours of seasonings and other ingredients. They are pliable and great for wrapping, but needs to be cooked before eating. I fill mine with crunchy vegetables such as bamboo shoots, black mushroom fungus, cabbage, bean sprouts and carrots. When pan-fried the tofu skin takes on a crispy aromatic flavour that is savoury with every bite. I've been making this recipe since familiarizing  myself with tofu sheets- for family get-togethers, as a side with a Chinese meal, doling up small batches for friends, and teaching it in my TDSB parent engagement culinary program. I share it as a much healthier version to deep-fried spring rolls because the skin is nutritious and it shallow pan-fries in a lot less oil.

Having a few large bean curd sheets leftover from my brand new role at TDSB Learn4Life teaching my first Chinese cooking class, I wanted to expand my bean curd roll repertoire (I have made a handful of times a tasty ground pork and shrimp mousse filling). Coming across a Cantonese-speaking youtube recipe demo video using mixed mushrooms, I immediately fell in love. There are BIG mushroom lovers in this household :). I like that you can serve these rolls cold or hot, just like they do in the restaurants. Both yields a different taste experience. Shape the cooked filling into large flat logs, steam, let cool completely, then pan-fry if you wish to serve warm. Different than I have been doing wrapping small individual rolls and without steaming. So let the experimentation begin...


My first weekly Chinese Culinary Program with seniors at a community centre in Chinatown.

It is so lovely to see many learners wanting to participate. 

Rolling and Wrapping beautifully! Well done everyone!

Pan-fried numminess!

Today's recipe, I used three kinds of Asian cuisine-style mushrooms- black oyster- they were on sale :), king oyster for heartiness and shiitake for concentrated deep umami flavour. Feel free to swap and add enoki and/or shimeji mushrooms.


Nice long shreds make it easier for wrapping.


Mixed Mushrooms Beancurd Rolls
Makes 3  8" x 3" flat logs

1 package dried bean curd sheets (found in freezer section of Asian supermarket)

6 cups of mixed mushrooms (choose from oyster, king oyster, shiitake (fresh or dried), enoki and shimeji, sliced into long strips or long stalks separated (enoki)
1/2 tsp. sugar
1 Tbsp. soy sauce
a few dashes of salt and ground white pepper
2 Tbsp. cooking oil
1-1/2 tsp. sesame oil, divided

Seasoning mixture for bean curd sheets:
2 cups room temp. water 
2 Tbsp. soy sauce
1 Tbsp. dark soy sauce
1 Tbsp. sugar
1/2 tsp. salt 
a few drips of sesame oil

Heat a wok/skillet on medium high and add the oil. Add the mushrooms and stir for one minute. Add sugar, soy sauce, salt and pepper and 1/2 tsp. sesame oil. Cook until fragrant. Remove onto plate to cool.

Make a seasoning mixture for the tofu sheets. In a medium bowl, add the water, two soy sauces, sugar, salt and sesame oil. Mix well to dissolve sugar and salt.


My nine-year old helping out... He LOVES all kinds of mushrooms!


Cut open package of large bean curd sheets. They should be pliable. Carefully peel back three round sheets so they detach from each other. Place the other sheets back into the bag, seal well and refrigerate. Use within a week otherwise it will lose its pliability. Do not refreeze for optimum performance. 

Using a scissor trim the rim off the round sheets. These hard bit can make the finished roll tough and chewy. Save the rim strips for other use such as soup, congee or Chinese sweet dessert soup in a sealed bag and refrigerate. Cut the sheets in half, so you get two half moons. 


Crumple and submerge two half sheets (two for each log) one at a time into the seasoning liquid. Remove and lightly squeeze out excess. Lay lengthwise with round side facing away onto clean flat surface such as a cutting board. Repeat again with second half and lay directly on top with the round side facing you. Take one third of the cooled mushroom mixture and place it centre lengthwise 1/3 from the bottom in a log fashion. 


Take the inner sheet sides and fold over each other. Take the outer sheet sides and fold them over the top sheet. Fold up from the bottom and roll up and around to encase and compact the roll (not too tight). Repeat with remaining sheets to make three logs. To prevent rolls from ballooning, take a toothpick and poke a few holes into each log on the top.


Lightly grease cooking plate with 1 tsp. sesame oil to prevent tofu skin from sticking. Lay them side by side at least 1/2-inch apart so they do not stick together while steaming. Place onto a rack-lined skillet or pot with 2 inches water, cover and let steam on medium for about eight minutes.

Carefully remove plate from skillet, and transfer each onto a pair of chopsticks layed on top of an angled baking sheet to let air circulate top and bottom for faster cooling. Cool completely, if you want to pan-fry about two hours. I put mine near the air conditioning vent. 


When cooled, cut rolls into bite-size pieces. A nice fresh chewy skin and earthy mushroom taste.


For Pan-frying, pour a thin coat of oil in a skillet/pan and cook logs on medium-high heat for about one minute each side or until golden brown crispy. Remove onto paper towel-lined plate to drain excess oil. Cut slicing down to bite-size pieces. Serve with Thai sweet chili sauce or Worcestershire sauce. 


Serve cold or pan-fried as an appetizer or party offering at any gathering. 


Pan-frying, the tofu skin takes on a crispy aromatic flavour.


Two flavour experiences from One!


Full Recipe:

Mixed Mushrooms Beancurd Rolls
Makes 3  8" x 3" flat logs

1 package dried bean curd sheets (found in freezer section of Asian supermarket)

6 cups of mixed mushrooms (choose from oyster, king oyster, shiitake (fresh or dried), enoki and shimeji, sliced into long strips or long stalks separated (enoki)
1/2 tsp. sugar
1 Tbsp. soy sauce
a few dashes of salt and ground white pepper
2 Tbsp. cooking oil
1-1/2 tsp. sesame oil, divided

Seasoning mixture for bean curd sheets:
2 cups room temp. water 
2 Tbsp. soy sauce
1 Tbsp. dark soy sauce
1 Tbsp. sugar
1/2 tsp. salt 
a few drips of sesame oil

Heat a wok/skillet on medium high and add the oil. Add the mushrooms and stir for one minute. Add sugar, soy sauce, salt and pepper and 1/2 tsp. sesame oil. Cook until fragrant. Remove onto plate to cool.

Make a seasoning mixture for the tofu sheets. In a medium bowl, add the water, two soy sauces, sugar, salt and sesame oil. Mix well to dissolve sugar and salt.

Cut open package of large bean curd sheets. They should be pliable. Carefully peel back three round sheets so they detach from each other. Place the other sheets back into the bag, seal well and refrigerate. Use within a week otherwise it will lose its pliability. Do not refreeze for optimum performance. 

Using a scissor trim the rim off the round sheets. These hard bit can make the finished roll tough and chewy. Save the rim strips for other use such as soup, congee or Chinese sweet dessert soup in a sealed bag and refrigerate. Cut the sheets in half, so you get two half moons. Crumple and submerge two half sheets (two for each log) one at a time into the seasoning liquid. Remove and lightly squeeze out excess. Lay lengthwise with round side facing away onto clean flat surface such as a cutting board. Repeat again with second half and lay on top with the round side facing you. Take one third of the cooled mushroom mixture and place it centre lengthwise 1/3 from the bottom in a log fashion. Take the inner sheet sides and fold over each other. Take the outer sheet sides and fold them over the top sheet. Fold up from the bottom and roll up and around to encase and compact the roll (not too tight). Repeat with remaining sheets to make three logs. To prevent rolls from ballooning, take a toothpick and poke a few holes into each log on the top.

Lightly grease cooking plate with 1 tsp. sesame oil to prevent tofu skin from sticking. Lay them side by side at least 1/2-inch apart so they do not stick together while steaming. Place onto a rack-lined skillet or pot with 2 inches water, cover and let steam on medium for about eight minutes.

Carefully remove plate from skillet, and transfer each onto a pair of chopsticks on top of an angled baking sheet to let air circulate top and bottom for faster cooling. Cool completely, if you want to pan-fry about two hours. I put mine near the air conditioning vent. 

Slice cold into bite-size pieces. For Pan-frying, pour a thin coat of oil in a skillet/pan and cook logs on medium-high heat for about one minute each side or until golden brown crispy. Remove onto paper towel-lined plate to drain excess oil. Cut slicing down to bite-size pieces. Serve with Thai sweet chili sauce or Worcestershire sauce.