Thursday, July 16, 2015

Tasty Banana Carrot Cinnamon Bread...


My family loves banana bread! I've been through many different recipes over the years in search of the perfect one until I came across this keeper which I can hands-down no-contest call Best-Ever Banana Bread. But once in a while, I want to change things up, and what better complement than to add a dose of antioxidant beta-carotene and Vitamin A-rich carrots! I was in charge again of supplying snacks during half-time at my twins' week night house soccer game. Parents have been toting packaged bear paws week after week to offer the young players, but I knew when it was my turn I would happily make something homemade. And I just happened to have five overly ripe bananas sitting on my counter that signalled "it's banana bread-making time"-- three to make the original and two to make the carrot-induced version with a sweet boost of cinnamon. My husband nudged me saying that the kids may turn their nose up because it was "too healthy", but can I say, the double amount that I packed for the team, not one to tote back-- they were greedily :) devoured! A parent came up to praise me for bringing the homemade goodness, and this week being in charge, she toted cookies baked from home, and cool watermelon slices! That's so awesome! Parents, let's ditch the plastic and boxes, and bring on the packed tupperware!!


Banana Carrot Cinnamon Bread
Makes 1 loaf serving about 16 

2 cups all-purpose flour
3/4 cup sugar
1 tsp. baking soda
1/2 tsp. salt
1/2 to 1 tsp. ground cinnamon (if you like cinnamon, use 1 tsp.)
2 eggs
1 cup mashed ripe bananas (2 to 3 medium)
1/3 cup canola oil
1 medium carrot (about 1 cup)
1/2 cup chopped pecans or walnuts (optional)


In a large bowl, w
hisk the eggs, bananas and oil. In a small bowl, combine the flour, sugar, baking soda, salt and cinnamon; stir into wet ingredients just until moistened. Fold in carrots and nuts if using. Transfer to a greased 9" x 5" loaf pan.


Bake at 350°F for 55-65 minutes or until a toothpick inserted near the centre comes out clean. Cool for 10 minutes before removing from pan to a wire rack to cool completely.

I like to use my toaster oven to save on energy. Just the perfect size to bake this loaf!

Cousins: Best-Ever Banana Bread alongside Banana Carrot Cinnamon Bread


Both versions, sliced and ready to go! Extras leftover for a sustainable quick breakfast the next few days!

My kids' green team wins the friendly game 5 to 2. Did my tasty banana bread have to do with it-- I'd like to think so! :)


The week before I toted Crispy Chewy Oatmeal Chocolate Chip Raisin Cookies for snack-time which was met with enthusiasm. Spent the afternoon baking with my kids before the game and they were happy they played a part with the delicious results!


Enjoy Green Timbits team!


Tuesday, July 14, 2015

Snails in Garlic Butter (Escargots au beurre d'ail)...


Today is France's National Day commemorating the beginning of the French Revolution-- the Storming of the Bastille on 14 July 1789, as well as the Fête de la Fédération-- celebrating the unity of the French on 14 July 1790. I'm giving nod to this occasion with a popular French appetizer of snails in garlic butter recipe-- Escargots au beurre d'ail. Apparently a dish I've introduced dozens of my friends to, and to this day they attest this was the dish that broke them into eating snails and their cousins...

Flashback a few months, I'll never forget when the twins came home one day after school begging me to make snails. I asked them if they knew what it was and why the interest. A classmate was bragging he ate snails, and so now not only did my boys want me to make it for dinner; they also wanted to take it for school as a snack. I made escargots au beurre d'ail using canned snails- tasty they say but not sure of the chewy texture. Pretty sure they won't ask me to make it again-- but so cool that they asked and tried it though...


You can buy escargot dishes at the dollar store-- the ceramic dish usually contains six pocket holes.

Escargots au beurre d'ail
For about 36 snails in a can

1 tsp. olive oil
1 Tbsp. butter
1 shallot, finely chopped or 2 Tbsp. finely chopped onion
1 or 2 garlic cloves, minced
1 can escargot, drained, rinsed and well-drained
3-4 Tbsp. white wine
salt and ground black pepper to taste
bread crumbs (optional)
parsley or chopped green onions (for garnish)

Melt butter and olive oil in a pan on medium-high heat. Sauté shallots/onion and garlic until fragrant and soft. Add the escargots, and cook for about a minute. Then finish with white wine and let simmer for another minute; season with salt and pepper. Place three snails in each of the dish holes along with spoon in some of the butter-wine sauce. You can also sprinkle some bread crumbs on top. Pop in the toaster oven to bake at 375F for about ten minutes until bubbling. Top with parsley or green onions. Serve with sliced French baguette to sop up the juices. Voila!!

Look for canned snails in the canned fish aisle at supermarkets or at specialty seafood stores for premium brands.


For some other French dishes to try-- here is my friend Juli Bailer's Healthibella's Salade Niçoise-- a beautiful French salad from Nice. Vibrant, colourful and healthy with hard-boiled eggs, green beans, cherry tomatoes, boiled potatoes, cucumbers, radishes, olives and of course tuna. And my classic Beouf Bourguignon-- a delicious famous French slow-simmering beef stew made with red wine, bacon, onions and mushrooms. Bon appétit!

Healthibella's Salade Niçoise

Beouf Bourguignon 


Sunday, July 12, 2015

Our Family's Love Affair with Durian...


Oh how we love thee... All of us, loves all of you, all your curves and all your edges, all your perfect imperfections--  Yes, durian is such a star in our household, it should have its own love song! I've had durian growing up at home with my parents, but it wasn't until I had my own family that I've really come to adore this nature's magical treasure. In fact, all my kids were exposed to it as babies, soon after they were introduced solids; for each one we braced our eagerness to see their reactions upon their first taste, and time again it was met with want. And now, when it comes to eating durian, we all lose ourselves to giddiness and anticipation to overwhelming joy when the prickly fruit splits open revealing its golden plump flesh. One that involves cheerleading chants, in-air fist-pumping and swooning ooh-la-las! You can eat it at room temperature or slightly frozen for an icy bite! We love them both ways, although chilled it is less aromatic-- a subtler way to entice beginners to give it a taste.

The durian is Southeast Asia's most highly prized fruit-- the King, and the most controversial because of its overpowering odour. It is the only fruit banned from airline cabins, hotels and some public transport. Native to Southeast Asia, the fruit is roughly the shape and size of a spiky football. Inside the tough skin are about five segments enclosing two or three portions of soft cream to yellow-coloured flesh lobes, each wrapped around a single large beige seed. Both the flesh and seed (after boiling) can be consumed. Those who love it, are lifelong aficionados... those who don't, loathe it with a ten-foot pole. No food out there have I heard such extreme polarizing reactions-- some merely can't get pass the smell let alone attempt to eat it. I've heard people describe the odour as sweet floral fragrance (that's my category) and luscious fine wine and cheese to the complete opposite such as sewage socks, horse manure, rotten onions etc.,

To my family, it is sweet fragrant, its texture, soft and creamy with floral and pineapple undertones, and tastes like no other! We relish in these durian moments, because they bring us together, transports us to heaven and lets us stay in heavenly bliss with each other for a while...

Buying from a durian lady at her bicycle stand in Saigon City with my father-in-law in 2004.

Loved the outdoor Vietnamese fruit markets-- the most astounding fresh exotic fruits abound.

Here are some varieties of the durian tree- there are reported about 30 species of only 9 are edible. The durian contains four to six locales, with one to four seeds each and tastes sweet or bitter or wine-like depending on the type and ripeness.

Photo Credit: http://www.malaysiafruit.com/durian/durian.php

Whole durian is conveniently sold frozen year-round in Toronto, and its the most economical option (sometimes you can find fresh, but they are a few times more expensive and frozen is just as good). I've only seen two types of durian here, and the one I like is plump on top and tapered on the bottom. Since they are frozen you can only rely on its visual-- one that is thin-skinned bearing large ripe and numerous fruit is the goal but it depends on the batch, and it can be a crap shoot. As much as I can control, when looking to purchase a frozen durian, here are things I look for:

1) large plump fruit, with a plump upper body and tapered rounded bottom;
2) number of pronounced segments where the fruit are encased- the more the better;
3) even beige tone throughout, with minimal broken/smashed spikes;
4) no visible cracks, damp or mold spots, trapped insects (blech-- I know)

I usually purchase frozen whole durian of either the Tiger or Fish brands.

It can take half a day or more to thaw the frozen durian enough to slice into it and scoop out the fruit. You can thaw in the fridge or in room temperature. The fruit starts to emit its fragrant aroma when the thawing is well underway. Usually we carefully press between the spikes to see if it is ready to cut. If not frozen to the touch and the skin yields slightly, this is usually the queue to round up the kids to the kitchen.

When cutting durian, you need ample space. The floor is our gathering ground for the slicing ritual, and we lay a few newspaper around and have a plastic bag handy. Contrary to what most do, we don't use a sharp knife or cleaver but rather a butter knife and a large metal tablespoon to get the job done. Locate one of the humps, look for a thin line often visible down the segment and wedge the knife in it to splice. Once you get a crack big enough, pry open with both hands.


Whoa!! Gorgeous, big and creamy! This one contained two fruit lobes.

Spoon them out onto a plate. Or start devouring right away

This segment had one giant lobe!


Repeat until all segments are dugged into. We love filling the plate up with these creamy golden nuggets!


Growing up with durian...
Sebastien at 2 years old. Ask him his favourite fruit-- and he'll tell you right away "durian"!

Matias at ten months making an adorable durian messy-face!


That's two hefty glorious lobes! 

Pure excitement and love!

My husband tells me when he was growing up as a child in Vietnam, his aunt would take emptied durian skins, tie them on their ends and hang them up on her bed posts. This was a way to keep her room smelling fragrant.... suit yourself!

Photo Credit: stinkyspikes.wordpress.com

According to my mom, Chinese belief says that "eating a durian is liken to eating ten chickens", demonstrating its huge health benefits. They're probably right-- I know when I down a few, I feel ready to conquer the night, and since its usually after dinner time, that means sleep... zzzz! Thanks durian for giving me sweet dreams!


Friday, July 10, 2015

Healthibella's Salade Niçoise...


I can't tell you what an honour and privilege it is to have my beautiful friend Juli Bailer grace her presence and unified mind-body-soul eating with us. She is the Founder of Healthibella, a Board Certified Integrative Nutrition Health Coach, a Certified Yoga Instructor and Therapist and a Jamie Oliver Food Revolution Ambassador for SpainKorean-born, raised in New York and living in Palma de Mallorca, Spain with her German husband and two children, her diverse background and extensive travels garners her as a culturally-rich life voyageur. She captivates me with her warm sunny personality, simple but radiant healthy food inspirations and her pleasures with wholesome clean eating. Without further ado, here's Juli sharing her gorgeous salad recipe I am deeply in love with...

Juli Bailer, Mallorca Spain


I’m on a mission to prove that healthy food doesn’t have to be dull or stressful. I wholeheartedly believe that whether you're a busy professional or parent, you can learn how to prepare fresh, simple, beautiful meals for you and your loved ones because food is one of life's greatest pleasures and it should be gorgeous and nourishing! That's why I'm so excited to help my Healthibella clients overcome their unhealthy food cravings and dependence on processed Frankenfoods and transform to eating whole, body-loving food and stop yo-yo dieting for good.

I may be a New Yorker living in Spain, but the other half of my heart adores France. A good Salade Niçoise has come to my rescue many times in my travels throughout France-- partly because I adore salads, but also because I strictly limit wheat and dairy and I don’t eat meat, making eating on the road a bit more challenging. (Thankfully, I don’t have severe food intolerances, so once in awhile, I can enjoy “all things French” and carry on.)


In my take on the great French salad, I obviously veered a bit from the tradition, but kept the ingredients I love to have the most: green beans (French haricots verts when you can find them), tomatoes (I used cherry ones in this case because they’re sweet, cute, and less watery), boiled potatoes, cucumbers for crunch, radishes, olives (the Niçoise-type if you can find them), and of course tuna. It isn’t traditional to use fresh tuna and I don’t eat endangered bluefin tuna, so I prefer to use line-caught olive oil-packed Spanish bonito tuna, which are small-- usually weighing less than 12 kg and are therefore less contaminated with mercury than larger species.

The traditional Nice classic also doesn’t include lettuce, which can water down the other ingredients, but if you’re keen to add more greens (which I usually very much advocate!), a crispy Cos lettuce would work well. I like the various textures of this salad and because it has bonito tuna and hard boiled eggs, it is also very satisfying as a meal-- making it the perfect summer lunch. Prepared in this manner, it makes an excellent and gorgeous plate to bring to a garden party-- simply add the dressing just before serving! Bon appétit!


Healthibella's Salade Niçoise
Serves 4 as a main

4 hard boiled eggs, peeled and halved
250 g olive oil packed bonito tuna, drained
4 cups green beans (preferably haricots verts), trimmed and steamed
1 large cucumber, seeded and cut into small pieces
4 cups cherry tomatoes, halved and lightly sprinkled with sea salt
4 cups small white potatoes, boiled in salted water
1/2 cup niçoise olives
8 radishes, trimmed and thinly sliced
anchovy fillets (optional)

Dressing:
1/4 cup extra virgin olive oil
1/4 cup white wine vinegar
2 tsp. raw honey or maple syrup
1 tsp. fresh lemon juice
2 tsp. fresh tarragon, minced
2 tsp. dijon mustard
pinch of sea salt
dash of freshly ground black pepper
1 anchovy filet, minced (optional, if you know everyone is on board with the fishy flavour)


On a large platter, arrange a row of each: tuna, eggs, green beans, cucumbers, tomatoes, potatoes. (If you’re serving a group, it’s probably better to put the eggs and tuna on one end in case someone on a vegan diet wants part of the salad). Scatter olives and radish slices evenly around the salad. Combine all dressing ingredients well in a clean jam jar or your fabulous Jamie Oliver Flavour ShakerDrizzle with dressing just before serving.


Susan says, "Absolutely exquisite! Beauty on a plate and for the palate and soul!"

Head over to healthibella.com for more about Juli's health coaching programs, Farm To Table cooking courses, health and wellness tips, superfoods, and recipes! Rest assured, the Healthibella way of eating is about balance, not starvation or liquid-only diets, and there is no outdated calorie counting because all calories are not created equal. All Juli's recipes are sugar and wheat-free, and most are gluten and dairy-free, with the majority being purely plant-based and even compatible with the Clean Program 21 day detox-- but you wouldn't know that from a taste test! Her recipes are designed for you to reap nature's whole food goodness to help you reach and maintain your ideal weight, have clear glowing skin, and amazing energy!

Here's to your radiant health, inner serenity, and to gorgeous food for life!... Juli


Wednesday, July 8, 2015

Rice Noodles with Smooth Eggs and Shrimps (Wat Dan Ho Fun)...


I can't get enough of noodles, but I have a particular fondness to ho fun. I love it cooked dry like Cantonese Stir-Fried Beef Ho Fun, but when it's soppy wet with a gravy sauce, I can't resist... This dish with its smooth glistening egg sauce is one that falls in this swooning pleasure zone! I gleefully order it at restaurants but it never occurred to me how easy it is to replicate at home, plus you cut out all the extras- such as MSG, excess soy and salts that are added. I am glad to say I gave it a go and so delighted it turned out deliciously! From my kitchen to yours...


Rice Noodles with Shrimp and Smooth Egg (Wat Dan Ho Fun)
Makes 6-8 servings

1 lb. ho fun flat rice noodles

300 g frozen medium shrimp, thawed and deveined
salt and ground white pepper
1 clove garlic, minced
1 Tbsp. soy sauce
1 Tbsp. oil for stir frying
1/2 lb. gai lan, or other Chinese greens, washed, drained and cut into 3-inch pieces

Gravy:
3 cups chicken broth (if using can broth, taste and adjust gravy ingredients accordingly)
1 Tbsp. oyster sauce
2 tsp. soy sauce
1/2 tsp. sugar
1/4 tsp. sesame oil
2 eggs, beaten
2 Tbsp. cornstarch mixed with 1/4 cup of cold water


Mix shrimps with 1/2 Tbsp. salt and 1 cup cold water; let sit for a few minutes. This will allow the shrimps' impurities to be released (the water will turn grey and slightly foamy). Rinse with cold water until water runs clear. Pat dry and season with salt and pepper. Combine the first five gravy ingredients in a bowl or measuring cup and have ready before stir frying.

Pull apart the rice noodles. Even if the noodles are fresh, blanching them in boiling water for one minute helps loosen the strands and remove excess oil. Otherwise, refrigerated noodles will take about five minutes to cook; it will also make stir-frying easier. Drain. If not using immediately, run cold water through to stop it from cooking and so they don't stick together.

Heat 1/2 Tbsp. oil in skillet/wok, add garlic and shrimps and cook until shrimps are translucent about three minutes. Remove onto plate. 

Heat oil in a wok/skillet on medium high heat. Add noodles, stir fry until they begin to soften and separate a bit. Add soy sauce, stir fry until noodles separate fully, and surface of noodles begin to brown, or even burn (this will add that delicious ‘wok hay’ taste). Set noodles aside in a large dish.

I made a pot of black silken chicken soup, so I used its broth for the gravy. 

Turn the wok up to high, pour in the gravy mixture. Let come to a boil, then simmer on medium for 3-4 minutes. Add in vegetables and cook until crisp-tender. Add cooked shrimp; slowly spoon in cornstarch mixture until gravy is thick enough to coat a spoon.

Turn heat off, pour beaten eggs into the gravy. Stir until cooked for a fine egg texture or stir gently only a few times if you want large egg pieces. Pour gravy onto the rice noodles, serve while hot.


Yep,  super smooth alright!

May I add, even if your kids are super with chopsticks, you may need to bring forks to the table just in case... first of all these are noodles, they are wet and then they are slippery! Enjoy!


Monday, July 6, 2015

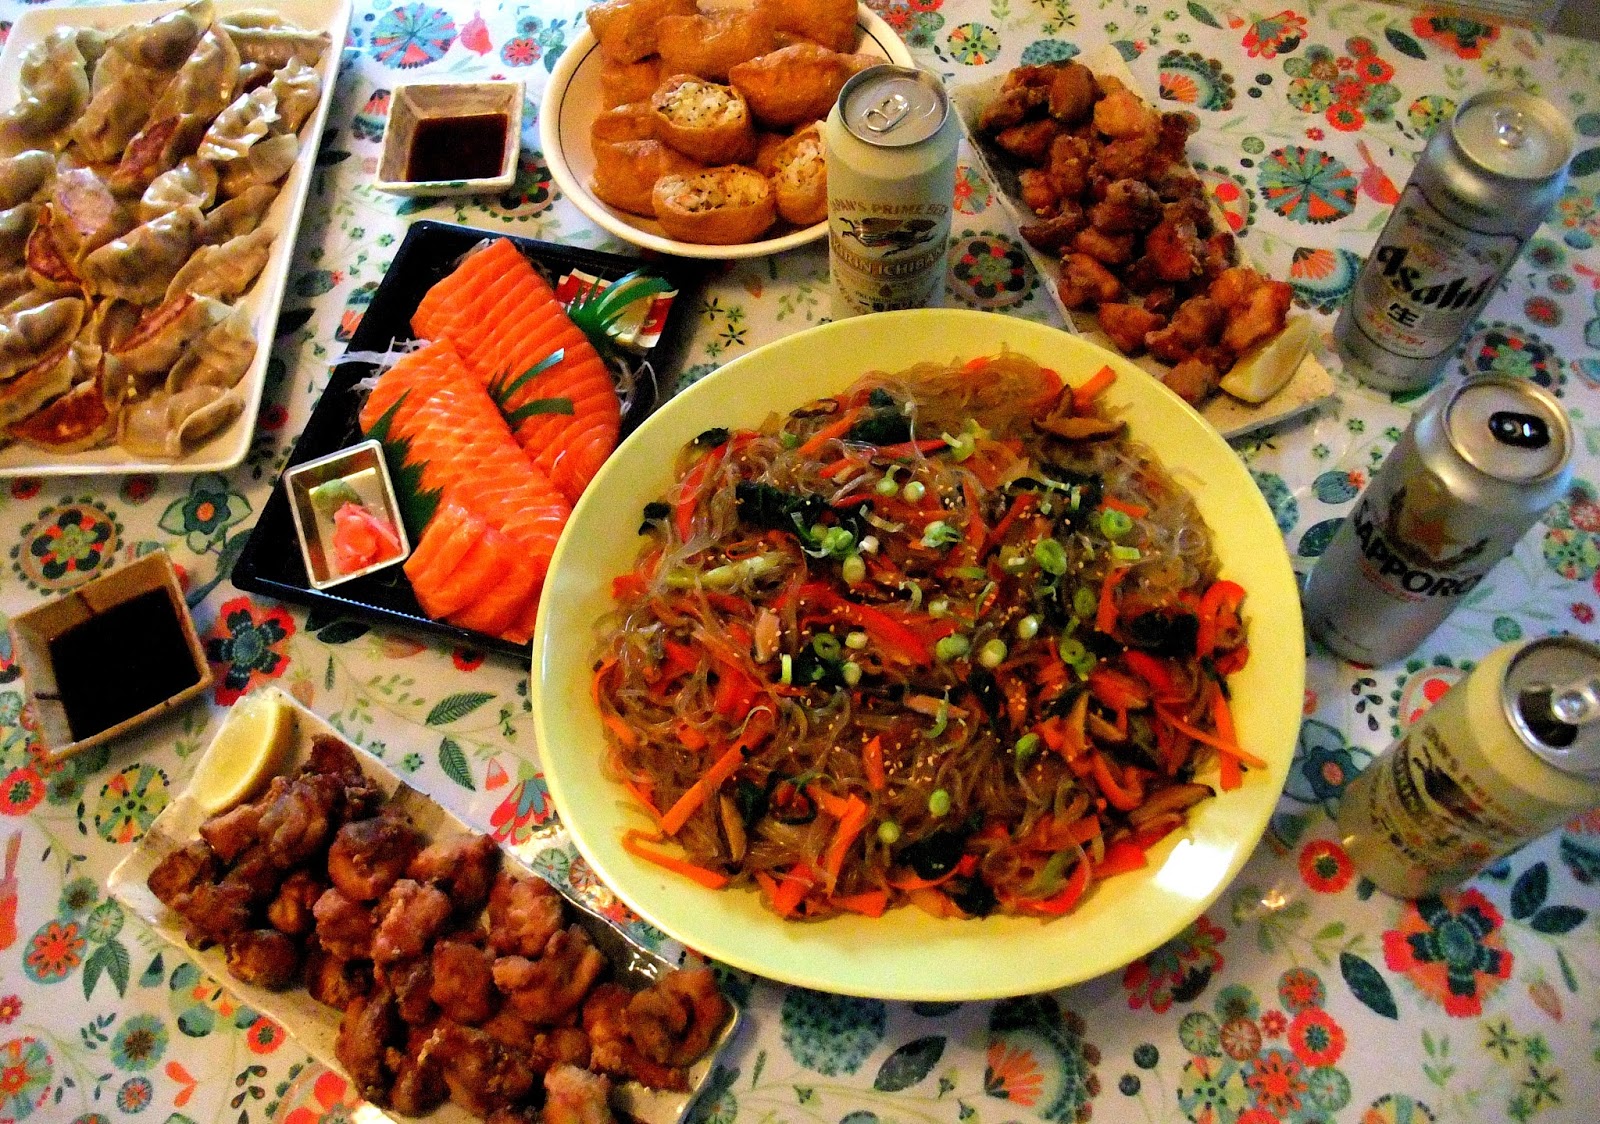
Japanese Eats with Inari Zushi and Deep-Fried Chicken Karaage...


Women's FIFA Finals yesterday and we wanted to cheer our team Japan on with dinner at my place with none other than Japanese eats. Two menu ideas I've always wanted my Japanese sister-in-law to teach me to make were Inari Zushi and her version of Chicken Karaage. This was the perfect occasion to do it! 


Inari Zushi is not your accustomed sushi. These are fried tofu pouches, that are stuffed with sushi rice and other vegetable filling-- perfect for vegetarians. This is a nice alternative to onigiri Japanese rice balls wrapped with nori.

Inari Zushi
Makes 14-16 pouches

2 cups short-grained raw rice

2 Tbsp. sake
1 carrot, finely minced
1 burdock, finely minced (do not peel skin away as their a lot of nutrition; just wipe dirt under running water)
konnyaku (devil's tongue), minced (optional)
1 Tbsp. sake
1 Tbsp. sugar
1 Tbsp. soy sauce
1 Tbsp. mirin

1/4 cup seasoned rice vinegar (or warm 1/4 cup rice vinegar to dissolve 2 Tbsp. sugar) 
1 package aburage (fried tofu skin) (containing 8 pieces each)
1 Tbsp. toasted regular of black sesames

Cook rice according to instructions with 2 Tbsp. sake to replace water needed to cook. Combine the sake, sugar, soy sauce and mirin in a saucepan and bring to a boil. Add the vegetables and simmer until the sauce evaporates about five minutes.

Remove cooked rice into a large bowl. Sprinkle the vinegar dressing all over the rice; using sideway cutting strokes toss the rice (this will prevent it from getting mushy) as it cools. If you have a fan that will help the cooling faster. Add the vegetables and sesame seeds, and mix into the rice.

Cut the aburage in half horizontally, and carefully separate the sides of the cut section with your fingers to form a pouch. TIP: If the brand you are using has too much excess oil, remove the excess oil by placing the aburage into a large heat-proof bowl in the sink and pour boiling water over them, stirring to expose all pieces; drain into a colander, rinse with cold water and gently squeeze out the water.


Gently squeeze out the liquid from a piece of aburage; scoop up a portion of rice about the size of an egg in one hand, and stuff it into the aburage pouch. Fold over the cut ends, press lightly to shape, and place cut side down on a serving dish.


Pillowy and delicious-- my kids love these hand-held rice balls; they make a great hearty snack!

Chicken karaage is gaining popularity in the western world especially with all the izakaya Japanese pubs popping up all over-- it's such an awesome bite-sized popper to serve with a mug of beer. The word "kara" has Chinese origins and "age" means deep-fried. Crispy on the outside with a gingery flavour and succulent on the inside, this is a must. Just a few simple ingredients needed to make your own at home-- give it a try!

Deep-Fried Chicken Karaage
Makes 4 to 6 servings as an appetizer

2 pieces (~300 g) boneless chicken thighs
1 piece fresh ginger, minced or grated (1 to 1-1/2 tsp.)
1 Tbsp. sake
1-1/2 Tbsp. soy sauce
~1/2 cup potato starch or cornstarch, (I prefer potato starch to yield lighter, crispier results)
peanut oil or other vegetable oil for deep frying
a few drops sesame oil (optional for extra flavour)

Cut up the chicken thighs into bite-sized pieces. You can take off the skin if you like, though it does make the chicken crispier.

Put the chicken pieces in a bowl. Add the grated ginger, sake and soy sauce; mix well. Let marinate for 30 minutes is ideal, otherwise the salt in the soy sauce draws out too much moisture from the chicken.

Heat the oil; test with a single piece of chicken or a small piece of skin. Pat the chicken pieces dry and toss enough potato/cornstarch into the marinated chicken so that each piece is completely coated. Fry the chicken pieces in batches until a deep golden brown. Drain well - a wire rack is best for this, but paper towels work too.


Serve with lemon wedges, Japanese kewpie mayo and/or ponzu sauce.


Other items on the menu were Japanese gyoza dumplings-- filled with ground pork, cabbage, ginger, green onions and garlic. Click here for a complete step-by-step on how to make and wrap dumplings. 

Everyone pitches in! Even my 7-year old nephew who is a dumpling wrapping pro!

Salmon sashimi and Korean Chap Chae Noodles (I know it's not Japanese) but the dish really rounded out the spread. And of course we need Japanese beer!!!


Korean Chap Chae Noodles


It was a disappointing lost to USA, but these American girls played amazingly. Congrats to both teams! Here's to the next FIFA game in 2019! BANZAI!