Monday, October 20, 2014

Tonkatsu (Japanese Fried Pork Cutlet)...


Glistening pork cutlets, breaded with delightful crispy crumbs and dunked in bubbling hot oil until incredibly juicy, crunchy and golden... that my friends, is Japanese tonkatsu. Thanks to an inventive chef named Kida Motojiro, in 1899 he came up with this dish during which Western food was newly popular in Japan... instead of lacy tempura batter, why not deep-fry pork dipped in batter, and coated thinly with panko crumbs- an aha! moment. He continued to tinker with various cuts of pork and side dishes and finally settled on perfect accompaniments of thinly sliced raw cabbage and Japanese Worcestershire sauce- the classic original pairing up until this day!  A tonkatsu boom took off across Japan and a new comfort food was born, lovingly savoured both in the restaurants and at home.

I love tonkatsu with bite.. the secret to extra crunchy tonkatsu is double battering with flour and egg! Incredibly satisfying and easy to whip up, you'll be an instant star at the table when the kids and adults alike come beckoning for seconds! 
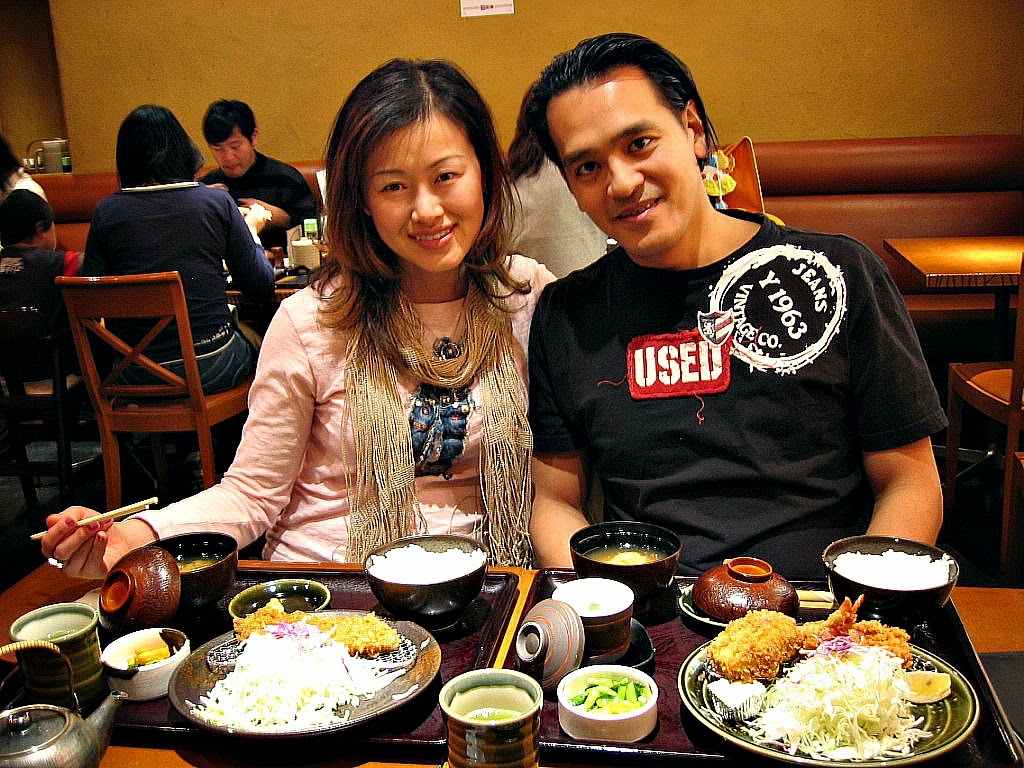
My husband Quoc and I enjoying lunch in a Tokyo tonkatsu restaurant in 2006.

Classic tonkatsu served with cabbage, rice and hot mustard for dipping.

Variations include deep-fried shrimp and potato cakes. 
Original Tonkatsu
Makes 4 servings

1/4 cabbage (a green cabbage is traditional but works with any cabbage- I used Taiwanese)
4 boneless pork loin or rib loin (about 1 lb.)
salt and ground black pepper to taste
2 eggs, beaten
1/2 cup flour
2 cups panko
oil for deep-frying (I prefer canola)
Tonkatsu sauce (Bulldog brand), Japanese karashi mustard and/or prepared Japanese curry for serving


Prepare the side cabbage salad (I like to also add chopped parsley or cilantro and thinly sliced red onions for colour and flavour). Make it ultra-crunchy by following these steps and tips: 


Photo Credit: Japanese Soul Cooking cookbook by Ono and Salat

Cut the sinew running between the fat and lean tissue with a knife. Pound the meat with the knife's flat side or meat mallet about 6 to 8 times on each side to flatten to 1/2-inch thick fillets. Sprinkle with salt and pepper. 

TIP: Use a saran wrap to protect your cutting board and to cover your pork before pounding.

Prepare four plates. One for flour, one for eggs mixed with a Tbsp. of water, one for the panko and the last to hold the breaded fillets. (I'm making up a few more pork chops for the next day).


Start by dredging a fillet in flour on both sides and shake off excess. 


Secondly, dip the fillet in egg, coating both sides. Thirdly, repeat the process with flour and egg on both sides. 


Finally, lay the fillet on the panko crumbs. Pile panko on top and press with firmly to ensure a generous layer coats both sides. Repeat with the remaining pork and place them on the empty plate.


Fill a wok or skillet with oil to at least 1-inch. Set up a tray with a cooling rack on top to drain and rest the cooked pork cutlets t ensure they stay crispy on both sides. Turn the heat to medium-high. Oil is ready when a skewer inserted into centre of oil has bubbles rising around it. Let the pork slide gently into the oil. When the surface of the pork cutlet hardens and becomes light brown, reverse to fry the meat thoroughly. Retrieve and drain on the cooling rack. Repeat with remaining pork. 

Cook's NOTE: Too cold or too hot the oil, the dish is ruined. In Japan, they say to deep-fry the tonkatsu until it's the colour of kitsune- the golden brown hue of a fox. 

Today I also made Japanese curry from a box to make the meal more heartier.

Slice the tonkatsu into strips. For each serving, place the pork on a plate, along with heap of sliced cabbage and a dab of Japanese karashi mustard (make a decent replicate with 2 parts Dijon mustard and 1 part prepared wasabi). Serve with tonkatsu (Bulldog) sauce on the side and/or prepared curry if you wish for a heartier meal. Make Japanese Curry in a Hurry minus the meat. Serve piping hot with steamed rice.


Tonkatsu comes out ultra crunchy with juicy succulence...

The cabbage salad is extra delicious with a helping of Japanese Kewpie mayonnaise.

A huge hit at the table... From the mouth of my babes... Thanks mom, I wish I could eat this everyday!


Give Japanese Curry In a Hurry a try- simply follow the steps on a package of Japanese curry and dinner is served. And I highly recommend Curry Beef Rice Korokke (Deep Fried Croquettes)- they're out of this world!!

Curry Beef Rice Croquettes


Saturday, October 18, 2014

Persian Kotlet (Meat Patties)...


Kotlet is a Persian dish of delicious savoury patties made from ground meat, potatoes, onions, herbs and spices.  It’s incredibly tasty, and dead easy to make. If you can make a meatball, you can make kotlet!  They are perfectly portable making it a hand-held treat- my kids absolutely loves them! I have Iranian in my family (my three cousins who are sisters all married Iranian, and their kids are all gorgeous may I add). However, in spite of our Chinese mixed Iranian festivities involving food over the years, this dish was first introduced to me by my Iranian neighbour. I mean the intoxicating smell wafting out of his window, had me stopped in my tracks many a time as well as my kids, just taking in the heavenly aroma and easily whetting our appetites. We knock on each other's door often sharing food from our kitchens and this one I had my hand way up to try! I couldn't expect him to send some over every time, so I happily make my own... fiddled around with a few recipes and came up with this one that I think my neighbour Hassan would approve!


Persian Kotlet
Makes 20 patties

1 lb. lean ground meat (beef or pork or half-half)
1 onion, finely chopped
2 large potatoes, peeled and grated (water squeezed dry)
1 clove of garlic, minced
1 large egg
1 bunch of parsley or cilantro, finely chopped
1 tsp. turmeric
1/4 teaspoon saffron powder or threads*, dissolved in 1 Tbsp. of hot water
1/2 cup dried bread crumbs
Salt and pepper to taste
Oil for frying


I used lean ground beef and cilantro in the kotlets today.

*If using saffron threads, pound with bottom of knife in a
small bowl before adding water to dissolve.

Squeeze water out of grated potatoes or patties will be too moist and fall apart.

In a large bowl combine all the ingredients except oil and mix well. 


Take a handful of the mixture; flatten into an oval or a round shape. 
Heat some oil in a large non-stick pan on medium-high heat; pan-fry patties until browned on both sides about six to seven minutes total. Place on a paper towel-lined plate to drain the excess oil. TIP: to make extra crispy patties, make them slightly smaller and flatter like a rosti.


Serve warm or cold with your choice of sliced tomatoes, onions, Arabic-style pickles, pickled hot peppers, olives and warm pita bread. I like to also serve kotlet with lime wedges, a sprinkle of sumac (a must tart berry spice in Iranian food) and creamy mayonnaise to dip.


Crispy grated potato on the outside, moist tender centres and overall saffron-onion fragrant!

Served on top of my beloved Iranian block print table cloth. I just love Persian design and ornamentation. So rich and colourful!


You can also try Beef Kaftas with Tahini-Lime Sauce. Both this recipe and kotlets are great served wrapped up or stuffed in a pita for lunch or a quick eat on-the-go!


Thursday, October 16, 2014

Simple Steamed Fish Fillets with Ginger and Onions...


We love fish in this household but I find we could be eating more of it... at least once a week is ideal! Although we adore fresh whole fish once in a while, I like to use frozen thawed fillets as they are convenient to take out of the freezer to thaw overnight in the fridge, and you don't have to contend with fish bones especially the young kids. I always make sure to have frozen skinless basa fish fillets on hand. They are cheap and plentiful, and you can count on a further deal at Asian supermarkets. Cantonese Chinese cuisine is not complete without a dish of steamed fish with ginger and green onions, usually done whole, however using frozen fish fillets is just as delicious and a cinch to prepare! 

Simple Steamed Fish Fillets with Ginger and Onions
Makes 4 to 6 servings


3 large basa fish fillets (about 1 lb.), thawed overnight, drained and patted dry
A few dashes of ground white pepper
1 Tbsp. Chinese cooking wine
3 slices of ginger, peeled and cut into thin strips
2 green onions, cut into 2-inches, then cut vertically into silken strips
4 sprigs of cilantro, stems removed and chopped (optional)
1 Tbsp. canola oil
2 Tbsp - 1/4 cup seasoned soy sauce for seafood (*see note below)
1/4 tsp. sesame oil


Cook's NOTE: You can use any firm flesh white fish such as catfish, sole or sea bass.


Make sure to pat fish dry. Slice the fillets in half along its centres.

Cut fish fillet into 2-3 inch pieces. Lay the pieces on a heat-proof plate, dash some pepper and drizzle cooking wine on top. Scatter ginger strips over the fish, cover with lid and steam for 10-12 minutes.


As soon as the fish is done, carefully remove it from the steamer or skillet. Discard the fish water and ginger strips. Lay the onions and cilantro if using all over fish.


Heat up a pan over high heat and add cooking oil, swirl around until it’s smoking hot. Pour the oil over the steamed fish. Drizzle over with the soy sauce and sesame oil.


*Did you know you can buy soy sauce specifically for seafood? If you wonder why the soy sauce tastes particular harmonious and delicious on whole fish in Chinese restaurants it's because they use a brew that is made for fish- savoury but slightly sweeter to bring out the natural sweetness in its meat. Once I figured this out, I can't go back to any ol' soy sauce on fish. Look for it in the soy sauce aisle in Asian supermarkets. Pearl River Bridge is particularly tasty. TIP: If you can't find seasoned soy sauce for seafood make your own mixture with 2 Tbsp. soy sauce, 1 Tbsp. cooking wine, 1 Tbsp. water and 1 tsp. brown sugar. Use sparingly.

I always serve some sort of Chinese greens with Chinese-style fish. Today I used yu choy.

Matias digging in!


No matter how you serve it, you know you're giving your family a healthy dose of omega-3 fatty acids, protein, vitamins, and nutrients. So come all, let's eat more fish- it really does the body good!


Tuesday, October 14, 2014

Smita Chandra's Home-Style Butter Chicken...


I am super excited to introduce you to Smita Chandra, a renowned Indian cookbook author, cooking instructor, brand ambassador, food consultant and spokesperson for various food companies, and her vast culinary talents and experiences goes on. She also develops recipes for Kraft's South Asian platform Kraft Ka Khana and I had the pleasure to meet her before I left Kraft Kitchens. She's simply the sweetest person and extremely passionate about food and travel, and teaching. I invited her to guest blog on Susan's Savour-It with an Indian recipe that appeals to families and that is great for fall... I think we can all agree butter chicken fits this bill in so many ways.  Without further ado...

Smita Chandra, a leading authority
on Indian cooking.
Butter chicken is one of the best known and best loved dishes of Indian cuisine. Ask anyone what their favourite Indian dish is and chances are they will say it is Butter chicken! 

There is something almost addictive about the rich, creamy, mildly spiced tomato sauce, studded with succulent morsels of roasted chicken. If you are trying to get your kids used to eating a bit of spicy food, this is the dish to get them hooked on! 

It is quite easy to make butter chicken at home. All you need are a few well-chosen spices, tomatoes, butter and cream. My home-style version also has sautéed onions and peppers for added flavour and texture. You can throw in any veggies that you like such as sliced zucchini, roasted cauliflower, fava beans, or whatever you have lying around in your refrigerator. 

I like to use boneless skinless chicken thighs because they have better flavour than its breasts and they don’t dry out with long cooking. However, you can easily substitute chicken breasts if you like and cut down on the cooking time. 


Smita's Home-Style Butter Chicken
Makes 4 servings

1-1/4 lb. boneless skinless chicken thighs (about 8 large), trimmed of fat and cut into bite sized pieces 

For the marinade:
2 Tbsp. vegetable oil
Salt to taste
1/2 tsp each: ground coriander, ground cumin, garam masala, dried fenugreek leaves, cayenne pepper, turmeric 

For the sauce: 
2 tbsp oil
½ tsp cumin seeds
½ inch ginger, minced
2 cloves garlic, minced
1 medium onion, finely chopped
½ sweet red pepper, diced
½ sweet green pepper, diced
1 can (796 mL) premium whole plum tomatoes (San Marzano-style), pureed
1/2 tsp each: ground cumin, ground coriander, garam masala, cayenne pepper, dried fenugreek leaves and sugar
Salt to taste
1/4 cup whipping cream
2 Tbsp. butter

Garnish with chopped fresh cilantro,  2 Tbsp. lemon juice


Place chicken in a large mixing bowl. Add all marinade ingredients and toss well to coat. Cover and marinate for 15 minutes or longer in the refrigerator. 


Meanwhile, preheat oven to 425F. Line a baking tray with parchment and evenly spread marinated chicken in a single layer. Bake for about 15 minutes or until chicken is tender and lightly browned. Transfer chicken to a bowl, along with all of the juices. 

Roasted chicken out of the oven.

Warm oil in deep skillet over medium high heat. Add cumin seeds, let sizzle for 30 seconds. Add ginger and garlic, sauté for 30 seconds. Add onions and sweet peppers and sauté for eight to ten minutes until lightly browned and softened. Add tomatoes, all the spices, salt and sugar. Reduce heat to medium low, cover and cook till the mixture thickens slightly, about ten minutes. Add cream, butter and reserved cooked chicken with its juices; mix well with the sauce. Cook for ten minutes for flavours to blend. Remove from heat; fold in fresh coriander and lemon juice.


Susan says: "Aromatic, rich and velvety... can't wait to make this restaurant favourite in my home!"

For a vegetarian version of this dish, substitute cubes of paneer (Indian cottage cheese) for the chicken. Smita pairs butter chicken with steamed basmati rice, Wilted Spinach Raita and Alu Gobhi

If you are interested in home-style Indian cooking, Smita has a collection of mouth-watering recipes made specifically for the home cook http://smitachandra.com/recipes/ and a food travel blog http://smitachandra.com/blog/ that will entice you to pack up your bags and throw in a fork, knife, spoon and a pair of chopsticks and go meandering across countries in search of culture and the next tasty bite!


Monday, October 13, 2014

Best-Ever Brownies...


Decadently dense but moist, nutty and absolutely chocolatety over sugary, this was a sweet ending to a lovely Thanksgiving dinner and weekend...

Best-Ever Brownies

Makes 16 brownies

1 cup pecans, toasted at 325F for eight minutes or until golden, cooled then chopped
1 cup all-purpose flour
1/4 cup cocoa powder
1/4 tsp. salt
4 squares Baker's semi-sweet chocolate (I am partial to Baker's as I used to work for Kraft)

2 squares Baker's bittersweet chocolate
1/2 cup unsalted butter, cut into pieces
3 eggs
3/4 cup granulated sugar
2 tsp. vanilla


Cook's NOTE: Baking with some bittersweet chocolate creates a richer, less sweet flavour than with all semi-sweet chocolate. 


Spray a 9-inch square baking dish with oil. In a small bowl, stir flour with cocoa and salt. Coarsely chop chocolate; place in a medium-size bowl along with butter.


Microwave chocolate and butter on medium until almost melted, about two minutes. Use a rubber spatula to stir chocolate halfway through microwaving. Then stir until smooth. Let cool.

In a large bowl, whisk eggs, then sugar and vanilla. Using a spatula, scrape in cooled chocolate mixture, then stir until well blended. 


Gradually stir in flour mixture, just until incorporated. (TIP: Over mixing toughens brownies and makes them firm rather than moist.) Stir in nuts until evenly distributed. Spread batter in baking dish. Smooth top.


Bake until edges are firm and middle is set, 35 to 45 minutes. Don’t overbake. (A toothpick inserted in the centre may have chocolatey crumbs clinging to it.) TIP: If you bake in a toaster oven (this will save on energy over an oven as the pan size fits perfectly in most), bake at 325F for 25 minutes. 

Remove pan to a rack and cool. Cut into 16 squares. Brownies will keep well, covered, at room temperature for up to three days or in the freezer up to one month.


If you are toting or packing to eat later, make sure to cool completely on a rack before doing so.

Ahh.. look at my chocolatety moist centres... delish!!

Variations: Substitute pecans for skin-off toasted hazelnuts or blanched toasted whole almonds.Jazz up brownies with generous pinches of cinnamon, nutmeg or cayenne. Stir into flour before adding to the egg mixture. Or go all out by stirring 1/2 cup chopped Skor bars, toffee bits or dried cranberries into batter along with nuts.

I hope everyone had a Happy Thanksgiving! I know we did!...

Let the good times roll...