Showing posts with label Breakfast. Show all posts

Monday, April 18, 2022

Newcomer Kids Cooking Program with CultureLink...


What fantastic fun we had over eight weeks getting newcomer kids cooking and learning about healthy food and recipes 🍎🍌🥭🍇🍈!

I ran an eight-week virtual culinary program for newcomer kids 6 to 12 years old at CultureLink funded by IRCC. CultureLink is a prominent settlement and community organization in the west end with over 30 years’ experience in developing and delivering services to meet the needs of our diverse communities. Recipe ingredients were provided weekly in a grocery kit pick up to cook along with me 👩‍🍳👨‍🍳💞! 


Fruit Kebabs with Honey Yogurt Dip highlighted my first kids' cook along workshop. We talked about the beauty of the rainbow of fruits, skewered or made into a fruit salad with the bounty of colours. I loved the kids' engagement and their eagerness to show off their results before happily gobbling them up 🤗.


Then it was oats prepared three ways cooking with kids! 
Crunchy homemade baked granola to eat by the handfuls as a snack or topped in a yogurt parfait, plus hand-rolled power balls with PB and oats!


No Bake Power Balls or Energy Bites

The following session was on eggs, and asking the question of all time- which came first? The chicken 🐔 or the egg 🥚??

Infinite. The best answer is infinite, because the question loops on end!! And of course, being a chicken and rooster lover, I had to show off my 🐓 wares.

Egg salad and cheese omelets 🍳!! Always a creative and delicious time! We got egg salad cracker sandwiches, omelets studded with sausages and a whole smorgasbord of egg and beyond goodies fit for a restaurant meal. So proud of these cheflings 👩‍🍳👨‍🍳💞!!


Then it was more colour your plate with the rainbow of veggies 🥕🍅🍄🥬🌶...

Take your pick! Pinwheel veggie wraps or veggie pizza baguettes (ok I snuck some pepperoni in there) with simple green salad and jam jar vinaigrette 🍕🥗.

Veggie Pinwheel Wraps

Veggie Loaded Pizza Baguettes

March Break baking fun was had with my revered oatmeal cookies- crispy on the outside, chewy with all the yummy goodness inside 😋. Lots to share with friends!! 🍪🍪🍪 Click for Susan’s Chewy and Crispy Oatmeal Raisin and Chocolate Chip Cookies recipe.


Oodles and oodles of noodles workshop with kids' versions of Chinese veggie lo mein 🥦🥕🍄🍜!


Look at all that fresh colour!!

A Taco Fiesta Contest wraps up my after school culinary program with kids @clink_youth 🌮🌮🌮! Combining cooking and art to introduce families to the new art innovation workshops (also because you eat with your eyes first 👀), kids were put to the challenge of designing their tacos and judged based on creativity, customization and presentation! The last three photos were the 3 winners of 3 cool lunch boxes! Congratulations 👏! But everyone is a winner and got prizes- a tote with safe kid-friendly kitchen tools 🔪🥄! #playwithyourfood


Excellent creativity everyone!!


This says it all... Until next time!

I am waiting to hear back on a similar Spring culinary program with CultureLink-- Stay Tuned!


Monday, December 14, 2020

Dim Sum with Sticky Rice Pearl Meatballs and Egg Tarts...


Yum cha my friends with sticky rice pearl meatballs and Chinese egg tarts dan tat...

My last Fall term with Learn4Life.ca Toronto learners and we are going out in dim sum style with these steamed cuties and baked yummies!

Pearl meatballs are not typical at dim sum, but can appear on Chinese new year menus and banquets for special occasions. It originated in Hunan and brings the family together rolling these balls at the table. I'd say it was perfect to mark the end of my weekly Asian Cooking Program term teaching online for the first time and with a great bunch- a special memory forever 💞! Sticky rice means bonding ties, and many learners are returning for my winter term, which is amazingly already full!

But for now I am officially on Holidays unless something else crops up. Looking forward to some down time, but still lotsa cooking and development in the horizon. Now off to my neighbours toting these tarts 🤗!


Sticky Rice Pearl Meatballs
(adapted by WoksofLife.com)
Makes ~20 meatballs

3 cabbage leaves or thawed banana leaf, dried lotus/bamboo leaves, soaked overnight
¾ cup glutinous rice, soaked in water to cover according to package or for six hours
1 lb. medium ground pork (need 20% fat) 
⅓ cup canned water chestnuts, minced
2 tsp. minced ginger 
3 Tbsp. minced green onions (just the white parts)
3 Tbsp. cold water
2 Tbsp. Shaoxing wine
2 tsp. cornstarch
¼ tsp. ground white pepper
½ Tbsp. sesame oil
1 tsp. sea salt
½ tsp. sugar

In a large bowl, add the ground pork, water chestnuts, ginger, the green onions, water, Shaoxing wine, cornstarch, white pepper, sesame oil, sea salt, and sugar. Stir to combine everything well, whipping in just *one* direction for at least 5 minutes until the filling becomes fluffy and sticky. Cover and marinate in the refrigerator for 30 minutes. 

Meanwhile, prepare the steamer. Wash the cabbage leaves or cut the banana leaves/ trim the lotus or bamboo leaves, and use them to line the steamer.

After soaking the glutinous rice, drain well and do your best to shake off any excess water.

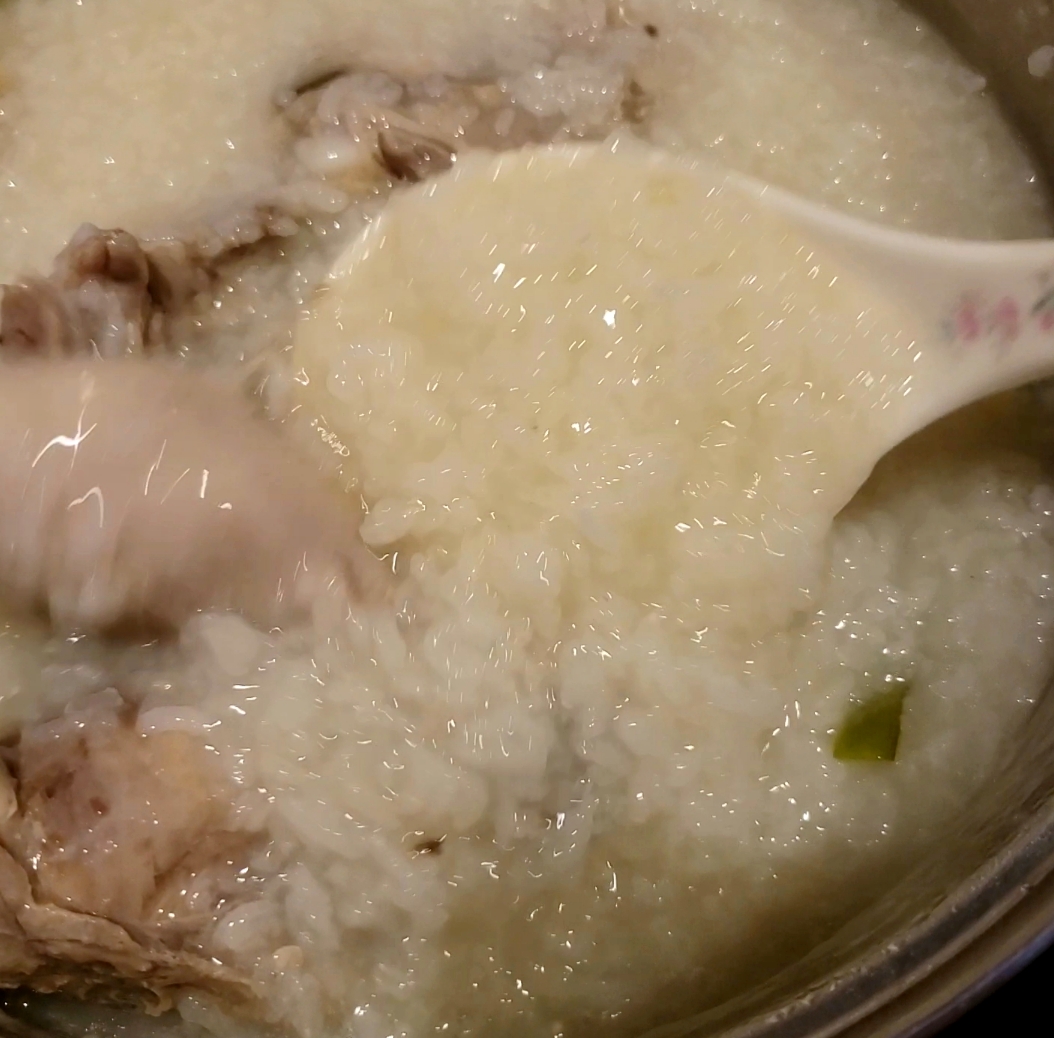
Remove the meat mixture from the fridge after the 30 minutes has elapsed. Take a heaping Tablespoon of meat filling, form a ball and roll it in the glutinous rice so that the whole surface is coated. Roll it between your palms lightly to ensure all the glutinous rice adheres to the meatball. Position the meatballs on the lined steamer with about ½ an inch of space in between each meatball.

To cook, start with cold water with the steamer covered. Steam over high heat for 20 minutes. After steaming, turn off the heat, and let the meatballs sit with the cover on for three additional minutes before removing the lid and serving.

Serving Suggestion: Lao Gan Ma spicy chilli crisp oil and soy sauce. 


Sticky Rice Pearl Meatballs
(adapted by WoksofLife.com)
Makes ~20 meatballs
3 cabbage leaves or thawed banana leaf, dried lotus/bamboo leaves, soaked overnight
¾ cup glutinous rice, soaked in water to cover according to package or for six hours
1 lb. medium ground pork (need 20% fat)
cup canned water chestnuts, minced
2 tsp. minced ginger
3 Tbsp. minced green onions (just the white parts)
3 Tbsp. cold water
2 Tbsp. Shaoxing wine
2 tsp. cornstarch
¼ tsp. ground white pepper


If you like chili oil, you HAVE to TRY Lao Gan Ma's Spicy Chilli Crisp made with fried chilis, onions, and prickly ash Szechuan peppercorns that gives a tingling sensation, and not too spicy- our fave condiment here these days!

Here are pearly meatballs by my student Ingrid 🥰!


When you fail, you try and try again. Tested out a few dan tat recipes until satisfied at round #3. I wanted a practical dough recipe that was light, crispy, slightly chewy and buttery that comes together with a hand mixer or just some light kneading that works in a muffin tray. Egg custard smooth, silky and not too sweet! The harmonious dan tat emerged 💗.


Chinese Egg Tarts (Dan Tat)
Adapted by dimsumcentral.com
Makes 12 tarts

Pastry:
3/4 cup butter, room temp. or softened
1/3 cup powdered sugar
1 egg, room temperature
1/4 tsp. vanilla extract
1-1/2 cups all-purpose flour
1/2 Tbsp. cornstarch

Filling:
1/3 to 1/2 cup sugar
1 cup hot water
3 eggs, room temperature
1/3 cup evaporated milk
1/4 tsp. vanilla extract

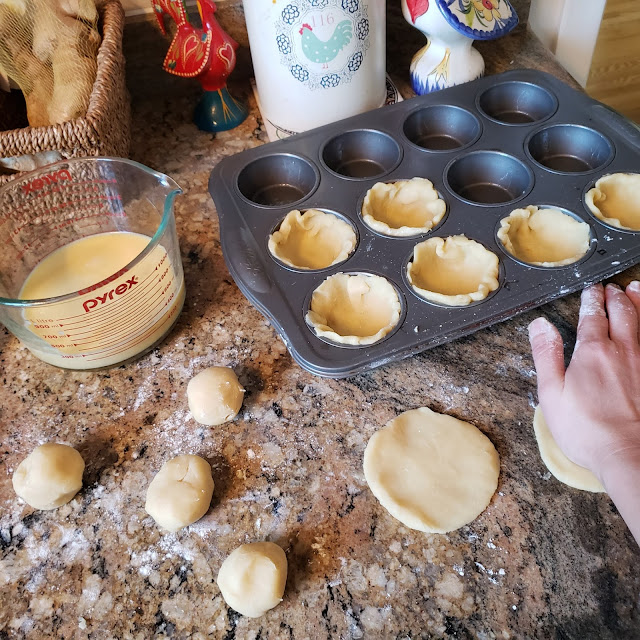
With a hand mixer, cream the butter and powdered sugar until fluffy and smooth. Beat in the egg and vanilla extract. Combine the flour and cornstarch, stir into the butter mixture with a wooden spoon, then knead slightly until a dough ball forms. Add a bit of flour until the dough just loses its stickiness. Wrap and refrigerate the dough for 30 minutes.

Mix hot water and sugar together in a bowl, until the sugar dissolves and cool to room temperature. Then whisk in the eggs, evaporated milk and vanilla extract. Strain through a fine sieve for a smooth filling. Set aside.

Lightly grease your 12 muffin tin tray. After refrigeration, roll the cooled dough out into a log and divide into 12 equal pieces. Roll each piece into a ball and press flat onto the counter to about 4” circles. Lightly press each dough round into a tart tin so that it doesn’t extend over.


Heat the oven to 400 F and place a rack in a low position. Pour the egg filling into the muffin tray until they are about 80% full. Place the egg tarts into the oven, then immediately reduce the temperature to 350 F.

Bake the egg tarts until the filling puffs up into a dome shape, about 15 to 20 minutes. When this happens, reduce the heat to 325 degrees and set the timer for an additional 10 minutes to finish. Remove from the oven, let cool slightly, remove from the tray and serve warm.


Sunday, June 7, 2020

Rhubarb Cream Scones...


Sunday baking with rhubarb cream scones...

Tart like cranberry scones, I tossed a bit of sugar with the chopped rhubarb to sweeten, and finished with a sprinkling of snowy icing sugar. Can't beat garden grown rhubarb- it's thriving beautifully 🌱 with the blessed combo of sun and rain 🌦! Have a beautiful day my friends!


Rhubarb Cream Scones 
Makes 12 scones

1-1/2 cups chopped fresh or frozen rhubarb, thawed (3-4 stalks)
1/2 cup sugar, plus 1 Tbsp.
2-1/2 cups all-purpose flour
1 Tbsp. baking powder
1/2 tsp. salt
1/2 cup cold unsalted butter, cubed
1/2 cup heavy whipping cream
1/4 cup milk
1 tsp. vanilla extract
Icing sugar for garnish

Preheat oven to 400°F. Toss chopped rhubarb with 1 Tbsp. sugar; let sit for ten mins. In large bowl, whisk the flour, sugar, baking powder and salt. Cut in butter until mixture resembles coarse crumbs. Then toss in rhubarb to coat. Do not overwork dough. You should see bits of cold butter in it for flakiness.


In another bowl, whisk cream, milk and vanilla; stir into crumb mixture just until moistened.

Turn onto a floured surface; knead gently 4-5 times. Divide dough in half; pat into two 6-in. circles. Cut each into 6 wedges. Place wedges on parchment paper-lined baking sheets. Brush with a bit of cream for extra golden crunchy tops. Bake 18-22 minutes or until golden brown. Sprinkle with icing sugar and serve warm.


Cook's Note: If using frozen rhubarb, measure rhubarb while still frozen, then thaw completely. Drain in a colander, but do not press liquid out.

Make Ahead or Extras: Freeze prepared uncooked scones sealed and thaw before baking as per recipe.

Absolutely beautiful...
Deliciously crunchy tops yielding to cream soft!


Rhubarb Cream Scones 
Makes 12 scones

1-1/2 cups chopped fresh or frozen rhubarb, thawed (3-4 stalks)
1/2 cup sugar, plus 1 Tbsp.
2-1/2 cups all-purpose flour
1 Tbsp. baking powder
1/2 tsp. salt
1/2 cup cold unsalted butter, cubed
1/2 cup heavy whipping cream
1/4 cup milk
1 tsp. vanilla extract
Icing sugar for garnish

Preheat oven to 400°F. Toss chopped rhubarb with 1 Tbsp. sugar; let sit for ten mins. In large bowl, whisk the flour, sugar, baking powder and salt. Cut in butter until mixture resembles coarse crumbs. Then toss in rhubarb to coat. Do not overwork dough. You should see bits of cold butter in it for flakiness.

In another bowl, whisk cream, milk and vanilla; stir into crumb mixture just until moistened.

Turn onto a floured surface; knead gently 4-5 times. Divide dough in half; pat into two 6-in. circles. Cut each into 6 wedges. Place wedges on parchment paper-lined baking sheets. Brush with a bit of cream for extra golden crunchy tops. Bake for 18-22 minutes or until golden brown. Sprinkle with icing sugar and serve warm.

Cook's Note: If using frozen rhubarb, measure rhubarb while still frozen, then thaw completely. Drain in a colander, but do not press liquid out.


Make Ahead or Extras: Freeze prepared uncooked scones sealed and thaw before baking as per recipe.


Saturday, April 25, 2020

Easy Chinese Chicken Congee...


Congee "jook" for breakfast. For lunch. For dinner. For midnight snack too. This resonates true in a Chinese household. It's the ultimate comfort porridge for any time but especially when you're under then weather with a weary head and off taste buds. When the body simply craves uncomplicated nourishment, it soothes like nothing else. You can cook it plain with just rice and water to serve alongside a few salty side dishes or concoct a variety of porridges by adding meat, vegetables, mushrooms, herbs or eggs. I've always loved the classic flavour combo of pork, salted duck eggs and a thousand year old black eggs. But to make it really simple, I am going to show you how with just chicken legs so you can be on your way to making your very own chicken congee.


You want homemade congee that is glossy with a thick viscous texture for heartiness and oomph. The secret is to use three varieties of rice for their unique textures. Glutinous or sweet rice gives the porridge the stickiness texture (1 part); Jasmine medium grain rice gives the porridge “volume” (2 parts); Japanese or Korean short grain rice gives the porridge the shiny and glossy texture (1 part).


Easy Chicken Congee
Serves 6

1-1/2 lbs. bone-in chicken legs (skinned, cut into thigh and drumsticks (about 3), rubbed with salt and white pepper in fridge for one hour)
2 slices ginger
1 green onion, cut into 2-inch pieces
2 cups rice (1/2 cup glutinous / 1 cup jasmine /1/2 cup short grain rice), rinsed
12 cups water
Salt to taste

After rinsing rise, soak the rice with water to cover for one hour if you have the time. If you don’t, don't bother and skip this step.
Soaking rice speeds up the cooking by kick-starting the absorption of water.


Marinating skinless chicken pieces with salt and white pepper for at least one hour in fridge.

Bring a pot of water to a boil with a tsp. of salt, ginger and onions. Add the chicken pieces. Bring the water back to a boil and cook on medium heat, uncovered. 15 mins. later, add drained rice, stir and continue to cook for 45 mins (total one hour). Stir, pot bottom up every 15 minutes to ensure it doesn't stick.


Cook's NOTE: Add 1/2 cup of water during the last 15 mins. Of cooking if the congee is too thick. Add more water to get the desired consistency. 


Remove chicken at the end of cooking time; shred the tender chicken off the bones with two forks. Return to pot and mix with congee. Season to taste. Serve hot.


At the table, set ground white pepper, salt, sesame oil, sliced green onions, cilantro, shredded ginger and preserved spicy radish as classic garnishes to jazz up your congee.

Here, I have spicy chicken gizzards and lotus root as sides too.

Oh and don't forget those dual fried dough crullers pronounced as Yau Tiew in Cantonese (meaning oil sticks) which are a must companion! Dunk the stick to eat or slice into thin pieces for a crunchy topping. You can pick this up at your Asian supermarket in the bakery or hot table section, especially if that counter is a dim sum one. Just pop it in the oven to warm up.


Always a welcomed hearty pot in our house!


Jook time! 


Full Recipe: 

Easy Chicken Congee
Serves 6

1-1/2 lbs. bone-in chicken legs (skinned, cut into thigh and drumsticks (about 3), rubbed with salt and white pepper in fridge for one hour)
2 slices ginger
1 green onion, cut into 2-inch pieces
2 cups rice (1/2 cup glutinous /1 cup jasmine /1/2 cup short grain rice), rinsed
12 cups water
Salt to taste

After rinsing rise, soak the rice with water to cover for one hour if you have the time. If you don’t, don't bother and skip this step.
Soaking rice speeds up the cooking by kick-starting the absorption of water.

Bring a pot of water to a boil with a tsp. of salt, ginger and onions. Add the chicken pieces. Bring the water back to a boil and cook on medium heat, uncovered. 15 mins. later, add drained rice, stir and continue to cook for 45 mins (total one hour). Stir, pot bottom up every 15 minutes to ensure it doesn't stick.

Remove chicken at the end of cooking time; shred the tender chicken off the bones with two forks. Return to pot and mix with congee. Season to taste. Serve hot.

Cook's NOTE: Add 1/2 cup of water during the last 15 mins. Of cooking if the congee is too thick. Add more water to get the desired consistency.