Wednesday, November 30, 2016

Cereal Is Not Just For Breakfast! Ways To Cook With High-Fibre Cereal...


As a freelance writer & recipe developer for Huffington Post Canada, here is my latest contribution (write-up only not video in original link)-- Creative Food Hacks to Get More Fibre in Your Diet as a sponsored feature for Kellogg's All-Bran Cereals.

SPONSORED FEATURE

Cereal Is Not Just For Breakfast! Ways To Cook With High-Fibre Cereal

Sunday, November 27, 2016

How To De-Seed and Juice A Pomegranate...


It's still November, but everywhere I seem to go and read nowadays is blaring Christmas. My kids urged us to get the family tree up, and for the first time in years, it's erected, decorated and sparkling waaay ahead of schedule! 

Two pomegranates have been sitting on the kitchen counter. My second son loves the pearly bright red seeds, and I thought how lovely it would be to juice them for a beverage-- perfect to toast with as a prelude to the Yuletide season. Not only are they juicy, crunchy pops of tart flavour, they're nutritious-- a great source of fibre, vitamins C and K. Instead of picking the kernels out one by one, we discovered a fun, clever and mess-free way of de-seeding a beautiful pom ode to Jamie Oliver. No more stained fingertips, but just make sure you're not wearing white!


Wash the pomegranate well. Any time you’re cutting into a fruit or vegetable with a skin or rind, you take the chance of introducing bacteria from the outer surface into the edible portion. Slice the pomegranate in half horizontally.

Take one of the halves and hold the cut side down in the palm of your hand spreading your fingers a bit over a medium size bowl. Take a wooden spoon and tap firmly on the top surface and then give it some good whacks to release the red kernels. They tumble out through your fingers into the bowl. Continue to firmly tap until all seeds have been removed. Repeat with other half. Remove any bits of white pith that may have fallen in.


You can also fill the bowl with cold water to release the seeds in.

Here's Jamie Oliver's one-minute video for making de-seeding and juicing a beautiful pomegranate easy.


You can eat the kernels straight (consuming the seeds or spitting them out), or juice them which makes a fine beverage. I find scooping the released seeds back into the empty pom shell and squeezing produces more juice than if you didn't release the seeds first. 

TIPS: Store pomegranate seeds in the refrigerator in an airtight container or zippered bag. They will keep this way for 4-5 days. They can also be frozen and stored for several months. 


Serve over ice or straight! To ringing in the last month of the year!


Sunday, November 20, 2016

Chocolate Ganache Bundt Cake...


It was my youngest son's birthday this weekend! When asked what he wanted to eat at his family party he shouted out ChoCoLate! So chocolate cake it was, but one that would satisfy both kids and adults. And I had the perfect chocolate cake recipe that baked up nicely in a pretty bundt pan. Store-bought icing or frosting just wouldn't do for this lovely, so whipping up a simple delicious ganache was in order, and it poured on divinely. Bespeckled with his favourite of all favourite chocolate candies and we were on our way to chocolate cake heaven!


Chocolate Layer Cake (cake recipe adapted by Canadian Living)
Makes about 12 servings

Chocolate Cake:
1 cup butter, softened
1-1/4 cups granulated sugar
2 eggs
1 tsp. vanilla
2 cups all-purpose flour
1/2 cup cocoa powder
1 tsp. each baking powder and baking soda
1/4 tsp. salt
1-1/2 cups buttermilk (combine 3 Tbsp. white vinegar in 1-1/4 cups whole milk- let sit five minutes)

Chocolate Ganache:
125 g (4 oz.) semi-sweet chocolate, chopped
1/2 cup whipping cream


Grease bundt cake pan OR/ Grease two 8-inch (2L) spring-form pans or two 8-inch (1.2 L) round metal cake pans and line bottoms with parchment or waxed paper. Set aside.

In large bowl, beat butter with sugar until light and fluffy. Beat in eggs, one at a time; beat in vanilla. In separate bowl, sift together flour, cocoa, baking powder, baking soda and salt. With wooden spoon, stir into butter mixture alternately with buttermilk, making three additions of dry ingredients and two of buttermilk. Spoon into prepared pan(s), smoothing tops.

What's better than making a cake with your kids? Oh what fun!


Mix over a sifter to loosen any clumps in the flour or cocoa, and to combine well.


Bake in centre of 350°F oven for 45 to 50 minutes in bundt pan, OR/ 30 to 35 minutes in round cake pans or until cake tester inserted in centre comes out clean. Let cool on racks for 20 minutes. Remove from pans; let cool completely on racks. For the latter, cut each cake horizontally into two layers. (Make-Ahead: Wrap layers separately in plastic wrap and refrigerate for up to one day or overwrap with heavy-duty foil and freeze for up to two weeks.)

All smiles! Getting ready for the big bake!

When making chocolate ganache to glaze or fill layered cake, use a 1:1 ratio with chocolate and heavy cream (tips as per thekitchn.com)

  1. Heat the cream: Pour the cream into a small saucepan and place it over medium-low heat for a few minutes. Keep an eye on the cream-  it's not necessary to boil or simmer it. It just needs to get hot. The cream is ready when you can place a finger in the cream and keep it there for 3 to 4 seconds. Turn off the flame and remove the cream from the stove.
  2. Add the chocolate: Scoop the chopped chocolate into the cream. Stir gently to distribute the chocolate through the cream and then let it sit for a few minutes to give the chocolate time to soften and melt.
  3. Stir the mixture: With a spatula or wooden spoon, stir the ganache. At first it might look spotty and broken but keep stirring until it comes together in a creamy mass.
  4. Cool the ganache: Cool the ganache. If you plan on pouring the ganache over a cake, pie, or pastry, it will need to be loose enough to flow but thickened enough to stay on the pastry. I whipped for two minutes until slightly fluffy for a thicker glaze.

The cake broke a bit when removing from bundt pan. But nothing ganache won't cover up :D


Chocolate ganache ladled over for that drool-worthy drippy look and touched up cracked spots! 
Moist, smooth and decadent!


And the final kiddie touch-- a rainbow of Smarties!


Happiness runs in a circular motion... 
HAPPY BIRTHDAY MY SWEET MATIAS!


Tuesday, November 15, 2016

Spinach Pici With Pancetta, Tomatoes and Artichokes...


Food Revolution Toronto is holding a fun contest underway this month of November. Cook up a plate of Jamie Oliver's made-from-scratch Spinach Pici Pasta from #FamilySuperFood for your chance to win one of five Jamie Oliver cookbooks. You have until Wednesday November 30th 2016 to submit a photo of the version you/your family cooked and share it on social media using the hashtag #CookwithFoodRevTO or at @FoodRevToronto on Twitter or Instagram-- and you'll be entered to win a cookbook! Please see contest rules.

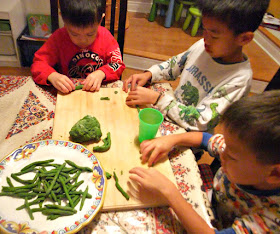
Tonight in this spirit, my three boys helped to create our customized spinach pici for a most delicious Italian-inspired dinner. I told them we were making our own homemade pasta, and their faces lit up with delight. Such a cinch to do with just two-ingredients and loaded with spinach nutrition. Pici is a thick, hand rolled pasta, similar to fat spaghetti usually made from just flour and water and cooks up with a pleasant chew. The result with fresh spinach mixed in the dough resemble that of green beans. The final dish full of vibrant colour and tasty flavours was just as enjoyable to eat as it was making it together. 

Spinach Pici With Pancetta, Tomatoes and Artichokes

The dough has a playdough consistency making it fun to get your kids involved.

To make the Spinach Pici:
Makes about 4 cups to serve 4 to 6

4 cups baby spinach or regular spinach, washed and chopped
2-1/2 cups plain or all-purpose flour, plus extra for dusting
water

In a food processor, blitz the spinach and flour until a ball of dough forms, letting the machine do all the work. Touch the dough – it shouldn’t be sticky, you want a playdough consistency, so add if needed, a bit or water (if too dry) or a little more flour (if wet). To make the pici, simply tear off 2 cm balls of dough and roll them out into long thin sausage shapes – think fine green beans – on a clean surface (the beauty is that they’re all different, so get little helpers involved, if you can). Cook the pici straight away, or leave them to dry out for a few hours, or even overnight (read on for more details).


Measuring flour and spinach to get ready for the food processor.

Blitz the mixture until a ball of dough forms, adding water if needed. 


It's pasta-making time! My kids loved working with the green dough-- pulling apart pieces, rolling, shaping, adding water when needed to create many, many perfect imperfect pici.


Take a small 2 cm ball of dough and roll into a very thin sausage. You can also roll it long and thin, and pinch off the tube in about 2-1/2 to 3-inch pieces.


Another technique I discovered was to take very small pieces of dough and rub it back and forth rapidly in the palms of your hands. This creates individual pici that tends to taper at the end that looks just like green beans. Cute!


Spinach Pici With Pancetta, Tomatoes and Artichokes

4 cups prepared spinach pici (as above)
125 g pancetta (Italian-style bacon), diced 
2 cloves garlic, chopped
1 cup grape tomatoes, halved
1 cup spinach, chopped
1 cup marinated artichoke hearts (quartered), drained
Garnishes:
Grated parmesan cheese, or freshly grated Parmigiana Reggiano
chopped basil leaves
jalapeno pepper, seeded and chopped
lemon for splashing

Pancetta releases a lot of fat during cooking. Olive oil is not required.

Add the pici to a pot of boiling salted water. If it’s freshly rolled, cook about five minutes, but if you’ve let it dry give it 8 to 10 minutes, checking to make sure you get al dente pasta. Drain, reserving 1/2 cup of cooking water.


YUM-- what lovely bright Italian ingredients!


Sauté pancetta in a skillet over medium-high heat until crispy. Use a slotted spoon and remove pancetta into a bowl. Drain fat, keeping three Tbsp. in skillet. Add garlic and tomatoes; cook for about one minute. Add artichokes and spinach, toss then stir in spinach pici and reserved pasta cooking water. You can add some Parmesan cheese to create an emulsified sauce with the oil and water, otherwise leave the cheese for garnishing at the table. Cook another minute until heated through. 


How beautiful, vibrant and full of mouth-watering Italian flavours! 


Served with toasted baguette slices!

My kids were excited to tell their dad how they accomplished making pasta for the first time. They were all over the pasta's chewy taste and thought the overall flavours was just delicious! I can see this easily becoming a family favourite! I find when my kids are involved the cooking process they were more likely to eat and enjoy it. And this can be a superb way to motivate fussy eaters to try new tastes and gain confidence with a variety of foods. I highly recommend giving this recipe a whirl with your family!


So what are you waiting for? I hope you give this fun recipe a try-- make is as simple or elaborate as you wish using your favourite ingredients. Snap your food photo and enter it in our contest cookbook giveaway

Buon Appetito and Good luck!


Thursday, November 10, 2016

Top-Secret KFC Original Recipe Revealed?...


Last week, I put up a post alluding that I may have the top-secret original recipe for KFC and to stay tune for the results. I had said that with all the news going-ons of leaked information surrounding the U.S. election, did I also have in my hands leaked classified info. published this late summer? Could've Colonel Sanders' nephew accidentally reveal the long-guarded KFC's original recipe (11 secret herbs and spices) to Chicago Tribune's newspaper reporter? A spokesperson from Yum! Brands, the corporate parent of KFC says it was not. But is it? The election is finally over, and I am also happy to share my results :D.

Coming from someone who used to work at a KFC store during late high school years, and a fan of their original chicken growing up, I was more than eager to give this recipe a try!

Looks like KFC!

11 Herbs and Spices revealed in this The New York Times article.


11 Herbs and Spices 
Makes about 3 cups of breading

2/3 Tbsp. salt
1/2 Tbsp. tbsp. dried thyme
1/2 Tbsp. dried basil
1/2 Tbsp. dried oregano
1 Tbsp. celery salt
1 Tbsp. black pepper
1 Tbsp. dried mustard
4 Tbsp. paprika
2 Tbsp. garlic salt
1 Tbsp. ground ginger
3 Tbsp. white pepper
2 cups of white flour (all-purpose is fine)

2 eggs, beaten with 1 Tbsp. water
3 lbs. skin-on chicken pieces (I used drumsticks)
canola oil for deep-frying

NOTE: Colonel Sander's nephew Ledington says in the article their secret ingredient is white pepper. Nobody knew how to use it in the 1950s.

Mix the herbs and spices with the flour (I used 1/4 of the total breading- about 1/2 cup). Save the remaining mixture in a sealed container and place in a cool spot (good for several months).

First off, looking at the recipe, I can tell immediately that it lacked salt. 2/3 Tbsp. salt for three cups of total breading is minute. We all know KFC chicken is salty, so I was skeptical of the recipe's authenticity. Next, taking in the smell, it did have a subtle aroma of the actual breading I remembered wafting in the breading station during my KFC days. It had promise but lacked severely in potency. Although the recipe doesn't say, I believe the chicken should be rubbed with salt and refrigerated for at least an hour, better overnight before breading. I recall back at KFC, the chicken was left to marinate in a clear brine overnight. What's in that brine?-- no idea but I'm sure it was loaded with salt.

Set up a breading station with two shallow bowls: one with the beaten eggs and one with the breading. While you bread in the order of above, to keep your hands from getting messy from touching wet and the dry ingredients, use one hand only for dredging chicken in the wet egg mixture and the other for dipping into the dry breading. 

I like to use disposable gloves to keep my fingers clean.

We all know deep-frying just tastes better. However, I wanted to try oven-baking for a healthier and mess-free version but of course deep-frying a few to compare the taste and texture difference in results.

Line baking tray with slightly greased foil; place chicken at least 1/2-inch apart and bake in oven at 400F, turning once for 45 minutes, or until juice runs clear when pierced with skewer.

Baking in my handy convection oven to save energy.

Heat up a pot of oil (a couple of inches just enough to cover chicken pieces) and deep-fry in batches. Use a chopstick or wooden skewer to check if oil is hot enough. It is when bubbles form all around the stick when inserted in the centre of oil. A deep-fryer thermometer will register between 350F to 375F when ready. Deep-fry the chicken pieces for about 10 to 15 minutes or until lightly browned. Do not overcrowd the pan or chicken won't cook evenly. 


Here is a look at the oven-baked chicken. Golden brown and crispy like KFC.


And the deep-fried batch -- golden brown and a crispy but more crunchy-looking skin! The smell was intoxicating (what deep-fried foods are not), more so than the oven-baked batch. It did hint at KFC but not dominantly.


Voila! A home-made KFC meal on the table along French fries and a few sides of my own-- vegetable crudites and ranch dip, steamed corn niblets and mushroom gravy.


Appetizing! I love the specks of herbs and spices, just as it appears on KFC chicken.


The moment of truth-- TASTE! Both oven-baked and deep-fried version tasted delicious, juicy and tender with the latter having a better crunch and crispier skin. So, is it the real finger-licking good KFC recipe? Perhaps not surprisingly, I am sorry to report, NO it is definitely not! I have little doubt that the 11 herbs and spices revealed are indeed the ones in the secret spice blend, but the amounts are off. The flavour lacks salt and spices. Putting on my recipe development hat, I would significantly up the salt, increase the paprika, black pepper, celery and garlic salts. Also the dried herbs (thyme, oregano and basil) would need to be adjusted up but not too much or it'll taste too earthy and be bitter. This would obviously require a lot of tinkering and testing, time I don't have. I admit though this is a great base recipe for homemade fried chicken.

My kids agree it was yummy but the chicken does not taste like real KFC!


A few days later, I did give it another shot by adjusting the amount of herbs and spices as mentioned above in the remaining breading on chicken wings for a change. I coated the wings with buttermilk first, then the breading and oven-baked them. Since chicken wings are small, the buttermilk-breading combination would work better deep-fried to seal in the coating and crisp in the hot oil. Oven-baking created a wet result not allowing the wings to crisp up. Using larger chicken pieces such as drumsticks would have fared better. Always lessons to be learned no matter how much you work and cook with food!


So did I get the breading closer to the original KFC recipe...? I think it tastes a bit more like KFC but it still lacks their signature essence. Perhaps, it also needs to factor in the brine they use. Regardless, it looks like KFC's top-secret recipe has not been spilled after all. I can't imagine as the article explains, Sander's nephew accidentally showing the reporter a family scrapbook belonging to Sander's second wife with the real recipe handwritten in the final pages. KFC takes any threat to its secret recipe seriously and has sued to keep it under wraps. I think after this kind of claimed leaked publication, there would be more measures from the brand and Sander's family to ensure it stays classified confidential forever!

Oven-baked "KFC" chicken wings