Monday, November 30, 2015

Fool-Proof Basic Miso Soup....


I love the simplicity of good miso soup. I've read that there are as many types of miso soup as there are households in Japan-- a recipe that offers a different taste developed over many years in each family. Based on my most-trusted cookbook Recipes of Japanese Cooking, I picked up while in Japan, I share with you helpful information to concoct your own basic bowl of soup to build on. Miso (soybean paste) is said to have hundreds of varieties. Classified in three ways: by ingredients--  rice and soybean-based, barley and soybean-based, and just soybean-basedor by taste-- flavour of very sweet, sweet and salty, and by colour-- white (tends to be sweet), light-coloured (sweet and salty) or red (high in salt). Personally, I prefer red soybean-based miso that has a deep umami flavour for all-purpose Japanese cooking. It can overwhelm mild dishes, but I love it in miso soup and in heartier soups, braises, and glazes. With a few good tips, you're on your way to making miso soup that caters to your favourite flavours...


Photo Credit: Recipes of Japanese Cooking by Yuko Fujita

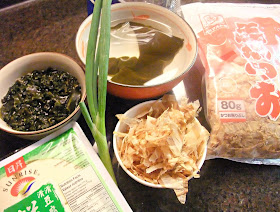
For miso soup, it's all about the dashi or basic stock. In simmered dishes, soups and many Japanese dishes, it gives it underlying umami depth regardless of what overall flavour was intended. You can use small dried fish such as sardines and anchovies, dried bonito flakes (katsuo-bushi), kombu kelp, dried shiitake mushrooms or a combination of two. Check out the Japanese aisle or dried vegetables aisle in Asian supermarkets. I've always made miso soup with a stock cooked up with packaged bonito flakes and kelp. 

Miso Soup with Tofu and Wakame Seaweed

1 or 2 piece of 4-inch kombu kelp
1 cup of dried bonito flakes (katsuo-bushi)
4 cups cold water
1/4 cup wakame (dried seaweed), hydrate in water to cover for 1/2 hour
250 g soft or silken tofu, cut into small 1/2-inch dice
3 to 4 Tbsp. miso (of your choice)
green onions, thinly sliced for garnish

For the Kombu and Bonito Dashi stock:

Wipe kombu kelp with a cloth to clean the cloudy residue on its surface. Fill a bowl with cold water, add the kelp and let hydrate for two hours to half a day. Transfer the kelp and its water to a pot. Over medium heat, remove the kelp once small bubbles form on the pot bottom (Do not boil the liquid while kelp is inside the pot or it will make the stock slimy and bitter). NOTE: if you are in a hurry, instant dashi stock sold in granules is a good substitute.


When the liquid begins to boil, add all the bonito flakes. Turn down the heat to simmer for a few minutes while removing foam on top thoroughly. Turn off the heat. Allow the bonito to sink to the pot bottom. Strain the liquid through a sieve of fine mesh or paper towel to obtain a clear soup in a bowl (Do not squeeze liquid from the remaining dried bonito flakes).

Now for the Miso Soup:

Add first the tofu then hydrated wakame to the soup. Turn up the heat to high; bring liquid to a boil then turn down to medium. Add the miso and gradually dissolve into the liquid. Turn the heat up to medium, sprinkle the soup with onions and turn off heat immediately taking care not to let it boil. Adjust seasoning by adding more miso a little at time.  NOTE: Miso has a delicate aroma that is destroyed by boiling. 

You can make the soup vegetarian, by making kombu stock or using cold water to start the soup base.


A nice hot bowl is satisfying sip and savour especially during chilly evenings!

Guidelines for Other Variations:

Fill a pot with the dashi stock or cold water, and place it over medium heat. Add ingredients. Put anything solid that will take time to cook thoroughly (giant white radish, turnip, potato and other edible roots) first. Things like clams, wakame and tofu can go in the last few minutes of cooking as they need less time to cook.

Turn up the heat to high. When the liquid comes to a boil, turn heat down to medium. Make sure the ingredients are thoroughly cooked, and turn down the heat to low. You can soften the miso in a ladle or strainer, and gradually dissolve into the liquid. Turn up the heat to medium again, sprinkle with onions and turn off heat immediately before it begins to boil again.

Look at the amazing variety! Miso soup is truly customizable to your favourite flavours!
Photo Credit: Recipes of Japanese Cooking by Yuko Fujita


Saturday, November 28, 2015

Breakfast Egg and Sausage Burrito...


I get food inspirations all the time... this past week McDs was offering a free small coffee (my favourite brew) and I had for the first time their egg and sausage breakfast burrito drizzled with a package of salsa.... zoinks, was I instantly hooked! Perhaps, it was also early hunger pangs, but the spin of Mexican flavours on breakfast champion eggs did me in, and I just had to make it for my family-- my kids love eggs and salsa, and it'll taste even better when momma' makes it! Scrambled eggs with sautéed crumbled mild Italian sausage (out of its casing), chopped bell pepper, jalapenos (optional) and shredded cheese all bundled in a warm soft tortilla wrap topped with salsa-- what a satiating hearty portable brekkie-- a break away from our typical pancake/French toast weekends! And I can see, this is just the beginning of a whole new way to savour the first meal of the day... Yeh! :)


  Just glorious! Add cilantro and avocados if you've got those handy too!

 With some fruit, this was a deeply satisfying way to wake up the taste buds and enjoy the start of our day...


Mmmmm... Enjoy my little one...


Thursday, November 26, 2015

Banana Oatmeal Mookie...


Okay, how much do I love the sound of this muffin cookie hybrid? I'm making mookies... Would you like a mookie?... Come and get your mookie!! This extra soft and low sugar tasty baked goodness is great for breakfast, a snack and a healthy treat. As a lunch coach with children's catering company Real Food For Real Kids, I have the awesome benefit of coming across all kinds of kid-approved favourites and inspiring recipes, and this one I was drawn to instantly-- mookie. Made with whole wheat flour, oats and ripe bananas.... parents can feel good about serving them anytime, and kids and adults alike love 'em!


For more kid-approved recipes see RFRK.


NOTE: To make it easy, beat the room temperature butter with mashed bananas and egg until slightly blended. Do not over mix. 

Grating a whole nutmeg for 1/4 tsp.-- wow, love the instant warm fragrance it imparts.

My handy helpers. This is a great recipe to get your kids baking with you.


Mmmm... hot-out-of-the-oven bananaliciousness!

Get your mookie face on!

For an another flavour try Yummy Lunch Club founder Carol Harrison's version that's filling, novel and tasty to tote in your children's school lunch: Sweet Potato Apple Lunchbox Mookie. Mmmm...

Photo Credit: Yummy Lunch Club


Tuesday, November 24, 2015

Meatless Monday-- Indian Chana Masala and More...


If there's one popular cuisine I've been wanting to but haven't explored cooking at home, that's definitely Indian! Perhaps, it's the combination of the rich complex flavours and spiciness I thought wouldn't appeal to my young children's palates, and the amount of different spices you need to have in your pantry and all the time it takes to prepare and cook. But that is not the case. My kids have indeed graduated in their taste experiences, you could forgo the heat, and with a few good Indian spices (some easy substitutes) or some organization skills, and you are good to go. Perhaps I had been procrastinating all along, and with meatless Monday on the horizon, an Indian vegetarian meal easily came top of mind. With these duo challenges, I went straight to the best-- one of the leading authorities in Indian cuisine, Madhur Jaffrey and adapted from all her recipes. Also looking through my cupboards and fridge, a meatless menu came together nicely-- Chana Masala, Vegetable Pullao, Potatoes with Cumin and a side of cool yogurt raita. The aromas wafting from the kitchen was incredible-- just ask my kids! :)


This is a pretty stainless steel spices container given to me by my lovely friend and reknown Indian cookbook author Smita Chandra years ago. 


Chickpeas or garbanzo beans are high in fibre and protein, and versatile in so many dishes. This particular dish is a favourite when I eat at Indian restaurants. Warm, comfort and tasty, it's easily eaten up by the spoonful served along basmati rice.

Chana Masala (recipe adapted by Madhur Jaffrey)
Makes 4-6 servings

2 Tbsp. vegetable oil
1 medium onion, peeled and chopped
4 garlic cloves, minced
1/2 Tbsp. ground coriander
2 tsp. ground cumin, divided
¼ tsp. ground cayenne pepper (optional)
1/2 tsp. ground turmeric
1 tomato, chopped (1/2 for recipe and 1/2 for garnish)
1 can (796 mL) chickpeas, drained
1 cup water
1/2 Tbsp. ground amchoor (see Note 1) or use 1/2 tsp. sumak (Persian spice)
1 tsp. sweet paprika
1/2 tsp. garam masala (see Note 2)
½ tsp. salt (or to taste)
1 Tbsp. or more lemon juice
1 fresh hot green chile, minced (optional)
1 tsp. very finely grated fresh ginger or 1/4 tsp. ground ginger

Note 1: Made from sour, unripe mangoes, amchoor comes in dried slices and powder. Amchoor gives foods a slightly sweet sourness. My recipe calls for only ground (i.e., powdered) amchoor, available in Indian grocery stores.

Note 2: Garam masala is an aromatic mixture of spices, such as cardamom, cloves, and cinnamon, which are supposed to “heat” the body. Look for this spice in the spice or bulk aisle or make your own.

For the garam masala:
1 Tbsp. cardamom seeds
1 tsp. black peppercorns
1 tsp. black cumin seeds (you can use regular cumin seeds if black aren't available)
1 tsp. whole cloves
1/3 of a whole nutmeg (you can break a whole nutmeg by placing it on a cloth and bashing it with a meat mallet or rolling pin)
1 medium stick of cinnamon, about 2 to 3-inches, broken up into 3-4 pieces

Put all the garam masala spices in a clean coffee grinder or other spice grinder and grind as finely as possible. Store in a tightly lidded jar, away from heat and sunlight. This makes about three tablespoons.
-----------------------------------
Heat the oil in a wide pot/skillet over medium-high. Stir-fry onions and garlic until the mixture is medium-brown. Turn the heat to medium-low and add the coriander, 1 tsp. cumin, cayenne, and turmeric; stir for a few seconds. Add 1/2 the tomatoes; stir-fry until well blended with the onion mixture and spices. Add the drained chickpeas and 1 cup water. Stir.


Add the remaining 1 tsp. cumin, amchoor/sumak, paprika, garam masala, ground ginger (if using) salt, and lemon juice. Stir again. Cover, turn the heat to low, and simmer for 10 minutes. Remove the cover and add the minced green chile and grated ginger (if using). Stir and cook, uncovered, for another 30 seconds.


Top with tomatoes and cilantro.

Perfect served as a refreshing dip for spicy meat and raw vegetables, as a spread on flatbreads or as an accompaniment to tone down the heat in Indian dishes.

Yogurt Raita with Cucumber and Mint

Simply mix 3/4 cup plain or Balkan-style yogurt in a bowl until smooth and creamy; add 1/2 tsp. salt and 1/4 tsp. cayenne pepper (optional); blend well. Fold in 4-inch piece of cucumber, peeled, grated and excess moisture squeezed out and 2 Tbsp. finely chopped fresh mint. Refrigerate until ready to use.


I love this golden fluffy rice speckled with vegetables in season-- it can be served along a casual meal or elegantly in a formal dinner.

Vegetable Pullao (recipe adapted by Madhur Jaffrey)
Makes 6-8 servings

2 cups basmati rice
thumb-sized piece of fresh ginger or 1/4 tsp. ground ginger
3 Tbsp. olive oil
½ tsp. brown mustard seeds or 1/2 tsp. coarse grainy mustard
1 hot green chilli, finely chopped (optional)
1 medium potato, peeled and cut into ¼-inch dice
1/2 carrot, peeled and cut into ¼-inch dice
1 handful green beans, cut into ¼-inch segments
½ tsp. ground turmeric
1 tsp. garam masala (store-bought or try making a home-made mixture-- Chana Masala recipe)
1¼ tsp. salt
3 cups water


Wash the rice in several changes of water then drain. Put the rice in a bowl, cover with water and leave to soak for 30 minutes, then drain again.


Heat oil in skillet/heavy-based pan over medium-high heat. Add mustard seeds or coarse grainy mustard. When it begins to pop, put in the chilli, potato, carrot, green beans, turmeric, garam masala and ginger. Sauté, stirring, for one minute. Reduce the heat to medium-low and add the drained rice and salt. Cook gently, stirring for two minutes. Add the water and bring to a boil. Cover the pan tightly with lid or foil, then turn down the heat to very low and cook for 25 minutes. Fluff with a fork and serve hot.


How much do I love toasted whole cumin seeds now I've worked with them? So distinctly flavourful, earthy and warming. Did you know it's seed is part of the parsley family? 

Potatoes with Cumin (Zeera Aloo) (recipe adapted from Madhur Jaffrey)
Makes 4-6 servings

1 lb. potatoes, unpeeled and scrubbed
3 Tbsp. olive oil
1/2 tsp. cumin seeds 
2 tsp. very finely grated fresh ginger root or 1/2 tsp. ground ginger
1 tsp. salt
1 tsp. ground cumin
1/2 tsp. cayenne pepper (optional)
freshly ground black pepper
2 Tbsp. chopped cilantro

Cook the potatoes in boiling salted water until tender, then drain and leave to cool. Peel and cut them into 3/4-inch dice. Heat oil in skillet set over medium-high. When hot, fry cumin seeds for 10 seconds until aromatic. Put in the potatoes, ginger, salt, cumin, cayenne and pepper. Stir-fry the potatoes for 10 minutes. Toss with cilantro and serve.

Love toasting 'em cumin seeds.

Tastes so-O goood with the cool raita!


Dinner is served! And no one missed the meat!


"Mmm.. smells so good and the food is good too! Thanks mom-- I like Indian food!"


Give new cuisines a try-- you just never know... you may cook up some flavours your family can't live without! Go slow, make one or two new dishes to coincide with familiar ones... and before you know it a whole new world of ingredients and flavours are there for you to enjoy at your whim! Happy discovery!


Sunday, November 22, 2015

Noodles with Pork and Preserved Vegetables-- and More....


A family that cooks together, stays together... This weekend was yet another cook and feast at my parents place with my dear siblings' families. I am always enthralled at how much we all love to cook and excited to share our favourites. The gathering relishes such a "yeet lau" (Cantonese saying for hot festivity) feeling, it's like a special occasion every time! Hearing out the eclectic menu from my brother and sister, I felt a noodle dish of some sort was missing. Shanghai-style noodles came to mind, but I wanted to try it with Italian bucatini pasta, as they are not oily like thick egg noodles used in this dish, and I also like the fact that it has a little hole in the centre that sucks in air like a straw-- just different, cute and novel. I love using Szechuan preserved vegetable (zha chai) to boost the flavour of noodles-- it's a firm, crisp, salted- and chili- fermented bulbous stem of a mustard tuber that packs a salty flavour punch. And then it all came together, scanning what I had in the fridge and what I needed to pick up at the store-- pork, preserved vegetables, cabbage, carrots and black mushroom fungus. I made double the recipe batch because I was feeding an army... :) At the end, we had a whole lot going on, on the dinner table-- Chinese, Japanese, Korean and even raw oysters!


Big-Batch Noodles with Pork and Preserved Vegetables
Makes 16 servings (Half the recipe for half the servings)

1 lb. pork loin chops, sliced
2 Tbsp. soy sauce
1/2 tsp. salt
4 Tbsp. oil, divided
1 tsp. cornstarch
2 Tbsp. water
2 packages (500 g) bucatini pasta, prepared according to package instructions
2 carrots, skinned and peeled with a peeler
1/3 cabbage, thinly sliced
1 cup preserved vegetable, thinly sliced (found in cans- whole or sliced in Asian supermarket)
2 cups sliced black mushroom fungus (optional)
4 cloves garlic, minced
4 green onions, sliced on a diagonal
Sauce: 
2 Tbsp. soy sauce
2 Tbsp. Pearl River Bridge Mushroom Flavored Superior Dark Soy Sauce
2 Tbsp. sesame oil
2 Tbsp. chili oil (optional) or serve this as a table condiment

*TIP: Cook recipe in two batches if making a big-batch like I did unless you have a really really big wok :)


Season pork with soy and salt. Add 1 Tbsp. oil, cornstarch and water; mix well and let marinate for 1/2 hour.


Heat 1 Tbsp. oil in skillet/wok on medium-high heat; add carrots and cabbage. Stir-fry for one minute, then add preserved vegetables and mushrooms. Cook for two minutes, until vegetables are soft. Set aside. Heat remaining 2 Tbsp. oil in the same wok, add pork and garlic; stir-fry until pork is no longer pink. Add noodles and sauce to pork; toss until noodles are coated with sauce. Return vegetables and mix well. Adjust seasoning as required.


Just lovely!

Family members gathered around the table for great conversations, great wine and some good ol' Ng family tradition dumpling wrapping, while mom manned the pan cooking them up over the stove.


My sis-in-law Yoko prepares cooked lotus in a salad, thinly sliced with persimmon.


My sister Trai prepares her famous pan-fried tofu with Korean soy garlic dressing.


And an unlikely candidate in the Asian menu-dominant night, but certainly a highlight-- raw malpeque oysters for DIY shucking. I couldn't resist at $14 for 33 count.


Succulent and fresh! And oh so-O good!

Voila! Dinner is served-- Noodles with Pork and Preserved Vegetables, Korean Pan-Fried Tofu with Soy Garlic Dressing, Edamame Pods with Salt, Pan-fried Dumplings, Japanese Sliced Lotus and Persimmon Vinaigrette Salad, Korean Seasoned Mung Sprouts, Japanese Chestnut Steamed Rice, Bulgogi-Glazed Turkey Wings and Malpeques!


Chestnut Steamed Rice

Sliced Lotus and Persimmon Vinaigrette Salad


Saturday, November 21, 2015

Beet Carpaccio...


This is truly one of my life's simple pleasures on a plate.... cooked chilled sliced beets, good EVOO, good aged balsamic vinegar, fresh chopped dill and coarse sea salt or fleur de sel. One word... divine!


Thoroughly wash beets with skin and trim ends. Fill a large pot with water. Add the beets and cover to simmer on medium for an hour. Beets are ready when beets can be pierced smoothly with a butter knife. Drain beets and rub off skins with hands under cool running water. Transfer to a non-porous plate and chill in fridge for one hour (I like my carpaccio to be nice and cold). Use a cutting board such as glass so not to stain, then slice into thin rounds (carpaccio are usually paper thin slices, however I like mine 1/4-inch thick for bite).


Drizzle beets with your best extra virgin olive oil, balsamic vinegar and top with chopped fresh dill and salt. A great sharing appetizer to prelude your meal. Bon appétit!