Monday, December 14, 2020

Dim Sum with Sticky Rice Pearl Meatballs and Egg Tarts...


Yum cha my friends with sticky rice pearl meatballs and Chinese egg tarts dan tat...

My last Fall term with Learn4Life.ca Toronto learners and we are going out in dim sum style with these steamed cuties and baked yummies!

Pearl meatballs are not typical at dim sum, but can appear on Chinese new year menus and banquets for special occasions. It originated in Hunan and brings the family together rolling these balls at the table. I'd say it was perfect to mark the end of my weekly Asian Cooking Program term teaching online for the first time and with a great bunch- a special memory forever πŸ’ž! Sticky rice means bonding ties, and many learners are returning for my winter term, which is amazingly already full!

But for now I am officially on Holidays unless something else crops up. Looking forward to some down time, but still lotsa cooking and development in the horizon. Now off to my neighbours toting these tarts πŸ€—!


Sticky Rice Pearl Meatballs
(adapted by WoksofLife.com)
Makes ~20 meatballs

3 cabbage leaves or thawed banana leaf, dried lotus/bamboo leaves, soaked overnight
¾ cup glutinous rice, soaked in water to cover according to package or for six hours
1 lb. medium ground pork (need 20% fat) 
⅓ cup canned water chestnuts, minced
2 tsp. minced ginger 
3 Tbsp. minced green onions (just the white parts)
3 Tbsp. cold water
2 Tbsp. Shaoxing wine
2 tsp. cornstarch
¼ tsp. ground white pepper
½ Tbsp. sesame oil
1 tsp. sea salt
½ tsp. sugar

In a large bowl, add the ground pork, water chestnuts, ginger, the green onions, water, Shaoxing wine, cornstarch, white pepper, sesame oil, sea salt, and sugar. Stir to combine everything well, whipping in just *one* direction for at least 5 minutes until the filling becomes fluffy and sticky. Cover and marinate in the refrigerator for 30 minutes. 

Meanwhile, prepare the steamer. Wash the cabbage leaves or cut the banana leaves/ trim the lotus or bamboo leaves, and use them to line the steamer.

After soaking the glutinous rice, drain well and do your best to shake off any excess water.

Remove the meat mixture from the fridge after the 30 minutes has elapsed. Take a heaping Tablespoon of meat filling, form a ball and roll it in the glutinous rice so that the whole surface is coated. Roll it between your palms lightly to ensure all the glutinous rice adheres to the meatball. Position the meatballs on the lined steamer with about ½ an inch of space in between each meatball.

To cook, start with cold water with the steamer covered. Steam over high heat for 20 minutes. After steaming, turn off the heat, and let the meatballs sit with the cover on for three additional minutes before removing the lid and serving.

Serving Suggestion: Lao Gan Ma spicy chilli crisp oil and soy sauce. 


Sticky Rice Pearl Meatballs
(adapted by WoksofLife.com)
Makes ~20 meatballs
3 cabbage leaves or thawed banana leaf, dried lotus/bamboo leaves, soaked overnight
¾ cup glutinous rice, soaked in water to cover according to package or for six hours
1 lb. medium ground pork (need 20% fat)
cup canned water chestnuts, minced
2 tsp. minced ginger
3 Tbsp. minced green onions (just the white parts)
3 Tbsp. cold water
2 Tbsp. Shaoxing wine
2 tsp. cornstarch
¼ tsp. ground white pepper


If you like chili oil, you HAVE to TRY Lao Gan Ma's Spicy Chilli Crisp made with fried chilis, onions, and prickly ash Szechuan peppercorns that gives a tingling sensation, and not too spicy- our fave condiment here these days!

Here are pearly meatballs by my student Ingrid πŸ₯°!


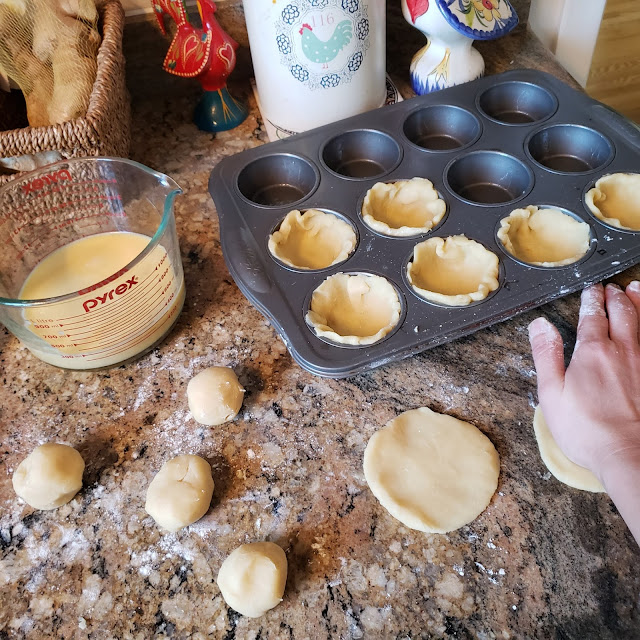
When you fail, you try and try again. Tested out a few dan tat recipes until satisfied at round #3. I wanted a practical dough recipe that was light, crispy, slightly chewy and buttery that comes together with a hand mixer or just some light kneading that works in a muffin tray. Egg custard smooth, silky and not too sweet! The harmonious dan tat emerged πŸ’—.


Chinese Egg Tarts (Dan Tat)
Adapted by dimsumcentral.com
Makes 12 tarts

Pastry:
3/4 cup butter, room temp. or softened
1/3 cup powdered sugar
1 egg, room temperature
1/4 tsp. vanilla extract
1-1/2 cups all-purpose flour
1/2 Tbsp. cornstarch

Filling:
1/3 to 1/2 cup sugar
1 cup hot water
3 eggs, room temperature
1/3 cup evaporated milk
1/4 tsp. vanilla extract

With a hand mixer, cream the butter and powdered sugar until fluffy and smooth. Beat in the egg and vanilla extract. Combine the flour and cornstarch, stir into the butter mixture with a wooden spoon, then knead slightly until a dough ball forms. Add a bit of flour until the dough just loses its stickiness. Wrap and refrigerate the dough for 30 minutes.

Mix hot water and sugar together in a bowl, until the sugar dissolves and cool to room temperature. Then whisk in the eggs, evaporated milk and vanilla extract. Strain through a fine sieve for a smooth filling. Set aside.

Lightly grease your 12 muffin tin tray. After refrigeration, roll the cooled dough out into a log and divide into 12 equal pieces. Roll each piece into a ball and press flat onto the counter to about 4” circles. Lightly press each dough round into a tart tin so that it doesn’t extend over.


Heat the oven to 400 F and place a rack in a low position. Pour the egg filling into the muffin tray until they are about 80% full. Place the egg tarts into the oven, then immediately reduce the temperature to 350 F.

Bake the egg tarts until the filling puffs up into a dome shape, about 15 to 20 minutes. When this happens, reduce the heat to 325 degrees and set the timer for an additional 10 minutes to finish. Remove from the oven, let cool slightly, remove from the tray and serve warm.


Sunday, November 29, 2020

The Wonderful World of Korean Mit-Banchan...


Korean banchan or panchan are considered dishes that are served with rice, but generally refer to main dishes with either meat or seafood. Smaller (side dishes) are called mit-banchan, where the vastly assorted creativity has no bounds. Go to any Korean restaurant and you'd be treated to delicious complimentary refillable house appetizers set in small shallow bowls to whet your appetite- greens, herbs, beans, fish, tofu, potato you name it, concocted in any flavours between spicy, pickle-ly, fermented, sweet or soy, or a combination. Sometimes just eating a bit of this and a bit of that with a bowl of hot steamed rice is all you need to be satisfied- forget ordering the main (my money-pinching university days echos) 😁!

A few banchan, rice, soup or kimchee water and a handful of contrasting mit-banchan (colours, textures and flavours) and you are on your way for a traditional Korean table home meal.


The set up for my on-line TDSB Learn4Life Asian Cooking Program last week, when I taught learners how to cook five vegetarian mit-banchan in 1-1/2 hours, a seemingly ambitious feat but reasonable with planning ahead, and getting my ducks in a row in organization.
 

Braised Sticky Soybeans (Kongjang or Kongjorim)
By Maangchi.com

1 cup dried soy beans (yellow or black), rinsed and drained
½ cup soy sauce
1 tsp. neutral cooking oil
2 garlic cloves, minced
⅓ cup of sugar
2 tsp. toasted sesame seeds

Soak the beans in a pot for 8 hours or overnight with 2 cups of water.

Cover and boil the beans over medium-high heat for 10 minutes, careful not to let boil over with a fork underneath the lid to open slightly.

Add soy sauce, sugar, oil and garlic. Stir a few times with a wooden spoon. Reduce the heat to low, cover, and cook for 30 minutes.

Open the lid and turn up the heat to medium high heat, stirring with a wooden spoon until the beans turn shiny and a little wrinkly.

Remove from the heat and sprinkle with the sesame seeds. Let cool and transfer to an airtight container. Refrigerate up to one month. Serve room temperature or cool.

You are looking for a shiny, sticky, concentrated yield.

Braised Sticky Soybeans (Kongjang or Kongjorim) 

Korean Candied Sweet Potato (Goguma Mattang)
Adapted by MyKoreanKitchen.com

1 lb. sweet potato, any variety
1 Tbsp. neutral oil
Garnish with toasted sesame seeds

Caramel Sauce:
3 Tbsp. raw sugar
1 Tbsp. cooking oil

Wash the sweet potatoes, peel the skin and cut it into small chunks. Roast sweet potatoes tossed in oil in a 400F oven for 25 minutes until tender and brown.

Scatter the sugar around and melt over a medium high heat until the sugar dissolves then add the oil, and quickly reduce the heat to low. Add the sweet potatoes into the pan and mix well with the sauce for one to two mins. The sugar will harden as it sticks to the potatoes.

Transfer onto a non-stick baking paper to cool down for 3 to 5 minutes. Serve with sprinkled sesame seeds. Serve warm or room temperature.

I used purple and Korean sweet potato varieties.

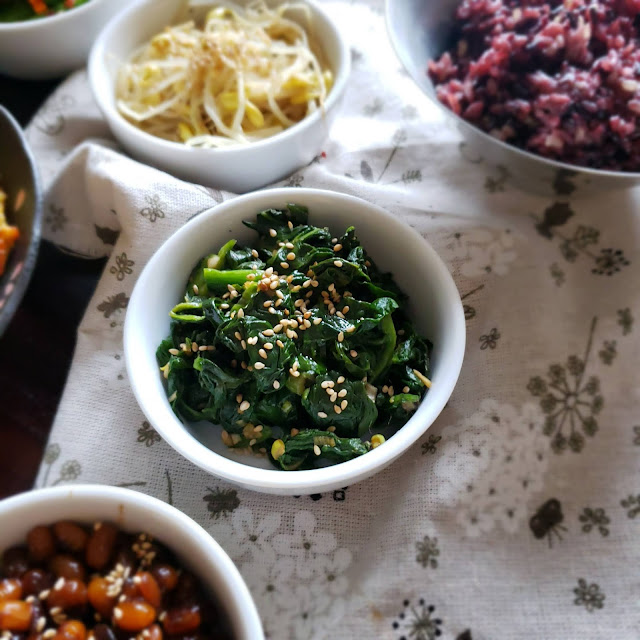
Seasoned Sesame Spinach (Sigumchi Namul) 

Serves 4 to 6

1-1/2 lbs. tender leafy spinach, well washed
2 Tbsp. soy sauce
1 garlic clove, minced
1 green onion, white and pale green part only, minced
1 Tbsp. sesame seed oil
1 Tbsp. toasted sesame seeds
salt and ground black pepper to taste
Garnish with pinch of Korean hot red pepper powder

In a large pot over high heat, bring about 3 litres of water to a boil. Add 1 Tbsp. vinegar with a
pinch of salt. Blanch spinach no more than 10 seconds and quickly plunge into ice cold water to stop the cooking; drain in a colander.

Take the cooled spinach and twist to wring out as much water as possible. Cut spinach into bite-size pieces.

In a medium-size bowl, add the spinach, soy sauce, garlic, green onion, and sesame oil;
mix well. Garnish with red pepper powder and serve at room temperature.

Seasoned Sesame Spinach (Sigumchi Namul) 

Seasoned Soybean Sprouts (K’ong Namul)
Serves 4 to 6

1 lb. soybean sprouts, tails trimmed, washed and drained
1 Tbsp. soy sauce
1 garlic clove, minced
2 Tbsp. sesame seed oil
salt and ground black pepper to taste
2 green onions, white and pale green part only, minced
1 tsp. toasted sesame seeds
Garnish with pinch of Korean hot red pepper powder

In a pot over high heat, bring 1 cup of water to a boil. Add sprouts, cover and boil for two minutes without lifting lid; drain in a colander.

In a medium-size bowl, combine well the remaining ingredients, except the hot pepper powder, and reserving some green onions and sesame seeds for garnish. Add the sprouts, and toss well. Transfer to a serving bowl; top with garnishes and serve at room temperature.

Seasoned Soybean Sprouts (K’ong Namul)

Cucumber Kimchi (Oi Kimchi) 
Adapted by MyKoreanKitchen.com

3 Lebanese cucumbers, about 1 lb., rinsed, or other pickling cucumbers
1 Tbsp. coarse sea salt
1 medium carrot, julienned
1 few garlic chives or chives, chopped in same length as the cucumber, optional

Kimchi Sauce:
2 Tbsp. Korean chili pepper powder
1 garlic clove, minced
1 Tbsp. grated red apple or Asian pear
1 Tbsp. honey or sugar
1/2 Tbsp. Korean salted shrimps, minced (or add more fish sauce to below)
1/2 tsp. fish sauce
1/2 tsp. minced ginger

Cut off both ends of each cucumber. Divide the cucumber into 3 pieces then quarter each piece length ways for ~1.5” pieces. Place the cucumbers into a large bowl then scatter the coarse sea salt around on top. Gently mix and set it aside for 20 minutes to pickle.

Gently brush off the salt from the cucumbers then transfer them into a clean bowl. Pour in the kimchi sauce then mix them gently. Add the carrots and garlic chives then mix well. Transfer into a glass container and cover.

Keep at room temperature for 12 to 18 hours then move it to the fridge. Serve chilled.

NOTE: Substitute salted shrimps and fish sauce in recipe with 1 Tbsp. regular soy sauce.


Cucumber Kimchi (Oi Kimchi) 

For a protein option, fish cakes are popular and delicious as a mit-banchan table offering.

Korean Fish Cake Stir-Fry (Odeng Bokkeum)
Adapted By MyKoreanKitchen.com

3 fish cake sheets, rinsed briefly under hot running water and thinly sliced
1/2 onion, thinly sliced
1/2 green bell pepper, thinly sliced
1/2 red bell pepper or 2 red chili peppers, thinly sliced
1 Tbsp. cooking oil 

OPTION 1: KOREAN FISH CAKE SAUCE (MIX THESE TOGETHER IN A BOWL)
1 Tbsp. soy sauce
2 tsp. honey
1 tsp. rice wine
1/2 tsp. minced garlic
1 tsp. sesame oil

OPTION 2: KOREAN SPICY FISH CAKE SAUCE (MIX THESE TOGETHER IN A BOWL)
2 tsp. gochujang (Korean chili paste)
1 tsp. soy sauce
2 tsp. honey
1 tsp. rice wine
1/2 tsp. minced garlic
1 tsp. sesame oil

Heat up a skillet/wok and once heated, add some cooking oil. Add all the vegetables and stir them until they are lightly wilted (about one min). Add the fish cake and stir it for about two mins. Add your choice of seasoning sauce and stir it quickly (about 30 seconds) and evenly. Remove it from the heat. Serve warm, room temperature or cool.

Korean Fish Cake Stir-Fry (Odeng Bokkeum) in sauce option 1.

The Korean bit-banchan spread. Gorgeous contrasting colours, flavours and textures.
Including my mom's very own kimchi.


To go with a Korean meal or any Asian meal, such as this delicious Vietnamese spread for fresh salad rolls with shrimp and pork.


Sunday, November 22, 2020

Japanese Rice Sandwich Onigirazu...


Hearty onigirazu sandwiches cause I got inspired on a youtube vid last night and I have the ingredients on hand πŸ™! And did I say how much I ❤ onigiliiii, especially squeezing these plushies? #inspiration


Instead of stuffed Japanese rice balls (onigiri) then wrapped with nori, make it easier and textural with a layered onigirazu sandwich. These ones are sushi rice bottoms and tops with flaked tuna & mayo, shredded cucumbers and lettuce in between, placed onto a nori sheet and corners fold up to form a firm parcel. Saran wrap keeps the sandwiches in place. Can be refrigerated for up to one day. Cut in half when ready to serve.

Love me 'em Japanese kewpie mayo for creaminess. 

Cute comfort lunch on a snowy day in 🌨... Oishiiiii πŸ‡―πŸ‡΅πŸ˜‹πŸ˜‹πŸ˜‹!

Tuna and mayo is a popular combo!


Portable perfect for the lunchbox and picnics in the future, I have my eyes set on another filling combo- runny fried egg and SPAM πŸ˜πŸ³πŸ™! The skies the limit... #funeats

Wet your sharp knife to make slicing a cinch.

Sooo Tasty πŸ˜‹✌!

You my colourful friend... will be next πŸ‘€❤!

SPAM and fried egg
Photo Credit: Youtube- Delicious Day


Thursday, October 22, 2020

My TDSB Learn4Life Asian Cooking Program Goes Online...


Whatever it takes, even if it means an LCBO Baileys' box ✌... This was me four weeks ago setting up my lap top station for a brand new world to me of online Zoom classes! And these were my exact sentiments about chartering this new virtual territory mid-summer: "With school around the corner, it's still uncertain how my Fall programs will look like. In-class, on-line demo and video-conferencing, both? I have never been keen on-video thus why I am a blogger and not a vlogger, however times a changing and we must adapt to survive and thrive. Who knows I may just love it??? Whichever the case may be, I look forward to teaching again and inspire the young and old alike to get in the kitchen to cook."

Well, in just over a month, I have been producing pre-taped food demo videos for St.Philip's Lutheran church in partnership to deliver recipe inspirations to 73 families in the west-end. For more, see my previous post. That means filming solo or with the help of my family, short clips of step-by-step recipes with or without me in them. Then collating the clips and photos, voicing over where needed, editing for flow and audio and e-packaging for client delivery. We then host a live session with the families to view the video together and have an engaging Q&A. Over to my TDSB con-ed seniors Asian cooking program, moving things online we now include adult learners, and I have a nice 11 people registered (with seven returning learners). I am proud to say I have conducted four lessons under my belt, and I can't ask for a better group- interactive, curious, inquisitive! And to answer, whether I may love it... You bet I do πŸ’“!

Yes instructing cooking classes online, learners lose the entire five senses experience and it's hard to gage whether you will try a new ingredient or flavour by watching the dish get made without tasting it, but hopefully with thorough planning on my part- prepping ingredients ahead, proper camera placement and just upping my virtual-teaching in general, the recipes will be just as inspiring to replicate from home! I am always striving to do better than yesterday, and I have to say I definitely got into my groove on-line. 

Whereas I use to present the ingredients and talk through the recipes upfront while mentally visualizing the how-tos before everyone joined in hands-on to cook together, now I get to do a proper demo; walking step-by-step the recipes as I am preparing them, providing lots of information such as how to shop, substitutes and in-depth origins of condiments, ingredients and dishes. It really is wonderful teaching this way as it is thorough and it sticks. Food education and knowledge is really key for producing a dish that takes it from good... to fantastic! And my students tell me, they now have front row seats to see and hear all my tips and tricks. Gotta love it πŸ’—!!

The bonus πŸ’₯: enjoying the dishes afterwards with my family πŸ˜‹!


Showcasing my designated cooking classes' new cutting board and shiny Japanese knife by my awesome niece from Montreal.  A gift from her a while back but I can't think of a better way to inaugurate it in my new home's kitchen then with the online platform for cooking πŸ˜ƒ.


I don't have an island connected to my stove top, but these make-shift tables are perfect for giving me counter space and optimal perspective from my laptop on the kitchen table.


No fancy tripod or second camera just yet. Making do with the laptop view for my students atop a foldable stool on my stove for close up cooking. I always prep everything first at my station (two recipes for each lesson), then I move over to cook at the stove and lastly, plating at tableside, repositioning my laptop as I go. I also close my shutters so I don't get a glare when it's sunny out or even when it's gloomy. This week I actually cooked in the dark with minimal natural light, as it didn't appear well on screen. I toggle my kitchen lights and overhead stove light to make sure the food is clearly visible at all times.


I lave been using Power Point presentation slides, and I love it! I include a page in my session when introducing my students to new ingredients. I highlight the points by sharing my screen to participants on Zoom.


This was- Mission Accomplished πŸ”₯... my first ever live online cooking class with Learn4Life.ca Toronto in my Asian Cooking Program for adults & seniors. #zoom

First session- Chinese Cuisine with Homestyle Take-Out Cashew Chicken and Winter Melon Soup was a hit. I love teaching new less familiar ingredients such as winter melon (check out its properties and benefits in slide above).

Homestyle Take-Out Cashew Chicken and Winter Melon Soup

The following week, it was Japanese cuisine and we will be learning about devil's tongue- konnyaku πŸ‘ΉπŸ‘…. 

Picking up various konnyaku formats at an Asian store.


Assembling the dishes tableside, this was the final presentation.

Konnyaku Sashimi and Simmered Beef, Potatoes and Vegetables

The third week, we celebrated National Seafood Month with Vietnamese Clay Pot Caramel Shrimp and Cantonese Salt and Pepper Squid πŸ¦πŸ™...

Encountering Zoom issues half hour before my online class started, thankfully our TDSB Con-Ed online trainer came to my rescue sharing his screen with me to host. Yes, some delay getting started and my prep was not ready but I slayed it πŸ’₯ with these two wonderful dishes.

Shrimps cook vigorously in a mixture of bittersweet caramel sauce, fish sauce, onions and ground black pepper to create a popular "kho" simmered dish that is rich, savoury and rustic and the shrimps chewy. The squid is diamond cut to create a pineapple surface and is wonderful dredged in potato starch, shallow-fried then tossed with stir-fried onions, garlic, pepper and hot chilies. Perfect served with rice 🍚πŸ₯’.

Vietnamese Clay Pot Caramel Shrimp and Cantonese Salt and Pepper Squid

Vietnamese cooks often prepare kho, simple dishes simmered in a bittersweet caramel-based sauce. The shrimp s cook vigorously, releasing juices that combine with the other seasonings to create a dark, tasty sauce. And you purposely overcook the shrimps to allow the flavours to penetrate thoroughly, resulting in a pleasant sweetness and chewiness.

Shrimp Simmered in Caramel Sauce (Tom Kho)
Serves 4

1-1/2 lbs. medium or large shrimps, peeled and deveined
1/2 tsp. salt for washing shrimps and 1/8 tsp. for seasoning
1-1/2 Tbsp. fish sauce
2 Tbsp. caramel sauce (* see below)
1 small onion, thinly sliced
1/2 tsp. ground black pepper
1-1/2 Tbsp. oil
1 green onion, green part only, chopped

Caramel Sauce (1 Cup): 3/4 cup hot water, divided and 1 cup granulated white sugar

In a small, stainless steel pot, cook 1/4 cup water and all the sugar, stirring just to combine, to a boil. Do Not stir when boiling. Now turn heat down to a simmer, and let cook for 10 minutes until it turns an amber colour. As the sauce begins to turn brown – at this point you need to watch it VERY closely! It will turn to a dark amber quickly; remove from heat into the kitchen sink, stand back and carefully pour in the remaining 1/2 cup hot water; stir well and let mixture thicken and cool to room temp. Store in container at room temp.

Place shrimps in a bowl with water to cover and 1/2 tsp. salt; mix rapidly with hand until frothy and water grey; rinse several times in cold water until clear; drain well.

In a clay pot/sauce pan, combine the shrimp, 1/8 tsp. salt, fish sauce, caramel sauce and bring to a hard simmer over high heat. Mix in the onion and black pepper. Cook, stirring occasionally for 10 to 15 mins. or until shrimps have turned an orange-brown.

Splash water to cook the shrimps longer; the juices eventually concentrate into a mahogany-coloured sauce, and at the end should only be a few tablespoons left.

Turn off heat, add the oil, and stir to coat the shrimps; check seasoning and add onions.

*****
Salt and Pepper Squid
Serves 4

1 lb. of squid, cartilage discarded, tentacles removed and reserved
4 cups water, with 1 Tbsp. salt added
3/4 cup potato starch
1 tsp. salt
A couple dashes of ground white pepper
Oil for shallow-frying

Vietnamese dipping sauce:

1/2 lemon, juice of
black pepper

Chinese-Style Stir-Fry:

1 Tbsp. oil
1/2 onion, chopped
2 garlic cloves, minced
1/2 green pepper, chopped
1 green onion, chopped
1 red chili, sliced (optional)

Take the squid tubes, and score into a diamond pattern. Cut into 1-1/2 inch strips.

Soak the squid in the salted water for 30 minutes. Drain the squid, and plunge into a skillet of boiling water with enough to cover for 20 seconds, then drain again and pat dry with paper towels. Toss with potato starch mixed with salt and pepper, shaking to remove any excess.

Dry the skillet and heat oil until hot. Working in batches, fry the squid for about 45 seconds or until golden crispy and cooked through, stirring gently with a slotted spoon to prevent them from sticking together. Drain on paper towels. Serve with a mixture of lemon and black pepper in a small bowl as a dip.

Or Chinese-Style:

Stir-fry ingredients, adding one at a time in a skillet with oil heated until tender-crisp. Add cooked squid and toss to coat quickly; ladle onto a serving dish and serve hot.

*****

This week we made Korean favourite bibimbap (bibim- to mix ingredients; bap- rice) and a side of mini enoki omelets.


Bibimbap (Korean Mixed Rice with Meat and Assorted Vegetables)
Serves two

100 g lean ground beef, or thinly sliced beef
1 Tbsp. soy sauce
1 Tbsp. sesame oil
1 tsp. brown sugar
1 clove garlic, minced
150 g mung bean sprouts, washed, drained, ends removed
1 medium zucchini, cut into 2-inch pieces and julienned
5 fresh / dehydrated shiitake mushrooms (hydrated six hours in water to cover), thinly sliced
1 small carrot, cut into 2-inch pieces and julienned
Oil for cooking
1/2 tsp. sea salt, divided
3 cups cooked steamed rice
2 eggs
Roasted seasoned seaweed, shredded or thinly sliced

Bibimbap sauce:

1 Tbsp. each gochujang (Korean red pepper paste), sesame oil, sugar and water
1 tsp. apple cider vinegar
1 clove garlic, minced
1 Tbsp. toasted sesame seeds

Mix the beef with the soy sauce, sesame oil, sugar and garlic; let marinate for 30 minutes.

In a skillet, lightly boil (blanch) bean sprouts, then rinse in cold water and drain. Wipe skillet, add oil and stir-fry zucchini, then shiitake mushrooms and carrot separately. Add a little salt each time.

Mix the bibimbap sauce ingredients in a bowl.

Heat oil in pan to medium high heat and stir-fry meat for three minutes until cooked through.

Fry the two eggs (sunny side up is most common).

Divide the rice into two bowls; add the meat, arrange the assorted vegetables and top each with an egg, shredded seaweed and some bibimbap sauce. Mix the ingredients well and enjoy!

So hearty and scrumptious!

Here are some shots my students took for me during class.


Happily presenting my final bibimbap bowl! 
This made it in my hungry husband's belly for lunch.


Stay tuned with more collaborations on the horizon-- all in the name of good food and community 🍲πŸ‘ͺ!


Sunday, October 4, 2020

The Neighbourhood Table At Home Fall...


SO ExCited to be part of this great initiative again with St.Philip's Lutheran Church in its third year addressing food insecurity, and championing food literacy and cooking skills! 

With the receipt of a large United Way grant, came the launch of #NHTatHome The Neighbourhood Table At Home Fall Program in Etobicoke. Making head waves across the city at large, their great volunteer efforts and community building achievements was picked up on CTV News πŸ€—❤!


The Neighbourhood Table was a summer program that started three years ago, where we hosted free family activities and cooking lessons with 6 to 12 year olds to learn food education and kitchen skills in preparations of serving a healthy and delicious multi-course, multicultural dinner to the registered families and guests. πŸ‘©‍πŸ³πŸ‘¨‍🍳πŸ₯—πŸ§. See here to read more of how this originated and see the action from our first ever session.

However with Covid, The Neighbourhood Table pivoted to the home this spring with #covid19 food boxes from Food Share @foodshareto, further funded by the Government of Canada and Community Food Centres Canada @aplaceforfood to help offer emergency food relief to the Etobicoke community, doubling the number of families to receive the support πŸ’₯! And with the recent United Way grant, the program was able to extend into Fall to continue to help families in need, coupled with an online cooking component led by myself and co-host Chef Sandy. Yay!

Demoing colourful salads with this fine bunch of kids in 2018.

The day of the Fall program inauguration was a beautiful day.


Weekly generous produce boxes from @foodshareto and bread 🍞 from @cobsbread πŸ’–, along with online cooking food skills workshops are offered for eight weeks to 73 families in Etobicoke. Our partnering communities are returning Arab Community Centre of Toronto (ACCT) and new collaboration Polycultural, an immigration and community centre serving East Europeans mainly Russians.

This wouldn't be possible without the incredible organizers and volunteers devoting their time every week to help put together the weekly themed loot bags, unload the FoodShare delivery truck and get in their own cars to deliver the goods on the various routes to all the homes πŸ‘πŸ‘πŸ‘.


This is Salma, the lovely lead at ACCT, unravelling the first fall food box to be delivered to a family. So many lovely fresh produce to make some tasty meals.


Food boxes are delivered alongside gift bags containing some ingredients or supplies that would fit the weekly cooking themes. Here is what we have in store.


We even had member of Parliament for Etobicoke Centre Mr.Yvan Baker join in the presentations and award the church for their huge achievements. Congratulations πŸ€—!!


Check out the full article with video on the church's site to hear more about the exciting initiative.


It's a daily challenge: which parent doesn't scramble to find inspiration, variety and extra time in the morning to keep their children interested in their daily lunch box, and not have them bring it home half-eaten? 

I proudly presented my first pretaped video (BTS Lunchbox) on Zoom offered to 73 families as part of the cooking skills portion of the Neighbourhood Table At Home Fall Program for eight weeks. Showcasing a number of lunchbox packing ideas I do for my three kids, in hopes to inspire theirs with themes such as "All Dips and Dippers", "Build Your Own Lunch Kit", "Bento Compartment- Style", "Cook Once, Eat Twice", "Creative Leftovers", and "Beat The Square Wonder Bread Sandwich Blues" etc., 🍱πŸ₯™πŸ₯—πŸ.


Get your children to cook with you. Lunch can evoke powerful feelings of childhood. As adults, we talk about tackling the dinner dilemma and the powers of wonderful dinners -- we discuss them, plan them, labour over them. But it is lunch that has this grasp on children-- those toting a lunchbox to school. It is when they are entrusted outside of their parents presence, free of their glares and lectures of not eating their vegetables or everything on their plate; this is the time they break bread with their schoolmates, and enjoy a piece of love from home as they plough through the long day. If you let them take some of that control (whether it be making it with you or choosing from a list of healthy options) we can assure you lunch will have a whole new meaning -- one they can feel good about to show off to their teacher and friends.


This is a collection of my favourite lunchbox ideas for visual inspiration.


Here is my co-host Chef Sandy. We divided the weekly themes, and are in charge of four each to concept build and content develop with produce information, recipes, food ideas and family activities.


We have had three sessions so far, and she has covered Ontario apples and most recently on fresh basil and different types of pestos.

On the bottom right you can see her fun bouquet of edible roses made with hollowed out
cherry tomatoes with cheese cube centre and basil leaves. How creative!

Here is a sneak peek into our next lesson with me: Thanksgiving with a focus on Fall harvest.


A look into my recommendations for family activities to enjoy Fall nature's bounty.


The timing of the program couldn't have been more fitting with a flashback four years ago to my great involvement with the global Food Revolution foundation led by Super Star Chef Jamie Oliver.


Two years ago, (October 6th, 2018), Jamie Oliver was in town talking with TO Food Revolution ambassadors about a healthier Canada. Our unified message was clear: the more we are equipped with food knowledge and can cook for ourselves, the healthier the outlook for our futures and the next generation. And less food waste with cooking and ideas know-how! An overall impactful kind of wonderful πŸ€—❤!


I am on a mission to help inspire others to eat well, for a better and healthier tomorrow. Although, Food Revolution no longer runs, I continue to carry that torchπŸ—½- championing real food, food education, and inspiring people of all ages to cook in my every day work and passion for teaching culinary in schools and the community, and now moving things on-line. I am Forever Grateful to you and for our global like-minded family @jamieoliver!πŸ’•πŸ™ See my post Jamie Talking Food Change In Canada for more.


Up next, my TDSB Learn For Life Asian Cooking Program moves to live on-line with Zoom. I will cover the changes to consider in my class planning process as I navigate this brand new world to me, with virtual teaching. Stay Tuned!