Saturday, September 26, 2015

Happy Harvest Moon Festival with Pan-Fried Taro Cakes...


Tomorrow marks Chinese Mid-Autumn Harvest Moon Festival also known as Moon Cake Day. The moon is supposed to be the brightest and fullest of the year and the Chinese people believe the full moon is a symbol of peace, prosperity, and family reunion. In these past weeks, you may have seen the vast array of moon cakes displayed front and centre at Asian supermarkets. Moon cakes are eaten and exchanged as gifts because they symbolise the roundness of the moon. Families reunite to attend big lantern parades and exhibitions; they join to light their lanterns and enjoy the sight of the full moon together. Other top traditional foods that are popularly eaten but less widely known to celebrate this festival under the bright moonlight are crab, river snails, duck, pumpkin, taro, lotus root, watermelon, pears and osmanthus. Each one symbolises auspicious elements of good luck, health or fertility.

What a great occasion to learn how to make pan-fried taro cakes-- my mom's specialty and to cook it together in preparation for our Sunday reunion dinner. You may have seen it or tried it at dim sum although their cousin dish with turnips are more popularly offered. There are quite a few steps and techniques to master for a great tasting result. The key is to have everything ready so that there is no time lag in the process from prepping to steaming the cake.


Mom's Pan-Fried Taro Cakes

2/3 cup dried shrimps, small or large soaked in 1/2 cup water for 1 hour, reserve water
3 Chinese sausages, halved lengthwise and chopped
1-1/2 lb. taro
1 Tbsp. oil
1 package (400 g) rice flour
2 Tbsp. wheat flour
1 can (473 mL) chicken broth
4 cups water
1/2 tsp. salt
1/2 tsp. ground white pepper
3/4 tsp. five-spice powder


When choosing taro, look for a firm and heavy tuber, similar to how you would choose a potato. Make sure the skin is dry-- moisture or wetness indicates deterioration. 


Chop the soaked shrimps into small pieces; place on a plate with chopped sausages. Cut the taro in half. Placing the taro flat side down, peel the taro with a knife and cut into 1/2 inch-thick slices, then into cubes. Repeat until you have about 5 cups chopped taro. TIP: Cut taro right before cooking or it taro will oxidize and discolour.


Heat oil in a how wok/skillet and sauté the ingredients in two minute intervals- the dried shrimps, then add the Chinese sausage and lastly the taro. Add the white pepper and five-spice powder. Toss until well incorporated. Set aside.


If you've got a helper, one person could make the rice flour batter while the other cooks the ingredients. Pour chicken broth, reserved dried shrimp water and cups of water and salt in a pot and bring to a boil; lower heat to keep at a rapid simmer. Place the rice flour and wheat flour in a large bowl. Using a large slotted spoon, mix flours and pour a large ladle of hot soup into the mixture and stir. Pour another ladle and mix rapidly again. Do this one ladle at a time and mix until all the water is incorporated. NOTE: The batter will turn from lumpy to thick paste to thin smooth. You want to cook the flour while dissolving completely so it is important the broth is super hot, otherwise the batter will separate with the solids on bottom and liquid on surface. This gives you the glutinous binding consistency and texture.


Prepare your skillet/wok for steaming by bringing enough water to a boil with a steamer rack placed in the centre. Add the sautéed ingredients into the batter. Mix well and pour into a lightly greased cooking vessel or pan for steaming.


Place the taro cake on the rack, cover with lid and steam on high heat for one hour. Check every 20 minute intervals to ensure there is enough water for steaming. The resulting cake should be appear shiny and solid to indicate doneness. There may be a little water on top from the condensation, which you can remove with a spoon.


Let cool for at least 30 minutes before cutting into slices. Serve warm or you can pan-fry the slices in a little oil until golden brown crispy on both sides. This is often done with leftovers refrigerated overnight. We like to think the cake is flavourful enough without any condiments but soy sauce and hot sauce are likely accompaniments.


Deliciously savoury and homemade comfort! 


Happy Harvest Moon Festival to all! Enjoy the beautiful full moon viewing tomorrow!


Thursday, September 24, 2015

30 Minute Orzo Garden Vegetable Soup...


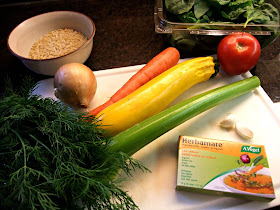
Fall to me is enjoying real life again, with cozy routines, days filled with purpose and a warm kitchen. Cooking up comfort food that lures the family to the table, no matter what else is going on, such as with a hearty soup full of colourful garden vegetables and orzo. This is a great way to use up leftover vegetables in your fridge and cupboards. Vegetable broth cubes are convenient to use at a pinch and Herbamare's provide a complimentary flavour as a light soup base to the fresh vegetables being added. I love that Herbamare also offers a low sodium option and that their product is organic, vegan and GMO-free. Serve it as a side to a dinner sandwich or add beans and shredded cheese and make it a true meal-in-one!


30 Minute Orzo Garden Vegetable Soup
Makes 6 servings

1 Tbsp. olive oil
1 small onion, chopped
2 garlic cloves, minced
1 carrot, chopped
1 celery, peeled and chopped
1 zucchini, sliced and quartered
1 cup orzo pasta
6 cups water
3 cubes A. Vogel Herbamare® Low Sodium Vegetable Broth
1 tomato, chopped
2 handfuls spinach, chopped
fresh dill, chopped


Heat the olive oil in a pot and sauté the onion, garlic, celery and carrots until tender, about 10 minutes. Add the zucchini and continue to sauté for five more minutes. Unwrap and add the broth cubes, stir to dissolve and while the soup is simmering cook the orzo pasta according to the package and drain. Add the tomatoes and let simmer for two more minutes. Stir in the spinach and orzo. Garnish with dill and serve hot.

For the soup lover, you can easily double this recipe and makes great leftovers.


Nothing better than soup comfort to welcome in the first days of Fall! 


"We want seconds and thirds mom!!" Music to a mom's ears...

Herbamare vegetable broth cubes are convenient to use and dissolve easily. It would provide a lovely depth of tasty vegetable flavours-- slightly sweet and mainly savoury as a base to build up soups, risottos and sauces. For other inspirations using these broth cubes follow #howdoyouherbamare.


*I am occasionally compensated for products and services that I review or post about. However, the information I share is completely my opinion, unless otherwise noted. I only promote products that I feel are truly a good fit for my audience.


Monday, September 21, 2015

Yummy Lunch Club Sobeys' Cooking Event!-- Plan It! Pack It! Eat It!...


Coming off a week worth of daily challenges to breakout of the lunch box conundrum (Thinking Outside of the Sandwich Box, Make Once, Eat Twice, Creative Leftovers and Compartmentalize) has taught me some valuable lessons and a week of good eats for the kids:

- I packed my son's two favourite foods-- Caesar salad and imitation crab meat in a Crab Caesar Salad Wrap and it came back untouched. I couldn't understand since I made similar wraps in the past that he enjoyed. After questioning how he liked each of the components ie; was it too much garlic? texture? the new wrap lavash? I found out it was simply because the wrap was flavoured-- the sundried tomato taste did not agree with him, so I know to use plan whole wheat next time. It pays to break it down and do some sleuthing because often it could be just a small change to turn it around or your kids will be missing out on a lot of goodness!

- Bring your kids grocery shopping. Engage your kids in the kitchen to help prepare the food with you. This will give them a sense of ownership and pride, and more likelihood to eat it and enjoy it. 

- Get them to be creative with you and ask how they would serve leftovers differently. A fun bonding exercise over dinner, and one that puts them in the driver seat to eat leftovers again in a lunch they created.

- Serve foods your children already like and give them healthy options to build around their lunch and snacks.

- Have fun packing a bentou box. We eat with our eyes first and what a feast it is for the senses when the lid comes off. A great canvas to build together and go crazy with the themes. skies the limit...

--------------------------------------------------------------------------------------

I think we all know kids are more likely to eat their school lunch if they helped to prepare it so let’s have fun teaching them how to do just that! Plan It! Pack It! Eat It!...

Toronto Food Revolution Day Ambassadors Carol Harrison, RD and Monika Strzalkowska are hosting a hands-on kids cooking class suitable for kids 7-12 years of age (along with an accompanying adult) on Saturday October 3rd at Sobeys in Mississauga. For more details and registration see here.


Photo Credit: Carol Harrison

Here is a new recipe updated on Yummy Lunch Club-- Veggie Cheese Muffin Frittatas. This is definitely a great and convenient recipe to stock in your freezer to make packing lunches easier. Busy homework nights are those nights you’d breathe a bit easier knowing you had a head start on lunches :). This recipe will be part of the hands-on cooking event. Come join us-- I will be there and I look forward to meeting/seeing you and your kid(s).

Veggie Cheese Muffin Frittatas

You may have read the story about my dreadful packed sandwich when I was in Middle School.  Well for fun, I shared my story and fielded out who could relate to my lunch bag woes growing up and I got some pretty good responses-- some lucky, some not so lucky... Enjoy!

Jay Greengrass: I made ours for the whole family from when I was 10, and it was either cheese sandwiches or processed sausage on white plastic bread. Yuck! I think that's the chief reason that as a parent I trawl the internet regularly to find good ideas for something quick and different for my kids' packed lunches (veg sticks, flatbreads, various homemade dips, soups in a flask, etc.)

Giuseppe Relleno from California, US: I had to take my lunch because all we had were vending machines. Since this was quite a few years ago, the standard lunch for me was a bologna sandwich on white bread (wheat bread did not exist), cheese sandwich on white bread, or a pimento cheese sandwich on white bread. I always had a thermos filled with milk or orange juice, and sometimes there was a homemade cookie thrown in as a surprise. I don't recall any fresh fruit of any kind.

Julie Ann Cockburn from Oregon, US: I often had cheese, crackers, and sliced summer sausage. I also remember those "Packable" brand lunches - sort of a highly processed, really bad tasting version of a bento box - again, a lot of cheese and crackers. I certainly had a lot of hot school lunches, too, although they didn't leave much of an impression.

What I remember most though was the horrific hamburgers they served when I was in elementary school. I still feel queasy when I think about them. They smelled terrible, were rubbery and thin and funky textured, and were served on white buns that stuck to the surface of the burger. Even as a kid, I thought they were horrible, and chose to just eat the French fries (which weren't very good, either) when that was the option of the day.

Shyamala Vishnumohan from Perth, Australia: Coming from a predominantly vegetarian background, I remember those days where Mum could not afford the highly priced veggies. So she packed a simple fried rice made using left over rice where she sautéed onion and tomatoes with cumin, ginger and turmeric. I find the simplest meals prepared with love is one of the healthiest and purest meals on earth!

Prachi Grover from Dubai, United Arab Emirates: Ok it is weird but I don't remember having a single lunch box that I didn't like. I should be calling up my mom this very minute and thanking her now that you've asked this!!!

Amy Baker Wambold, Arizona, US: I unfortunately am a product of hot school lunches. Lucky you Amy!

Mardi Michels, Toronto: I don't remember not enjoying my lunches that mum packed. Sure, they weren't the most innovative but they always included some kind of sandwich, fruit and a (mostly homemade) treat. I think it's easy to look back at what we were eating even 10 years ago and laugh or be horrified but think about how far our knowledge has come since we were all at school... I am sure if our parents knew what we did they might have made different choices.

And I think this one made me laugh the most-- I can't decide which of our tales is worse :): 
Karen Didier, Toronto:  I only had to start eating lunch at school when I hit Grade 8-- my Mom's favourite lunch for me was Wonder white bread spread with smoothly Kraft peanut butter and topped off with….wait for it…. a big hunk of iceberg lettuce.. she would put the second slice of bread on the sandwich and then smash it down with her hand to make sure it "stuck" together. Then it was then wrapped in waxed paper and put into that brown lunch bag! To this day no PB ever touches my lettuce and as for Wonder white, we split up!!!


Saturday, September 19, 2015

Packed Lunch Series: Challenge #4: Compartmentalize...


How do you choose from the vast array of lunch gear options out there? From basic single plastic storage containers to stacked Indian tiffin stainless steel canisters, there's a lunch box to suit the types of foods you pack, how you pack them, as well as when and where you eat them. In particular, Japanese bentou-type boxes in the market have been creating head waves for making lunch for kids (and adults) more interesting.  Multiple containers and compartments all packed in a big one spur creativity when filling them and this approach is so much fun! You open the lid and its a feast for the senses-- especially with kids, this plays so well on the notion that you eat with your eyes first, tempting them to try everything. Get them in the decision-making of what goes in it by giving them a list of options. This past Friday's lunch, I created an Asian theme with a bentou-inspired lunch kit I picked up on sale at Chapters-Indigo. Go beyond Asian, and do Mediterranean or Mexican cuisines for example, or mix-and-match. No matter what you pack, it's a fun open food concept that is sure to whet your kids' appetite(s) at a glance.


A cute bento lunch box kit sold at Chapters-Indigo.

Pan-fried dumplings are my kids favourite and have always been a hit in their packed lunches. I often have homemade dumplings frozen to use at my whim, but there are some great brands in the Asian market I buy occasionally too. Serve them boiled or pan-fried. Let cool slightly before packing.

My family loves this Korean brand Pyung Hwa with pork, beef, shrimp and vegetarian options.

Don't have a bentou kit?-- just serve the dumplings in a container, and items like a side and fruits in separate smaller containers.

Drizzle a little soy sauce on the dumplings or serve soy in a small container for dipping.

Boiling up some edamame for a nice nutritious side.

Fish-shaped red bean waffles-- if you haven't tried this popular Korean street food before, give it a whirl... crispy on the outside, chewy and soft with a slightly sweet red bean paste filling. I think this is perfect for a great sweet protein- and fibre-rich treat or an afternoon snack. Warm up before packing-- tastes pretty good cool too!


The makings up an eye-popping lunch box worthy of swooning from school lunch mates.


For true Japanese bentou fare, you can make your own filled rice balls wrapped with nori (onigiri). You can get a small variety of onigiri in Toronto mostly in Korean stores, usually filled with tuna mayo, grilled beef or kimchi and they are a welcomed snack any time of day. It is very simple to make at home and the best part is that you can fill it with whatever your heart desires. You can also buy nori sheet wraps covered in plastic that are designed to keep the nori from touching the rice until you are ready to eat which makes it super convenient to pack as part of lunch.

Check out my onigiri post for step-by-step how to's.

You can also make onigiri by incorporating a variety of colourful and healthy ingredients with the rice and shaping it that way. Place them in coloured muffin holders for portability and a cute presentation. This was a recipe I developed for a kid's article in Asian Gourmet Magazine years ago.

My recipe contribution to Healthy Kids Lunch in Asian Gourmet Magazine Winter 2007.

When my brother lived in Japan, his wife would always pack my 7-year-old nephew Jerome fun bentous for school filled with rice, meat and vegetables often arranged into cute cartoon caricatures or animals he loves. My brother tells me Yoko would wake up early every morning and prepare Jerome's bentou from her sketches the night before, and they always turn out amazing- we know we eat with our eyes first and what a surprise it is to open the lid everyday and see something so appetizingly unique and fun! Some tips they offered: saran wrapping the rice to mould the faces of characters and then scissors for snipping seaweed eyebrows and facial features. Below are just a few of many many creations over the years. They live here now and her creations continue in Toronto... I should take note :)

See my post: Bentou Boxes Inspiring Art and Lunch Fun

For more on lovely and cute bentou concepts, check out: Nami's Japanese recipe site with great bentou ideas. 

Another inspirational lunch resource is Beating the Lunch Box Blues by J.M. Hirsch, packed with great visuals of complete lunches coupled with suggestions and tips, the author made for his then-fussy-eater son. He's a working dad who couldn't dedicate that much energy to his 9-year-old's lunch but refused to cede control to the convenient processed lunch "kits" in the market. It's designed with colourful flashy images of a vast assortment of fresh healthy lunch boxes, perfect for flipping through and pointing with your kids for ideas!


Stay tuned for my next post with some recipe updates from Yummy Lunch Club and a Food Revolution Toronto Hands-on cooking class-- Plan it! Pack it! Eat it! to teach kids how to plan and pack awesome lunches!


Thursday, September 17, 2015

Packed Lunch Series: Challenge #3: Creative Leftovers...


Ah-- the creative leftovers... similar to the idea of make one, eat twice where you make too much dinner and you get to eat it again for lunch the next day. Only here you get to doctor it up for a new taste. Whether you're prepping for dinner and/or lunch, encourage your kids to come into the kitchen and give you a hand-, even simple tasks like washing vegetables or tearing up lettuce. I love Yummy Lunch Club's founder Carol Harrison's clever thought on this topic-- let them do small tasks with less time on hand, and larger ones with more time such as the weekend. There have been too many times I've turned my sons down when they've asked for help because I wanted to get dinner on the table fast or I had no time in the morning when slapping together their lunch. I've learned that planning ahead and cushioning extra time in the kitchen gives me a better sense of control that would allow me to invite their help. The feeling of ownership this fosters pays handsomely when it comes to getting them to actually eat the food. Shopping and cooking with kids isn't short of mishaps and mess, and not always fun, but it's a learning curve for both of you and you'll be thankful later when they're well broken in and rolling up their sleeves getting right into it with you. 

My boys preparing vegetables for dinner and school lunch.

Turn a night of leftover steak pieces or roasted chicken and the side of grilled or sliced vegetables into fajitas for lunch-- TIP: Cook up larger steaks and save the chicken breast(s).


However, if you are in fact serving Mexican fajitas for dinner which we did last night with steak...


... You can Make Once, Eat Twice, by serving fajitas again for lunch... Heat up the leftovers, top it with the cold toppings and cheese, then place the enclosed fajita wraps onto a hot pan and grill both sides to melt the cheese inside, seal the seam and give it a toasted touch.


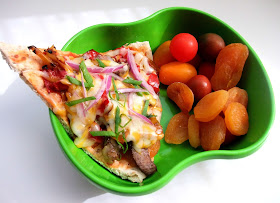
OR/ and this is where the creative leftover took place for us... make steak fajita pizzas. An idea spun by my kids over our fajita dinner. I asked them if they could eat fajitas again for lunch how would they eat it differently.... It was such a fun and creative exercise at the table :). You can buy a prepared pizza crust, and cut it into pizza-size wedges. Spread salsa on the base instead of tomato or pizza sauce, add your leftovers (steak, peppers and onions) and top with cheese. Bake for 7-8 minutes in a preheated oven at 425F until cheese is hot and bubbling. Add any additional cool toppings. Let pizza(s) cool slightly before storing into a lunch container or wrap up loosely in foil before packing.


 Yum-- my kids loved this homemade pizza lunch today and not even crumbs to tote back.


My slow cooker is going to be my go-to cookware favourite this fall-- try my Slow Cooker BBQ Pulled Beef for another idea on creative leftovers-- dinner of BBQ pulled beef and mashed potatoes or rice and a sandwich for lunch.


Check back tomorrow for my last challenge in the Packed Lunch Series-- Challenge #4: Compartmentalize-- Bento Fun!


Wednesday, September 16, 2015

Packed Lunch Series: Challenge #2: Make Once, Eat Twice...


Don't you love dinner leftovers when it's so delicious you and your family want to eat it again the next day for lunch? Leftovers make packing lunch easy and tasty-- it just makes sense to build them into your dinner plans. I think I've got a great recipe for you that could become your fall favourite. Who doesn't find comfort especially this time of year in Chili and Shepherd's Pie? If you put the two ideas together- you've got the ultimate comfort food bomb! Try turkey instead of beef for lean protein, this is also a perfect one pot meal that uses any leftover veggies you have on-hand. Prefer no beans, remove and add another 1/2 lb. of ground turkey to the recipe.


Turkey Chili Con Carne Shepherd's Pie
Makes 6-8 servings

2-1/2 lbs. sweet potatoes, or a combination of baking potatoes (4 or 5 potatoes), peeled and large diced
2 Tbsp. butter
1 cup milk
1/4 tsp. ground or freshly grated nutmeg or to taste
salt and pepper to taste
1-1/2 lbs. lean ground turkey
1 onion, chopped
2 garlic cloves, minced
1 Tbsp. each ground coriander, cumin, paprika and chili powder (adjust according to family's spice preference)
1 bell pepper, chopped
1 jalapeno, seeded and minced (cook into filling or serve on the side)
1 cup corn kernels
3/4 cup tomato paste
2 cups chicken broth or water seasoned with 1 tsp. chicken bouillon powder
1 can (426 g) kidney beans
salt and pepper to taste
2 cups shredded cheddar cheese (optional)

I had two leftover steamed sweet potatoes from the other night-- perfect to use up in this recipe.


Place potatoes on a steamer with water underneath in a pot and bring to a boil. Cook until tender about 15 minutes. Meanwhile, heat oil in skillet/pot on medium-high heat; sauté onions and garlic with spices until aromatic and onions are soft. Add turkey meat, break it up and cook until it's almost cooked through; add pepper(s)-- add jalapeno too if using and corn. Cook for two minutes, then stir in the tomato paste and let cook for one minute to thicken. Pour in the chicken broth and kidney beans; stir until everything is well incorporated. Bring the whole thing to the boil, give it a good stir. Turn down the heat until it is gently bubbling and leave it for 15 minutes. You should check on the pan occasionally to stir it and make sure the sauce isn’t drying out. If it is, add a couple of tablespoons of water and make sure that the heat really is low enough. Season with salt and pepper to taste.


Drain the cooked and soft potatoes; return to pot and mash with a potato masher until smooth and lump-free. Add butter and milk. Stir until well-blended. Season with salt, pepper and nutmeg to taste. I like mine soft but firm enough to hold up as the top layer on the pie.


Place the chili in a casserole dish, spread the mashed potatoes on top, and cover with shredded cheese (if desired). Or you can brush a thin layer of milk or egg on the surface to help brown the potato crust that will form more evenly and with a nice sheen.


Broil in a preheated oven (I use my toaster convection oven to save energy). Brown under the broiler until golden about 10 minutes in mine.


Serve Turkey Chili Con Carne Shepherd's Pie with a side of garden salad, chopped jalapenos and hot sauce! Look at all that scrumptious healthy numminess!


We approve mom! We'd eat this for lunch-- just don't forget to add some hot sauce!


Eat Once...

Eat Twice... How great is that for making your life just a little easier? Heat up a piece of the pie and pack in a wide-mouth thermos jar in your kid's lunchbox. This hearty lunch will keep your kids satisfied until break-time and something to look forward to mid-day to warm up little tummies.


Prefer to eat these great foods on its own that's also great to make and take, have a look at my recipes for Vegetarian Chili Con Carne and Shepherd's Pie.  

For more Make Once Eat Twice ideas check out the ideas in new lunch site Yummy Lunch Club. Lots of great ideas in there from Yummy Lunch Club's partnership with Canada Beef.

Next Up-- Challenge #3: Creative Leftovers. Make extras at dinner and get creative for a new taste for lunch.